Dodge Dakota (R1). Manual - part 469


  Index      Dodge     Dodge Dakota (R1) - service repair manual 2000 year


Search            


Content   ..  467  468  469  470   ..


Dodge Dakota (R1). Manual - part 469


PISTON RINGS

STANDARD PROCEDURE . . . . . . . . . . . . . . . . . 102

PISTON RING FITTING. . . . . . . . . . . . . . . . . . 102

VIBRATION DAMPER

REMOVAL . . . . . . . . . . . . . . . . . . . . . . . . . . . . . 104
INSTALLATION . . . . . . . . . . . . . . . . . . . . . . . . . . 104

FRONT MOUNT

REMOVAL . . . . . . . . . . . . . . . . . . . . . . . . . . . . . 104
INSTALLATION . . . . . . . . . . . . . . . . . . . . . . . . . . 106

REAR MOUNT

REMOVAL . . . . . . . . . . . . . . . . . . . . . . . . . . . . . 107
INSTALLATION . . . . . . . . . . . . . . . . . . . . . . . . . . 108

LUBRICATION

DESCRIPTION . . . . . . . . . . . . . . . . . . . . . . . . . . 109
OPERATION. . . . . . . . . . . . . . . . . . . . . . . . . . . . 109
DIAGNOSIS AND TESTING. . . . . . . . . . . . . . . . . 111

ENGINE OIL PRESSURE . . . . . . . . . . . . . . . . 111
ENGINE OIL LEAKS . . . . . . . . . . . . . . . . . . . . 111

OIL

STANDARD PROCEDURE . . . . . . . . . . . . . . . . . 111

ENGINE OIL . . . . . . . . . . . . . . . . . . . . . . . . . . 111

OIL FILTER

REMOVAL . . . . . . . . . . . . . . . . . . . . . . . . . . . . . 112
INSTALLATION . . . . . . . . . . . . . . . . . . . . . . . . . . 112

OIL PAN

REMOVAL . . . . . . . . . . . . . . . . . . . . . . . . . . . . . 112
CLEANING . . . . . . . . . . . . . . . . . . . . . . . . . . . . . 112
INSPECTION . . . . . . . . . . . . . . . . . . . . . . . . . . . 113
INSTALLATION . . . . . . . . . . . . . . . . . . . . . . . . . . 113

OIL PUMP

REMOVAL . . . . . . . . . . . . . . . . . . . . . . . . . . . . . 113

DISASSEMBLY . . . . . . . . . . . . . . . . . . . . . . . . . . 113
CLEANING . . . . . . . . . . . . . . . . . . . . . . . . . . . . . 114
INSPECTION . . . . . . . . . . . . . . . . . . . . . . . . . . . 114
ASSEMBLY. . . . . . . . . . . . . . . . . . . . . . . . . . . . . 115
INSTALLATION . . . . . . . . . . . . . . . . . . . . . . . . . . 116

INTAKE MANIFOLD

DESCRIPTION . . . . . . . . . . . . . . . . . . . . . . . . . . 116
OPERATION . . . . . . . . . . . . . . . . . . . . . . . . . . . . 116
DIAGNOSIS AND TESTING . . . . . . . . . . . . . . . . 116

INTAKE MANIFOLD LEAKAGE . . . . . . . . . . . . 116

REMOVAL . . . . . . . . . . . . . . . . . . . . . . . . . . . . . 116
CLEANING . . . . . . . . . . . . . . . . . . . . . . . . . . . . . 117
INSPECTION . . . . . . . . . . . . . . . . . . . . . . . . . . . 117
INSTALLATION . . . . . . . . . . . . . . . . . . . . . . . . . . 117

EXHAUST MANIFOLD

DESCRIPTION . . . . . . . . . . . . . . . . . . . . . . . . . . 119
OPERATION . . . . . . . . . . . . . . . . . . . . . . . . . . . . 119
REMOVAL . . . . . . . . . . . . . . . . . . . . . . . . . . . . . 119
CLEANING . . . . . . . . . . . . . . . . . . . . . . . . . . . . . 119
INSPECTION . . . . . . . . . . . . . . . . . . . . . . . . . . . 119
INSTALLATION . . . . . . . . . . . . . . . . . . . . . . . . . . 119

TIMING BELT / CHAIN COVER(S)

REMOVAL . . . . . . . . . . . . . . . . . . . . . . . . . . . . . 120
INSTALLATION . . . . . . . . . . . . . . . . . . . . . . . . . . 120

TIMING BELT/CHAIN TENSIONER AND PULLEY

DESCRIPTION . . . . . . . . . . . . . . . . . . . . . . . . . . 120
OPERATION. . . . . . . . . . . . . . . . . . . . . . . . . . . . 120

TIMING BELT/CHAIN AND SPROCKETS

REMOVAL . . . . . . . . . . . . . . . . . . . . . . . . . . . . . 121
INSPECTION . . . . . . . . . . . . . . . . . . . . . . . . . . . 121
INSTALLATION . . . . . . . . . . . . . . . . . . . . . . . . . . 122

ENGINE 3.9L

DESCRIPTION

The 3.9 Liter (238 CID) six-cylinder engine is a

V-Type, lightweight, single cam, overhead valve
engine with hydraulic roller tappets. This engine is
designed to use unleaded fuel.

The engine lubrication system consists of a rotor

type oil pump and a full-flow oil filter.

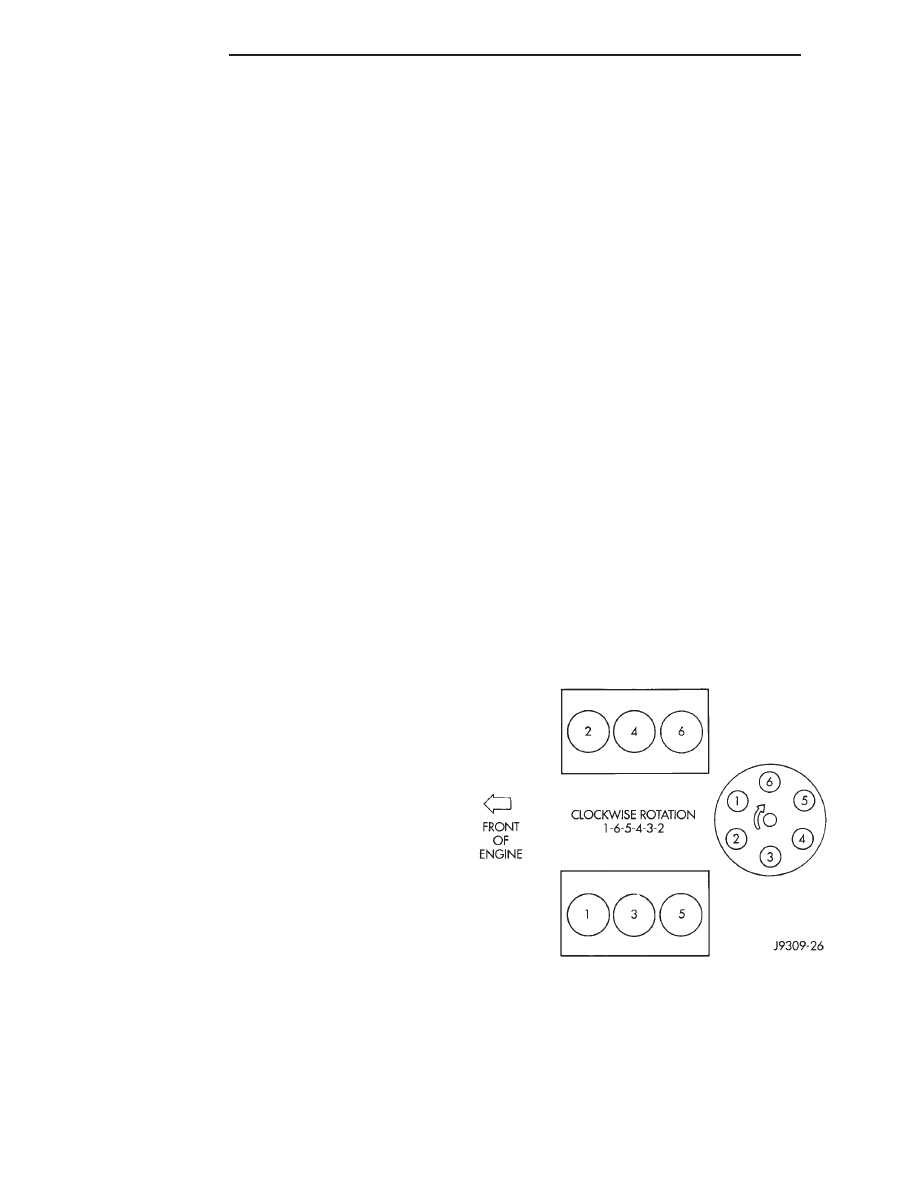
The cylinders are numbered from front to rear; 1,

3, 5 on the left bank and 2, 4, 6 on the right bank.
The firing order is 1-6-5-4-3-2 (Fig. 1).

The engine serial number is stamped into a

machined pad located on the left front corner of the
cylinder block. When component part replacement is
necessary, use the engine type and serial number for
reference (Fig. 2).

Fig. 1 Firing Order

9 - 64

ENGINE 3.9L

AN

DIAGNOSIS AND TESTING—ENGINE
DIAGNOSIS - INTRODUCTION

Engine diagnosis is helpful in determining the

causes of malfunctions not detected and remedied by
routine maintenance.

These malfunctions may be classified as either

mechanical (e.g., a strange noise), or performance
(e.g., engine idles rough and stalls).

(Refer to 9 - ENGINE - DIAGNOSIS AND TEST-

ING - Preformance) or (Refer to 9 - ENGINE - DIAG-
NOSIS AND TESTING - Mechanical). Refer to 14 -
FUEL SYSTEM for fuel system diagnosis.

Additional tests and diagnostic procedures may be

necessary for specific engine malfunctions that can-
not be isolated with the Service Diagnosis charts.
Information concerning additional tests and diagno-
sis is provided within the following:

• Cylinder Compression Pressure Test (Refer to 9 -

ENGINE - DIAGNOSIS AND TESTING)

• Cylinder Combustion Pressure Leakage Test

(Refer to 9 - ENGINE - DIAGNOSIS AND TESTING)

• Cylinder Head Gasket Failure Diagnosis (Refer

to 9 - ENGINE/CYLINDER HEAD - DIAGNOSIS
AND TESTING)

• Intake Manifold Leakage Diagnosis (Refer to 9 -

ENGINE/MANIFOLDS/INTAKE

MANIFOLD

-

DIAGNOSIS AND TESTING)

• Lash Adjuster (Tappet) Noise Diagnosis (Refer to

9 - ENGINE/ENGINE BLOCK/HYDRAULIC LIFT-
ERS (CAM IN BLOCK) - DIAGNOSIS AND TEST-
ING)

• Engine Oil Leak Inspection (Refer to 9 -

ENGINE/LUBRICATION - DIAGNOSIS AND TEST-
ING)

DIAGNOSIS AND TESTING—ENGINE DIAGNOSIS - PERFORMANCE

PERFORMANCE DIAGNOSIS CHART—GASOLINE ENGINES

CONDITION

POSSIBLE CAUSES

CORRECTION

ENGINE WILL NOT CRANK

1. Weak or dead battery

1. Charge/Replace Battery. (Refer to
8 - ELECTRICAL/BATTERY
SYSTEM/BATTERY - STANDARD
PROCEDURE). Check charging
system. (Refer to 8 - ELECTRICAL/
CHARGING - DIAGNOSIS AND
TESTING).

2. Corroded or loose battery
connections

2. Clean/tighten suspect battery/
starter connections

3. Faulty starter or related circuit(s)

3. Check starting system. (Refer to
8 - ELECTRICAL/STARTING -
DIAGNOSIS AND TESTING)

4. Seized accessory drive
component

4. Remove accessory drive belt and
attempt to start engine. If engine
starts, repair/replace seized
component.

5. Engine internal mechanical
failure or hydro-static lock

5. Refer to (Refer to 9 - ENGINE -
DIAGNOSIS AND TESTING)

Fig. 2 Engine Identification (Serial) Number

AN

ENGINE 3.9L

9 - 65

ENGINE 3.9L (Continued)

CONDITION

POSSIBLE CAUSES

CORRECTION

ENGINE CRANKS BUT WILL NOT
START

1. No spark

1. Check for spark. (Refer to 8 -
ELECTRICAL/IGNITION CONTROL
- DESCRIPTION)

2. No fuel

2. Perform fuel pressure test, and if
necessary, inspect fuel injector(s)
and driver circuits. (Refer to 14 -
FUEL SYSTEM/FUEL DELIVERY/
FUEL PUMP - DIAGNOSIS AND
TESTING).

3. Low or no engine compression

3. Perform cylinder compression
pressure test. (Refer to 9 - ENGINE
- DIAGNOSIS AND TESTING).

ENGINE LOSS OF POWER

1. Worn or burned distributor rotor

1. Install new distributor rotor

2. Worn distributor shaft

2. Remove and repair distributor
(Refer to 8 - ELECTRICAL/
IGNITION CONTROL/
DISTRIBUTOR - REMOVAL).

3. Worn or incorrect gapped spark
plugs

3. Clean plugs and set gap. (Refer
to 8 - ELECTRICAL/IGNITION
CONTROL/SPARK PLUG -
CLEANING).

4. Dirt or water in fuel system

4. Clean system and replace fuel
filter

5. Faulty fuel pump

5. Install new fuel pump

6. Incorrect valve timing

6. Correct valve timing

7. Blown cylinder head gasket

7. Install new cylinder head gasket

8. Low compression

8. Test cylinder compression (Refer
to 9 - ENGINE - DIAGNOSIS AND
TESTING).

9. Burned, warped, or pitted valves

9. Install/Reface valves as
necessary

10. Plugged or restricted exhaust
system

10. Install new parts as necessary

11. Faulty ignition cables

11. Replace any cracked or shorted
cables

12. Faulty ignition coil

12. Test and replace, as necessary
(Refer to 8 - ELECTRICAL/
IGNITION CONTROL/IGNITION
COIL - REMOVAL).

ENGINE STALLS OR ROUGH IDLE

1. Carbon build-up on throttle plate

1. Remove throttle body and
de-carbon. (Refer to 14 - FUEL
SYSTEM/FUEL INJECTION/
THROTTLE BODY - REMOVAL).

2. Engine idle speed too low

2. Check Idle Air Control circuit.
(Refer to 14 - FUEL SYSTEM/FUEL
INJECTION/IDLE AIR CONTROL
MOTOR - DESCRIPTION)

9 - 66

ENGINE 3.9L

AN

ENGINE 3.9L (Continued)

CONDITION

POSSIBLE CAUSES

CORRECTION

3. Worn or incorrectly gapped spark
plugs

3. Replace or clean and re-gap
spark plugs (Refer to 8 -
ELECTRICAL/IGNITION CONTROL/
SPARK PLUG - CLEANING)

4. Worn or burned distributor rotor

4. Install new distributor rotor

5. Spark plug cables defective or
crossed

5. Check for correct firing order or
replace spark plug cables. (Refer to
8 - ELECTRICAL/IGNITION
CONTROL/SPARK PLUG CABLE -
DIAGNOSIS AND TESTING)

6. Faulty coil

6. Test and replace, if necessary
(Refer to 8 - ELECTRICAL/
IGNITION CONTROL/IGNITION
COIL - REMOVAL)

7. Intake manifold vacuum leak

7. Inspect intake manifold gasket
and vacuum hoses (Refer to 9 -
ENGINE/MANIFOLDS/INTAKE
MANIFOLD - DIAGNOSIS AND
TESTING).

ENGINE MISSES ON
ACCELERATION

1. Worn or incorrectly gapped spark
plugs

1. Replace spark plugs or clean and
set gap. (Refer to 8 - ELECTRICAL/
IGNITION CONTROL/SPARK PLUG
- CLEANING)

2. Spark plug cables defective or
crossed

2. Replace or rewire secondary
ignition cables. (Refer to 8 -
ELECTRICAL/IGNITION CONTROL/
SPARK PLUG CABLE - REMOVAL)

3. Dirt in fuel system

3. Clean fuel system

4. Burned, warped or pitted valves

4. Install new valves

5. Faulty coil

5. Test and replace as necessary
(Refer to 8 - ELECTRICAL/
IGNITION CONTROL/IGNITION
COIL - REMOVAL)

AN

ENGINE 3.9L

9 - 67

ENGINE 3.9L (Continued)


Content   ..  467  468  469  470   ..