Dodge Dakota (R1). Manual - part 260


  Index      Dodge     Dodge Dakota (R1) - service repair manual 2000 year


Search            


Content   ..  258  259  260  261   ..


Dodge Dakota (R1). Manual - part 260


• If no problems are detected, install the DRB

(refer to the appropriate Powertrain Diagnostic Pro-
cedures manual for DRB scan tool operating instruc-
tions) and start the engine. Clip a 12V test light to
the battery positive terminal and probe circuit C27
(relay terminal 85). When the engine temperature
reaches 110° C (230° F), or A/C is requested, the test
light should light. If not, check circuit C27 for open.

• If no problems are detected at this point, replace

the cooling fan relay.

RADIATOR FAN RELAY

DESCRIPTION

The radiator cooling fan relay is a 5–pin, solenoid

type, mini-relay. It is located in the Power Distribu-
tion Center (PDC). Refer to label on PDC cover for
relay location.

OPERATION

The electric radiator cooling fan is controlled by

the Powertrain Control Module (PCM) through the
radiator cooling fan relay. The PCM will activate the
relay after receiving inputs from the engine coolant
temperature sensor and/or an air conditioning on/off
signal. Not Equipped With A/C: The relay is ener-
gized when coolant temperature is above approxi-
mately 103°C (217°F). It will then de-energize when
coolant temperature drops to approximately 98°C
(208°F). Equipped With A/C: In addition to using
coolant temperatures to control cooling fan operation,
the cooling fan will also be engaged when the air con-
ditioning system has been activated. Refer to 24 -

HEATING & AIR CONDITIONING for additional
information.

WATER PUMP - 2.5L

DESCRIPTION

CAUTION: All 2.5L 4-cylinder engines are equipped
with a reverse (counterclockwise) rotating water
pump. REVERSE is stamped or imprinted on the
cover of the viscous fan drive and inner side of the
fan. The letter R is stamped into the back of the
water pump impeller. Engines from previous model
years, depending upon application, may have been
equipped with a forward (clockwise) rotating water
pump. Installation of the wrong water pump or vis-
cous fan drive will cause engine over heating.

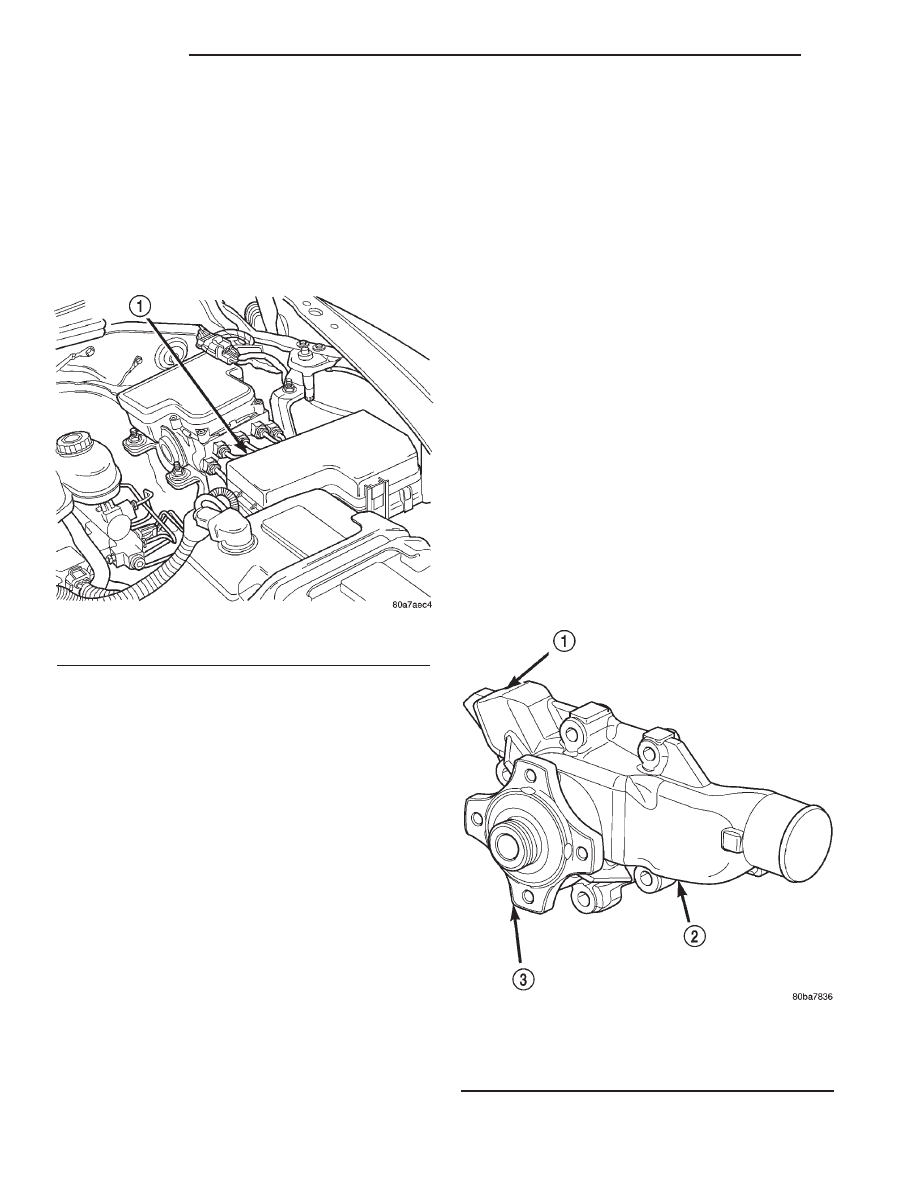
This aluminum water pump (Fig. 40) is the heart

of the cooling system. The water pump is located at
the front of the cylinder block, above the timing
chain cover

The water pump impeller is pressed onto the rear

of a shaft that rotates in bearings pressed into the
housing. The housing has two small holes to allow
seepage to escape. The water pump seals are lubri-
cated by the antifreeze in the coolant mixture. No
additional lubrication is necessary.

Fig. 39 Power Distribution Center (PDC)

1 - POWER DISTRIBUTION CENTER (PDC)

Fig. 40 Water Pump

1 - HEATER HOSE FITTING BORE
2 - WATER PUMP
3 - WATER PUMP HUB

7 - 52

ENGINE

AN

RADIATOR FAN MOTOR (Continued)

OPERATION

A

centrifugal

water

pump

circulates

coolant

through the water jackets, passages, intake manifold,
radiator core, cooling system hoses and heater core.
The pump is driven from the engine crankshaft by a
single serpentine drive belt on all engines.

REMOVAL

The water pump can be removed without discharg-

ing the air conditioning system (if equipped).

CAUTION: All engines have a reverse (counterclock-
wise) rotating water pump. The letter R is stamped
into the back of the water pump impeller (Fig. 41) to
identify.

Engines

from

previous

model

years,

depending upon application, may be equipped with
a forward (clockwise) rotating water pump. Installa-
tion of the wrong water pump will cause engine
over heating.

The water pump impeller is pressed on the rear of

the pump shaft and bearing assembly. The water
pump is serviced only as a complete assembly.

WARNING: DO NOT REMOVE THE BLOCK DRAIN
PLUG(S)

OR

LOOSEN

RADIATOR

DRAINCOCK

WITH THE SYSTEM HOT AND UNDER PRESSURE.
SERIOUS BURNS FROM COOLANT CAN OCCUR.

DO NOT WASTE reusable coolant. If the solution

is clean, drain coolant into a clean container for
reuse.

(1) Disconnect negative battery cable at battery.

(2) Drain the cooling system (Refer to 7 - COOL-

ING - STANDARD PROCEDURE).

(3) Loosen (but do not remove at this time) the

four fan hub-to-water pump pulley mounting nuts.

(4) Remove accessory drive belt (Refer to 7 -

COOLING/ACCESSORY

DRIVE/DRIVE

BELTS

-

REMOVAL).

(5) Remove power steering pump.

WARNING: CONSTANT TENSION HOSE CLAMPS
ARE USED ON MOST COOLING SYSTEM HOSES.
WHEN REMOVING OR INSTALLING, USE ONLY
TOOLS DESIGNED FOR SERVICING THIS TYPE OF
CLAMP, SUCH AS SPECIAL CLAMP TOOL (NUMBER
6094) (Fig. 42) SNAP-ON CLAMP TOOL (NUMBER
HPC-20) MAY BE USED FOR LARGER CLAMPS.
ALWAYS WEAR SAFETY GLASSES WHEN SERVIC-
ING CONSTANT TENSION CLAMPS.

CAUTION: A number or letter is stamped into the
tongue of constant tension clamps (Fig. 43) . If
replacement is necessary, use only an original
equipment clamp with matching number or letter.

(6) Remove lower radiator hose from water pump.

Remove heater hose from water pump fitting.

(7) Remove four nuts previously loosened and

remove the fan blade assembly and pulley.

(8) After removing fan blade/viscous fan drive

assembly, do not place thermal viscous fan drive in
horizontal position. If stored horizontally, silicone
fluid in viscous fan drive could drain into its bearing
assembly and contaminate lubricant.

(9) Remove the four pump mounting bolts (Fig. 44)

and remove pump from vehicle. Discard old gasket.
Note that one of the four bolts is longer than the
other bolts.

Fig. 41 Reverse Rotating Water Pump

1 - R STAMPED INTO IMPELLER

Fig. 42 Hose Clamp Tool – Typical

1 - HOSE CLAMP TOOL 6094
2 - HOSE CLAMP

AN

ENGINE

7 - 53

WATER PUMP - 2.5L (Continued)

(10) If pump is to be replaced, the heater hose fit-

ting must be removed. Note position of fitting before
removal.

INSTALLATION

(1) If pump is being replaced, install the heater

hose fitting to the pump. Use a sealant on the fitting
such as Mopar

t Thread Sealant With Teflon. Refer to

the directions on the package.

(2) Clean the gasket mating surfaces. If the origi-

nal pump is used, remove any deposits or other for-
eign material. Inspect the cylinder block and water
pump mating surfaces for erosion or damage from
cavitation.

(3) Install the gasket and water pump. The sili-

cone bead on the gasket should be facing the water
pump. Also, the gasket is installed dry. Tighten
mounting bolts to 23 N·m (200 in. lbs.) torque. Rotate
the shaft by hand to be sure it turns freely.

(4) Connect the radiator and heater hoses to the

water pump.

(5) Position water pump pulley to water pump

hub.

(6) Install fan and four nuts to water pump hub.

Tighten or nuts to 27 N·m (20 ft. lbs.) torque.

(7) Install power steering pump.

CAUTION: When installing the serpentine engine
accessory drive belt, the belt MUST be routed cor-
rectly. If not, the engine may overheat due to the

water pump rotating in the wrong direction (Refer to
7 - COOLING/ACCESSORY DRIVE/DRIVE BELTS -
INSTALLATION). You may also refer to the Belt
Routing Label in the vehicle engine compartment.

(8) Install accessory drive belt (Refer to 7 - COOL-

ING/ACCESSORY DRIVE/DRIVE BELTS - INSTAL-
LATION).

(9) Fill cooling system (Refer to 7 - COOLING -

STANDARD PROCEDURE).

(10) Connect battery cable to battery.
(11) Start and warm the engine. Check for leaks.

WATER PUMP - 3.9L/5.9L

DESCRIPTION

The water pump is located on the engine front

cover, and has an integral pulley attached (Fig. 45).

Fig. 43 Clamp Number/Letter Location

1 - TYPICAL CONSTANT TENSION HOSE CLAMP
2 - CLAMP NUMBER/LETTER LOCATION
3 - TYPICAL HOSE

Fig. 44 Water Pump Remove/Install

1 - HEATER HOSE FITTING
2 - UPPER VENT HOLE
3 - PUMP GASKET
4 - WATER PUMP
5 - LOWER VENT HOLE
6 - LONG BOLT
7 - BOLTS (3) SHORT

7 - 54

ENGINE

AN

WATER PUMP - 2.5L (Continued)

The water pump impeller is pressed onto the rear

of a shaft that rotates in a bearing pressed into the
water pump body. The body has a small hole for ven-
tilation. The water pump seals are lubricated by
antifreeze in the coolant mixture. Additional lubrica-
tion is not necessary.

OPERATION

A

centrifugal

water

pump

circulates

coolant

through the water jackets, passages, intake manifold,
radiator core, cooling system hoses and heater core,
this coolant absorbs the heat generated when the
engine is running. The pump is driven by the engine
crankshaft via a drive belt.

REMOVAL

The water pump can be removed and installed

without discharging the air conditioning system (if
equipped).

(1) Disconnect battery negative cable.
(2) Drain cooling system. (Refer to 7 - COOLING -

STANDARD PROCEDURE).

(3) Do not waste reusable coolant. If solution is

clean, drain coolant into a clean container for reuse.

WARNING: CONSTANT TENSION HOSE CLAMPS
ARE USED ON MOST COOLING SYSTEM HOSES.
WHEN REMOVING OR INSTALLING, USE ONLY
TOOLS DESIGNED FOR SERVICING THIS TYPE OF
CLAMP, SUCH AS SPECIAL CLAMP TOOL (NUMBER
6094). SNAP-ON CLAMP TOOL (NUMBER HPC-20)
MAY BE USED FOR LARGER CLAMPS. ALWAYS
WEAR SAFETY GLASSES WHEN SERVICING CON-
STANT TENSION CLAMPS.

CAUTION: A number or letter is stamped into the
tongue of constant tension clamps. If replacement
is necessary, use only an original equipment clamp
with matching number or letter.

(4) Remove upper radiator hose clamp and hose at

radiator.

(5) The thermal viscous fan drive is attached

(threaded) to the water pump hub shaft (Fig. 47).
Remove fan/viscous fan drive assembly from water
pump by turning mounting nut counterclockwise as
viewed from front. Threads on viscous fan drive are
RIGHT HAND. A Snap-On 36 MM Fan Wrench
(number SP346 from Snap-On Cummins Diesel Tool
Set number 2017DSP) and Special Tool 6958 Span-
ner Wrench with Adapter Pins 8346 can be used.
Place Special Tool 6958 Spanner Wrench onto the
water pump pulley with Adapter Pins 8346 inserted
into the holes on the pulley (Fig. 46)to prevent pulley
from rotating. Do not attempt to remove fan/viscous
fan drive assembly from vehicle at this time.

(6) If water pump is being replaced, do not unbolt

fan blade assembly (Fig. 47) from thermal viscous
fan drive.

(7) Remove fan shroud attaching hardware (two

bolts at bottom-two clips at top).

(8) Remove fan shroud and fan blade/viscous fan

drive assembly from vehicle as a complete unit.

Fig. 45 Water Pump

1 - WATER PUMP BYPASS HOSE
2 - FAN BLADE ASSEMBLY
3 - VISCOUS FAN DRIVE
4 - WATER PUMP AND PULLEY

Fig. 46 Viscous Fan Drive Removal / Installation

1 - SPECIAL TOOL 6958 SPANNER WRENCH WITH ADAPTER
PINS 8346
2 - FAN

AN

ENGINE

7 - 55

WATER PUMP - 3.9L/5.9L (Continued)


Content   ..  258  259  260  261   ..