Daewoo Matiz (2003 year). Manual - part 239


  Index      Daewoo     Daewoo Matiz - service repair manual 2003 year


Search            


Content   ..  237  238  239  240   ..


Daewoo Matiz (2003 year). Manual - part 239


9D – 6  WIPERS/WASHER SYSTEMS

REPAIR INSTRUCTIONS

ON–VEHICLE SERVICE

D109D519

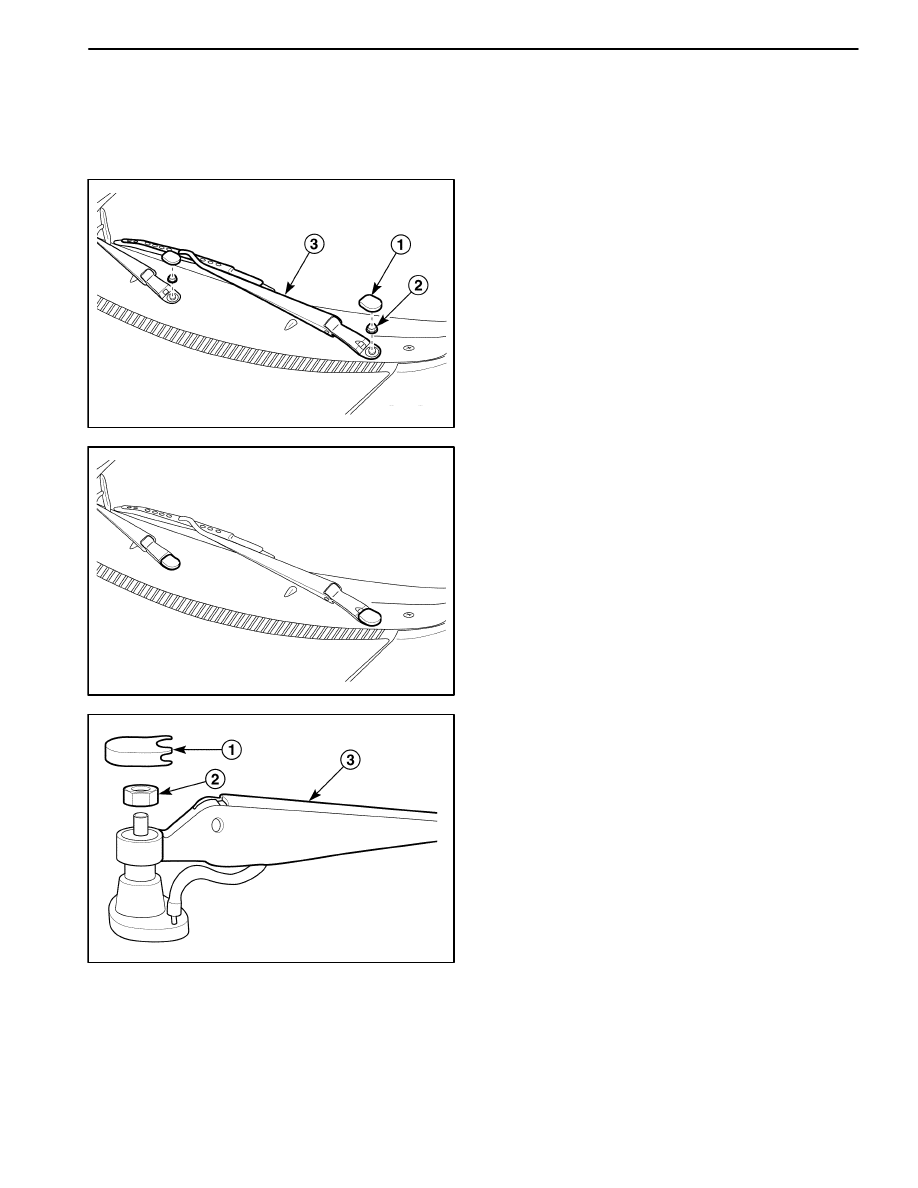
WINDSHIELD WIPER ARM

(Left–Hand Drive Shown, Right–Hand
Drive Similar)

Removal Procedure

1. Remove the wiper arm.

D

Remove the cap (1).

D

Remove the nut (2).

D

Remove the wiper arm (3).

D109D520

Installation Procedure

1. Install the wiper arm with the nut.

2. Install the cap.

D109D521

REAR WINDOW WIPER ARM

Removal Procedure

1. Remove the washer nozzle from the wiper arm. Refer

to “Rear Washer Nozzle” in this section.

2. Remove the wiper blade. Refer to “Windshield Wiper

Blade” in this section.

3. Remove the wiper arm.

D

Remove the cap (1).

D

Remove the nut (2).

D

Remove the wiper arm (3).

WIPERS/WASHER SYSTEMS  9D – 7

D109D522

Installation Procedure

1. Install the rear wiper arm with the nut.

2. Install the cap.

3. Install the wiper blade. Refer to “Windshield Wiper

Blade” in this section.

4. Install the washer nozzle to the wiper arm. Refer to

“Rear Washer Nozzle” in this section.

D109D523

WINDSHIELD WIPER MOTOR

(Left–Hand Drive Shown, Right–Hand
Drive Similar)

Removal Procedure

1. Disconnect the negative battery cable.
2. Remove the windshield wiper arm. Refer to “Wind-

shield Wiper Arm” in this section.

3. Remove the cowl vent grille. Refer to Section 9R,

Body Front End.

4. Separate the wiper motor from the wiper linkage.

D

Remove the wiper linkage ball from the wiper linka-
ge (1).

D109D524

5. Remove the wiper motor from the engine room.

D

Disconnect the electrical connector (1).

D

Remove the bolts (2).

D

Remove the wiper motor assembly (3).

D109D525

Caution: Because the wiper motor link plate is
fixed, do not separate the wiper motor from the
bracket.

9D – 8  WIPERS/WASHER SYSTEMS

D109D526

Installation Procedure

1. Install the wiper motor to the engine room with the

bolts.

a. Wiper motor assembly bolt.

2. Connect the electrical connector.

D109D527

3. Install the wiper linkage to the wiper motor linkage

ball.

b. Wiper linkage ball.

D109D528

4. Install the cowl vent grille. Refer to Section 9R, Body

Front End.

5. Install the windshield wiper arm. Refer to “Windshield

Wiper Arm” in this section.

6. Connect the negative battery cable.

D19D529A

REAR WINDOW WIPER MOTOR

Removal Procedure

1. Disconnect the negative battery cable.

2. Remove the wiper arm from the tailgate. Refer to

“Windshield Wiper Arm” in this section.

3. Remove the tailgate inside trim. Refer to Section 9G,

Interior Trim.

4. Remove the rear wiper motor assembly.

D

Disconnect the electrical connector (1).

D

Remove the screws (2).

D

Remove the rear wiper motor assembly (3).

WIPERS/WASHER SYSTEMS  9D – 9

D19D530A

Caution: Because the wiper motor link plate is
fixed, do not separate the wiper motor from the
bracket.

D19D531A

Installation Procedure

1. Install the wiper motor assembly to the tailgate with

the screws.

2. Connect the electrical connector.

3. Install the tailgate inside trim. Refer to Section 9G, In-

terior Trim.

4. Install the wiper arm. Refer to “Windshield Wiper

Arm” in this section.

5. Connect the negative battery cable.

D109D523

WINDSHIELD WIPER LINKAGE

(Left–Hand Drive Shown, Right–Hand
Drive Similar)

Removal Procedure

1. Remove the windshield wiper arms. Refer to ”Wind-

shield Wiper Arm” in this section.

2. Remove the cowl vent grille. Refer to Section 9R,

Body Front End.

3. Separate the wiper linkage from the wiper motor.

D

Separate the wiper linkage from the wiper motor
linkage ball (1).

D109D532

4. Remove the wiper linkage.

D

Remove the wiper linkage nuts (1).

D

Remove the wiper linkage (2).


Content   ..  237  238  239  240   ..