DAF CF65, CF75, CF85 Series . Manual - part 1104


  Index      DAF     DAF CF65, CF75, CF85 Series - service repair manual


Search            


Content   ..  1102  1103  1104  1105   ..


DAF CF65, CF75, CF85 Series . Manual - part 1104


©

 200448

3-15

Removal and installation

LEAF SUSPENSION

ΧΦ65/75/85 series

9

5

3.9 REMOVAL AND INSTALLATION, TANDEM AXLE SPRING ASSEMBLY

Support the vehicle securely and 

work safely.

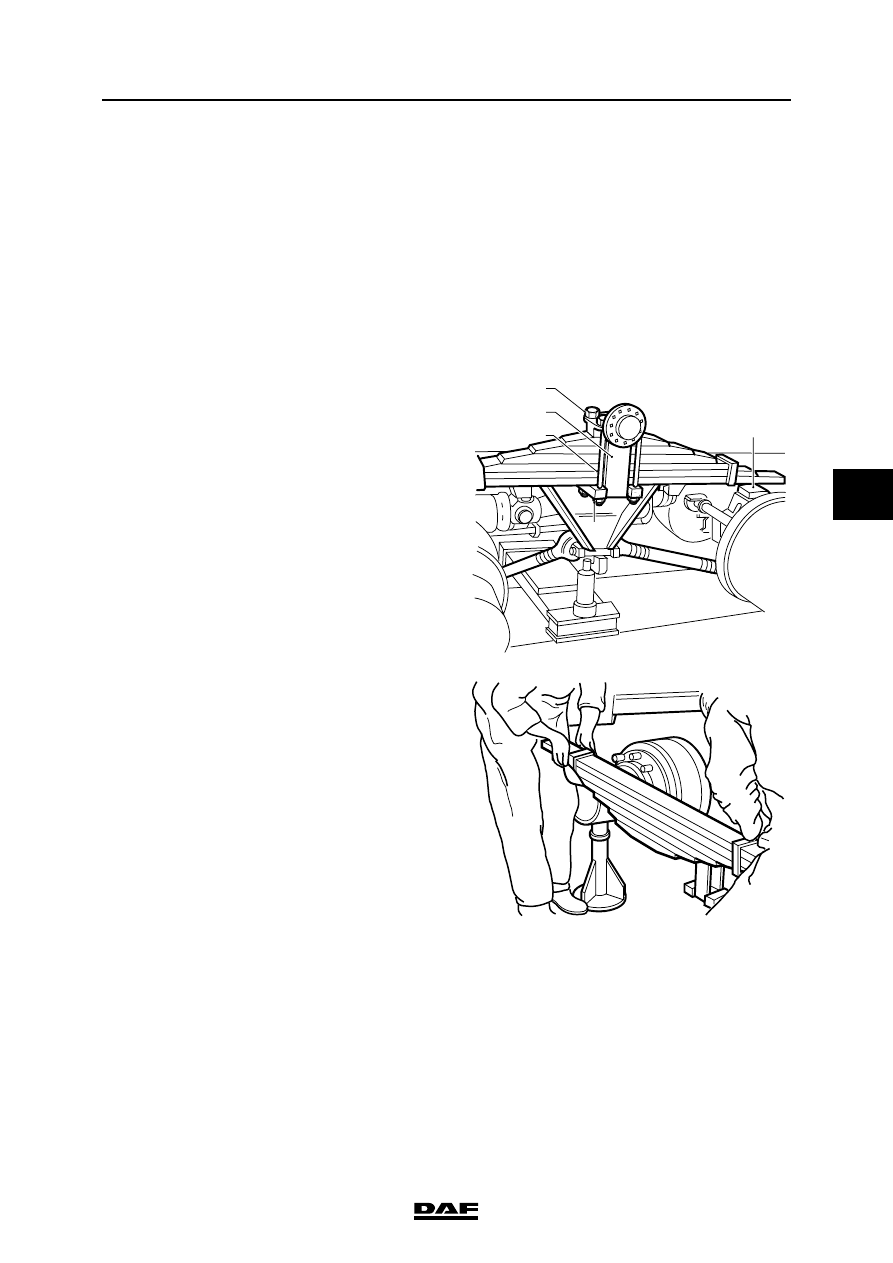
Removing tandem axle spring assembly
1.

Support both axles and remove the wheels.

2.

Jack up the chassis under the central 

suspension.

3.

Loosen the nuts (1) of the tie rods (4) until the 

centre bolt comes off the pivot pin shackle.

4.

Lower the chassis until the spring assembly 

rests on wearing plates (2).

5.

Remove the tie rods (4) and the bottom 

spring plate (3). The spring assembly is now 

ready to be taken off.

Before the spring assembly of a 

trapezoidal leaf spring assembly is 

taken off, it must be turned upside-

down. If this is not done, the spring 

assembly will tip over when being 

removed.

6.

Turn the spring assembly of a trapezoidal 

leaf spring assembly upside-down. Remove 

the spring assembly.

}

1
3
4

1

2

W904017

W904021

}

LEAF SUSPENSION

3-16

©

 200448

Removal and installation

5

ΧΦ65/75/85 series

9

Installing tandem axle spring assembly
1.

Put the spring assembly on the brake drums. 

Turn the spring assembly of a trapezoidal 

leaf spring assembly right side up again, so 

that the short side is on top.

2.

Put the spring assembly side by side on the 

wearing plates. This will prevent the 

trapezoidal leaf spring assembly from tipping 

over.

3.

Fit the tie rods (4) and the spring plate (3).

When tightening, check that the centre bolt 

head is located in the recess of the bearing 

support and that the alignment plates fit onto 

the cams of the bearing support.

4.

Lower the chassis.

5.

Tighten the tie rods (4) to the specified 

torque. See "Technical data".

Make sure that the attachment nuts fully 

engage the tie rod.

6.

Apply grease to the threaded ends of the tie 

rods sticking out above the attachment nuts.

7.

Put the wheels back on.

8.

Re-torque the tie rod nuts after 2,500 km.

W904023

1
3
4

1

2

W904017

©

 200448

3-17

Removal and installation

LEAF SUSPENSION

ΧΦ65/75/85 series

9

5

3.10 REMOVAL AND INSTALLATION, PIVOT PIN

Removing pivot pin
1.

Remove the spring assembly.

2.

Remove the pivot pin cover (15) and collect 

the oil.

3.

Remove the O-ring (14).

4.

Remove the two attachment bolts (13) from 

the locking plate (11).

5.

Remove the locking plate (11).

6.

Take bearing support (10) off the pivot 

pin (2).

7.

Take the oil seal (6) out of the bearing 

support (10).

8.

Remove the bearing bushes (7) and (8) from 

the bearing support (10), using a suitable 

driver.

1

2

4

5

9

3

6

7

8

10

11

14

15

17

16

19

18

13

12

W9 04 025

LEAF SUSPENSION

3-18

©

 200448

Removal and installation

5

ΧΦ65/75/85 series

9

9.

Remove the attachment bolts (9) from the 

pivot pin flange (5) and use a puller to pull the 

pivot pin flange together with the pivot pin (2) 

out of the chassis.

10. Drive the pivot pin (2) out of the pivot pin 

flange (5).

Installing pivot pin

1.

Check the oil seal chamber in the bearing 

support for damage.

Check the contact face of the oil seal on the 

pivot pin for damage.

2.

Drive the pivot pin (2) out of the pivot pin 

flange (5).

3.

Apply a thin layer of grease to surfaces (A) of 

pivot pin (2) and the pivot pin flange (5) and 

reinstall them in the chassis.

4.

Fit the attachment bolts of the pivot pin 

flange crosswise and tighten them to the 

specified tightening torque, see "Technical 

data".

W9 04 030

17 15 14

10

5

4

A

A

13 19

11

8

7

6

2

B

6mm

6mm

W9 04 035


Content   ..  1102  1103  1104  1105   ..