DAF LF45, LF55 Series. Manual - part 172
 

  Index      DAF     DAF LF45, LF55 Series - service repair manual


Search            


Content   ..  170  171  172  173   ..


DAF LF45, LF55 Series. Manual - part 172


©

 200505

4-23

Removing and installing

BE ENGINE

ΛΦ45/55 series

2

2

4.16 REMOVAL AND INSTALLATION, FLYWHEEL HOUSING SEAL

Removing the flywheel housing seal
1.

Remove the gearbox.

2.

Remove the clutch release assembly and the 

clutch plate.

3.

Remove the flywheel.

4.

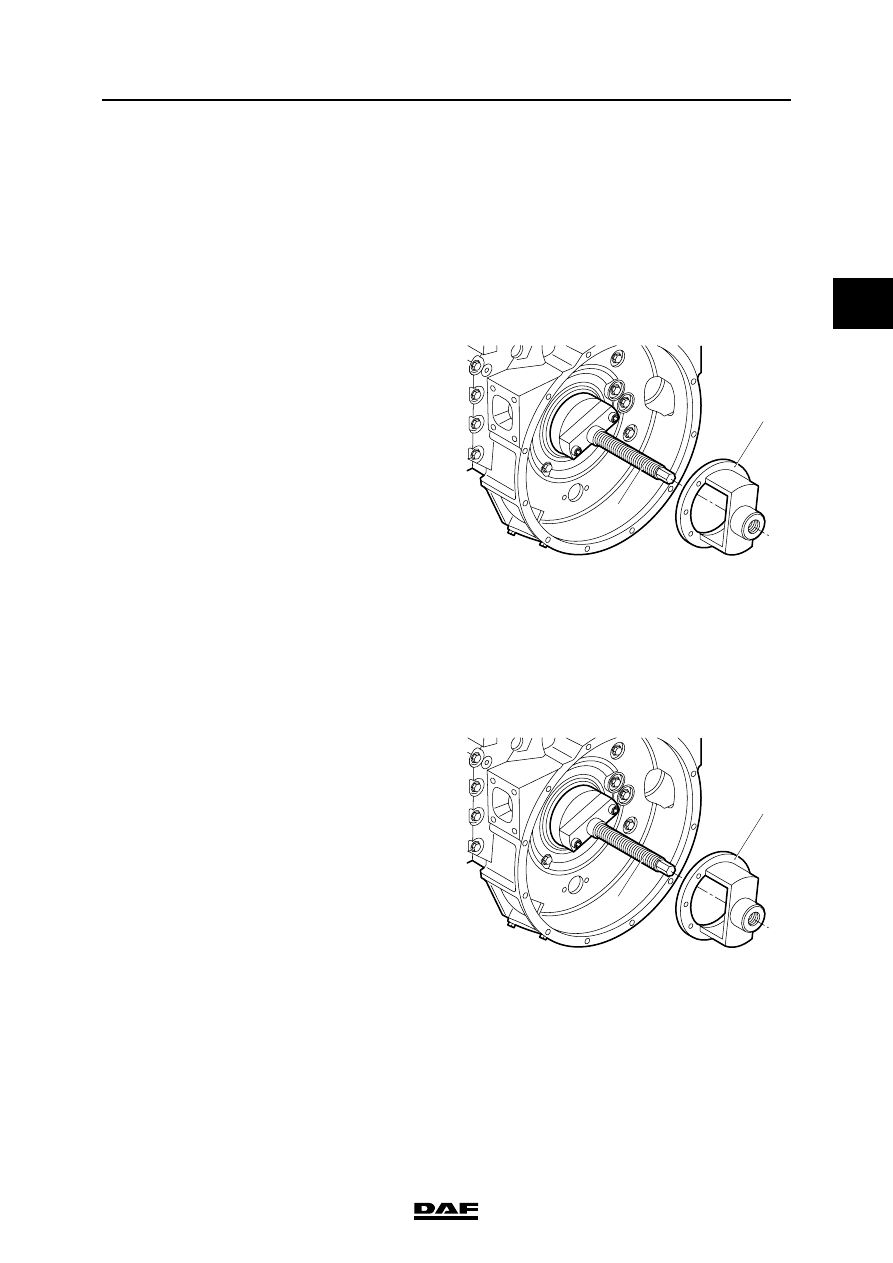
Fit the threaded spindle (2) of the special tool 

(DAF no. 1329475) on the crankshaft flange.

5.

Screw the push/pull piece (1) onto the 

spindle up to the flywheel housing.

Note:

Mark the drill at a length of 22 mm using a 

piece of tape.

6.

Drill a hole through the base plate to the tape 

marking and fit a screw in the seal to keep 

the base plate in its place.

7.

Drill the other five holes and fit screws.

8.

Turn the threaded spindle (2) clockwise until 

the seal has been removed.

Installing the flywheel housing seal
1.

Clean and inspect the seal chamber. Even 

minimal damage may cause a leak.

2.

Fit the threaded spindle (2) of the special tool 

(DAF no. 1329475) on the crankshaft flange.

3.

Put a new seal over the crankshaft.

4.

Screw the push/pull piece (1) onto the 

threaded spindle (2) up to the seal.

5.

Turn the threaded spindle (2) anti-clockwise 

until the push/pull piece (1) is level with the 

flywheel housing. The seal has been 

properly fitted once it is level with the 

flywheel housing.

6.

Remove the special tool.

7.

Fit the flywheel.

8.

Fit the clutch plate and the clutch release 

assembly.

9.

Fit the gearbox.

M201068

2

1

M201068

2

1

BE ENGINE

4-24

©

 200505

Removing and installing

2

ΛΦ45/55 series

2

4.17 REMOVAL AND INSTALLATION, FLYWHEEL HOUSING

Removing the flywheel housing
1.

Remove the starter motor.

2.

Remove the flywheel.

3.

Remove the flywheel housing seal.

4.

Suspend the engine securely in the hoist.

5.

Remove the engine brackets.

6.

Detach the crankcase breather on the 

flywheel housing so that the attachment bolt 

can be accessed.

7.

Remove the flywheel housing attachment 

bolts.

8.

Remove the flywheel housing.

Installing the flywheel housing
1.

Remove any gasket remnants from the 

contact areas. 

2.

Check the sealing surfaces for damage.

3.

Check the flywheel housing for cracks.

4.

Apply a sealant to the sealing face of the 

cylinder block. See "Technical data". Apply 

the sealant with a roller or brush evenly over 

the entire sealing face.

5.

Install the flywheel housing and tighten the 

attachment bolts in the correct sequence to 

the specified torque. See "Technical data".

6.

Fit the engine brackets.

7.

Fit the flywheel housing seal.

8.

Fit the flywheel.

9.

Fit the starter motor.

©

 200505

4-25

Removing and installing

BE ENGINE

ΛΦ45/55 series

2

2

4.18 REMOVAL AND INSTALLATION, VIBRATION DAMPER

Removing the vibration damper
1.

Remove the attachment bolts of the fan and 

place the fan in the wind tunnel.

2.

Remove the poly-V-belt.

3.

Remove the attachment bolts from the 

vibration damper and remove it.

Installing the vibration damper
1.

Check the vibration damper. See "Inspection 

and adjustment".

2.

Fit the vibration damper and tighten the 

attachment bolts to the specified torque. See 

"Technical data".

3.

Fit the poly-V-belt.

4.

Fit the fan.

BE ENGINE

4-26

©

 200505

Removing and installing

2

ΛΦ45/55 series

2

4.19 REMOVAL AND INSTALLATION, CRANKSHAFT SENSOR RING

Removing the crankshaft sensor ring
1.

Remove the attachment bolts from the 

viscous fan clutch and place the fan in the 

wind tunnel.

2.

Remove the poly-V-belt.

3.

Remove the attachment bolts from the 

vibration damper.

4.

Remove the vibration damper and the 

crankshaft sensor ring.

Installing the crankshaft sensor ring
1.

Fit the crankshaft sensor ring with vibration 

damper and tighten the attachment bolts to 

the specified torque. See "Technical data".

Note:

There is only one way of fitting the crankshaft 

sensor ring. For this purpose, a pin has been 

fitted which fits into a bore in the crankshaft 

sensor ring.

2.

Fit the poly-V-belt.

3.

Fit the fan and tighten the attachment bolts to 

the specified torque. See "Technical data".


Content   ..  170  171  172  173   ..