DAF LF45, LF55 Series. Manual - part 116


  Index      DAF     DAF LF45, LF55 Series - service repair manual


Search            


Content   ..  114  115  116  117   ..


DAF LF45, LF55 Series. Manual - part 116


1

LF45/55 series

Inspection and adjustment

EXTERNAL CAB COMPONENTS

3-1

3. INSPECTION AND ADJUSTMENT

3.1 INSPECTION AND ADJUSTMENT, HEADLIGHTS

Note:
Use adjustment equipment to check and adjust
the headlights.

Adjustment, headlamps
1.

When adjusting the headlights, check that:
-

the vehicle is unladen and the tyres are
inflated to the specified pressure.

-

the vehicle is standing on a flat and
level surface.

-

inside the cab the height adjustment of
the headlights is in ”0”-position.
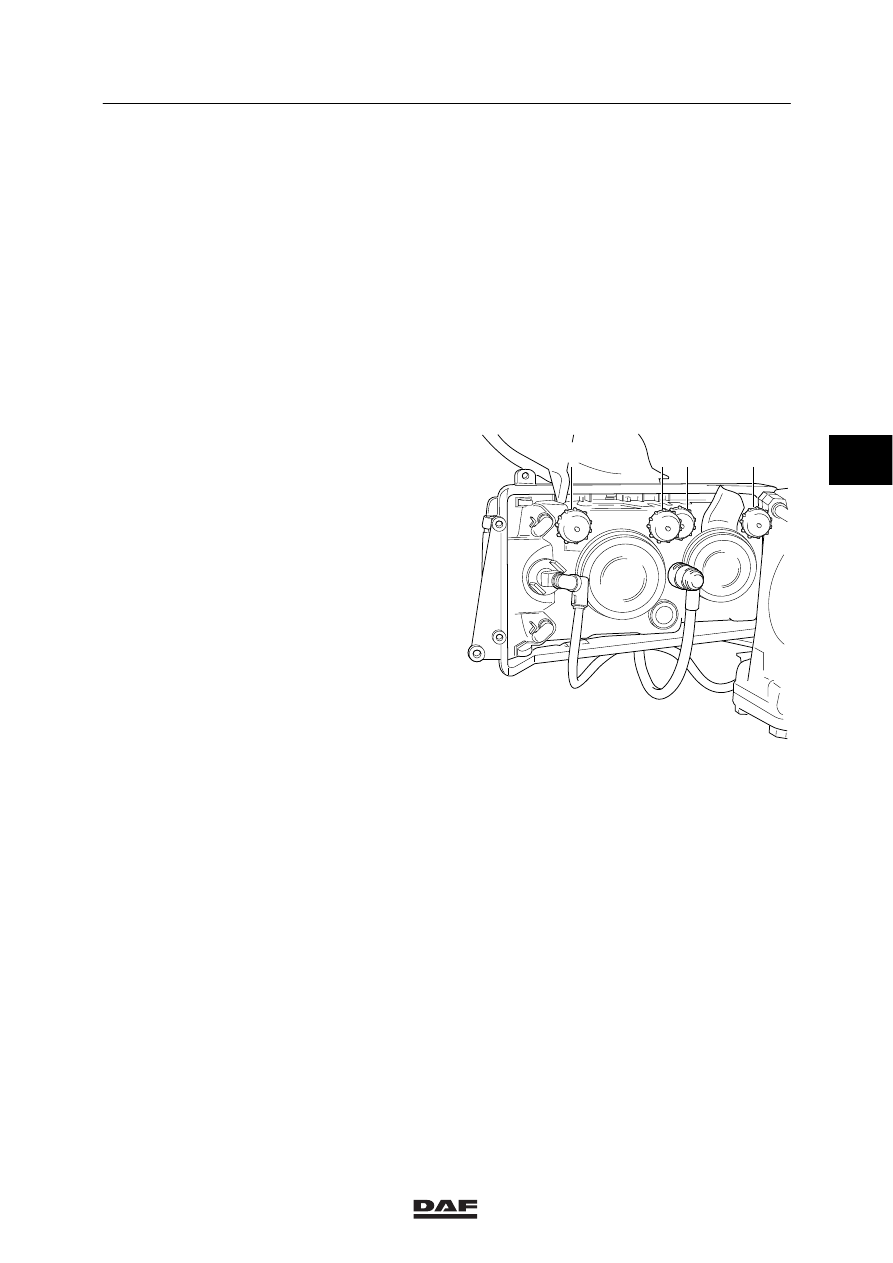
2.

The headlight can be adjusted by four
knurled knobs at the rear of the headlight
housing; main beam and dipped beam can
be adjusted separately:
-

To adjust the dipped beam horizontally,
turn knob 1.

-

To adjust the dipped beam vertically,
turn knob 2.

-

To adjust main beam horizontally, turn
knob 3.

-

To adjust the main beam vertically, turn
knob 4.

1

2 3

4

K1 01 156

4

ǹ 0210

1

EXTERNAL CAB COMPONENTS

Inspection and adjustment

LF45/55 series

3-2

3.

As clear headlight glass is used the image
of the asymmetrical light beam deviates
slightly from the usual image. The beam of
light is not a straight line that slants
upwards, but is slightly convex.

4.

Adjust the headlight in such a manner that
the intersection of the convex and the
horizontal light beam coincides with the
intersection of the asymmetrical diagonal
and the horizontal adjustment line. It does
not matter that the light beam convex is
above the asymmetrical diagonal.

K1 01 473

4

ǹ 0210

1

LF45/55 series

Removal and installation

EXTERNAL CAB COMPONENTS

4-1

4. REMOVAL AND INSTALLATION

4.1 REMOVAL AND INSTALLATION, WINDSCREEN WIPER SYSTEM

Notes:
Before replacing the wiper linkage, the following
points must be observed.

If the bearings of the wiper linkage are worn,
replace them as well as the linkage.

Use the correct tools when removing old linkage
in order to avoid damaging the seals.

Use FINA Ceran-grease for new linkage.

When fitting new linkage, never hit the sealing
covers of the linkage with a hammer or other
hard object. These covers are only 1 mm thick
and might suffer damage in this way.

If the motor shaft shows evidence of axial play,
replace the motor. This play will cause excessive
wear to the wiper linkage.

K1 00 985

2

1

2

1

Removing the windscreen wiper system
1.

Remove the attachment nuts (1) from the
windscreen wiper arms and remove the
windscreen wiper arms (2) using a pulley
puller (trade tool).

4

ǹ 0210

1

EXTERNAL CAB COMPONENTS

Removal and installation

LF45/55 series

4-2

K1 00 984

1

4

2

5

5

5

3

2.

Remove the hose for the windscreen wiper
fluid (1).

3.

Remove the protecting plate (2).

4.

Remove the connectors (3).

5.

Remove the attachment nut (4).

6.

Remove the attachment bolts (5) and
remove the windscreen wiper mechanism.

Installing the windscreen wiper mechanism
1.

Fit the windscreen wiper mechanism with
the attachment bolts (5).

2.

Fit the attachment nuts (4).

3.

Fit the connectors (3).

4.

Fit the protecting plate (2).

5.

Fit the hose for the windscreen wiper
fluid (1).

6.

Put the windscreen washer motor in the
neutral position by turning it on and off
quickly using the switch in the cab.

7.

Fit the windscreen wiper arms.

4

ǹ 0210


Content   ..  114  115  116  117   ..