DAF 95XF. Manual - part 395


  Index      DAF     DAF 95XF Series - service repair manual


Search            


Content   ..  393  394  395  396   ..


DAF 95XF. Manual - part 395


4

XF ENGINE FUEL SYSTEM

Removal and installation

95

XF series

4-16

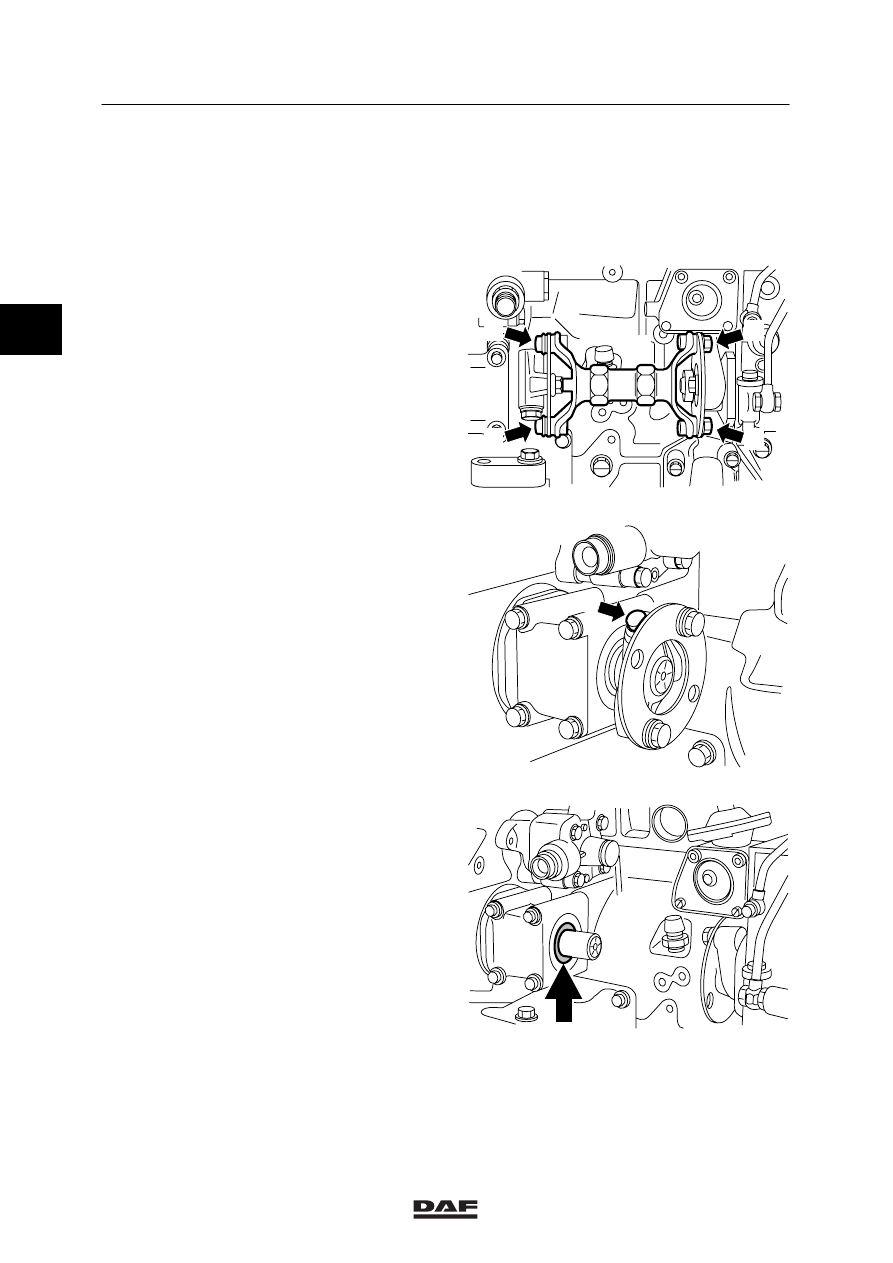
4.10 REMOVAL AND INSTALLATION OF FUEL-PUMP DRIVE SEALING RING

Removing the fuel-pump drive sealing ring
1.

Use the special tool (DAF no. 1310477) to
crank the engine until the 1

st

 cylinder

injects, see main group “Technical data”.

2.

Remove the fixing bolts (A) and the fuel
pump control between the control housing
and the fuel pump.

3.

Remove the clamp bolt (1) from the clamp.

4.

Remove the clamp from the drive shaft.

5.

Remove the sealing ring with the special
tools (DAF no. 0484899 and
DAF no. 0694928).

i 400200

A

A

A

A

i 400201

1

i400202

2

2

©

 0008

4

95

XF series

Removal and installation

XF ENGINE FUEL SYSTEM

4-17

Installing the fuel-pump drive sealing ring
1.

Clean the drive shaft and dry it.

2.

Fit a dry new sealing ring using the special
tool (DAF no. 1329308).

3.

Open the slot of the clamp, allowing the
coupling to be installed free of stress.

4.

Install the clamp, fitted with a new clamp
bolt (1), on the drive shaft.

5.

Install the fuel-pump drive and the centring
sleeves.

6.

Install the fixing bolts (A) and tighten these
to the specified tightening torque, see main
group “Technical data”.

7.

Adjust the injection timing, see chapter
“Checking and adjusting”.

8.

Check the clutch plates for cracking and
whether they have been installed
stress-free. If there is stress on the clutch
plates, they will be “convex” or “concave”.
Check using a steel measuring rod.

i 400184

2

©

 0008

4

XF ENGINE FUEL SYSTEM

Removal and installation

95

XF series

4-18

4.11 REMOVAL AND INSTALLATION OF RACOR FILTER ELEMENT

When the Racor filter element is
removed, a quantity of fuel will
escape. This fuel must be collected,
bearing in mind the risk of fire.

Removing the Racor filter element
1.

Drain the fuel from the filter element by
loosening the bleeding plug (2) and opening
the drain plug (8).

2.

Loosen any connectors of the water
sensor (6) and the heating element (7).

3.

Remove the filter element (4) together with
the bottom cover (5) and clean the O-ring
sealing.

Installing the Racor filter element
1.

Apply a film of engine oil to the O-ring and
the new sealing ring.

2.

Fit the bottom cover (5) to the new filter
element (4) and fill clean diesel fuel.

3.

Fit the bottom cover (5) together with the
new filter element (4) to the filter
housing (3).

4.

Hand-tighten the filter.

5.

Fit the water sensor connectors and the
heating element, if present.

1

2

3

4

7

6

8

i400356

2

©

 0008

4

95

XF series

Disassembly and assembly

XF ENGINE FUEL SYSTEM

5-1

5.  DISASSEMBLY AND ASSEMBLY

5.1

DISASSEMBLY AND ASSEMBLY OF INJECTOR

The injector side connection (3)
must not be removed from the
injector.

Disassembling the injector
1.

Remove the injector, see chapter “Removal
and installation”.

2.

Clean the injector, see chapter “Cleaning”.

3.

Note:
Do not exchange injector bodies (nozzles)
and injector needles because these
constitute interrelated sets.

Remove the union nut (2), after which the
various parts can be taken from the injector.

4.

Check that none of the injector parts have
been compressed by the injector needle.

i 400303

1

3

2

2

©

 0008


Content   ..  393  394  395  396   ..