DAF 95XF. Manual - part 44


  Index      DAF     DAF 95XF Series - service repair manual


Search            


Content   ..  42  43  44  45   ..


DAF 95XF. Manual - part 44


2

Inspection and adjustment

XF ENGINE

3-13

3.7 INSPECTION, CYLINDER HEAD

1.

Check the sealing plugs of the cylinder
head for leaks. If necessary, pressure-test
the cylinder head.

2.

Check the cylinder head for damage on the
sealing face, and possible cracks. If
necessary, have the cylinder head levelled,
see main group “Technical data”.

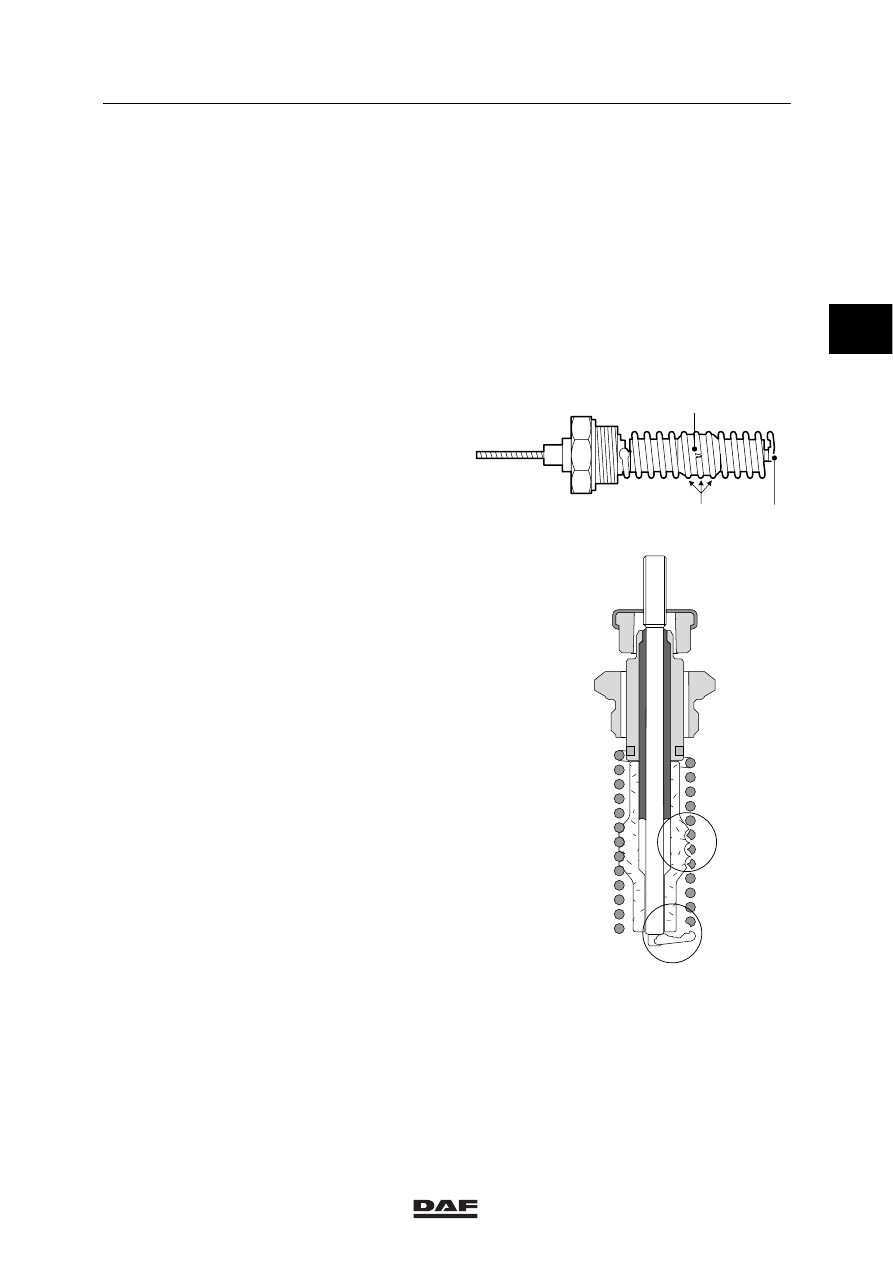
3.8 INSPECTION, GLOW FILAMENTS

Note:
To avoid engine damage it is important that the
glow filaments should be checked periodically.

1.

Check the glow filaments for the following
points:
-

windings that have worn thin due to
abrasion (A);

-

filament end broken or worn thin due to
continuous knocking of a loose
insulator (see B);

-

broken plug windings (C).

2.

Replace all glow filaments if one or more of
the above-mentioned situations occurs.

B

A

C

B

A

M200818

2

ǹ 0008

2

XF ENGINE

Inspection and adjustment

3-14

2

ǹ 0008

2

Removal and installation

XF ENGINE

4-1

4. REMOVAL AND INSTALLATION

4.1 REMOVAL AND INSTALLATION, ENGINE

Suspend the engine carefully from
the hoist, using approved lifting
gear.

Various fluids will be released when
pipes are removed. Collect these
fluids. Take care of your personal
protection and any fire hazards.

Note:
Because of the large number of vehicle
specifications, it is not feasible to exactly specify
the engine removal and installation procedures
for every vehicle.
This description only includes the main points
requiring attention.

-

Disconnect the earth lead from the battery
pole.

-

Avoid opening of fluid systems as much as
possible. If possible, remove and put aside
the engine components.

-

When removing the engine, ensure that no
parts or dirt fall into the engine, radiator or
other components. Therefore, plug all
openings.

-

Electrical wiring harnesses are easily
damaged. If damaged, they may cause
faults. Make sure these wiring harnesses
are stress-free and have been installed
away from moving parts.

-

Tighten all fixing bolts to the correct
tightening torque.

-

Do not allow the engine to rest on the oil
sump. Because the oil sump is made of
sheet material, it will be severely damaged
by the engine’s own weight.

2

ǹ 0008

2

XF ENGINE

Removal and installation

4-2

4.2 REMOVAL AND INSTALLATION, ENGINE MOUNTING

Suspend the engine carefully from
the hoist, using approved lifting
gear.

Various fluids will be released when
pipes are removed. Collect these
fluids. Take care of your personal
protection and any fire hazards.

Removing the engine mounting
1.

Disconnect the earth lead from the battery
pole.

2.

Drain the coolant.

3.

Remove the coolant hoses (A) between the
engine, the radiator and the header tank.

4.

Remove the reaction rod (B) between the
engine and the radiator.

5.

Remove the air inlet hoses (C) between the
engine and the intercooler. Plug the
openings.

6.

Remove the air-conditioning compressor, if
present, so that it can be put aside with the
pipes (D) attached.

7.

Remove the fixing nuts of the viscous fan
clutch and place the viscous fan clutch and
the fan in the wind tunnel.

8.

Disconnect the earth strip on the flywheel
housing.

9.

Properly suspend the engine in the hoist.

10. Remove the central engine mount fixing

bolts at the front and/or back of the engine.

11. Lift the engine up as much as is necessary.

12. Remove the engine mounting.

B

C

D

A

M201019

2

ǹ 0008


Content   ..  42  43  44  45   ..