Chrysler RG Voyager. Manual - part 691


  Index      Chrysler     Chrysler RG Voyager - service repair manual 2005 year


Search            


Content   ..  689  690  691  692   ..


Chrysler RG Voyager. Manual - part 691


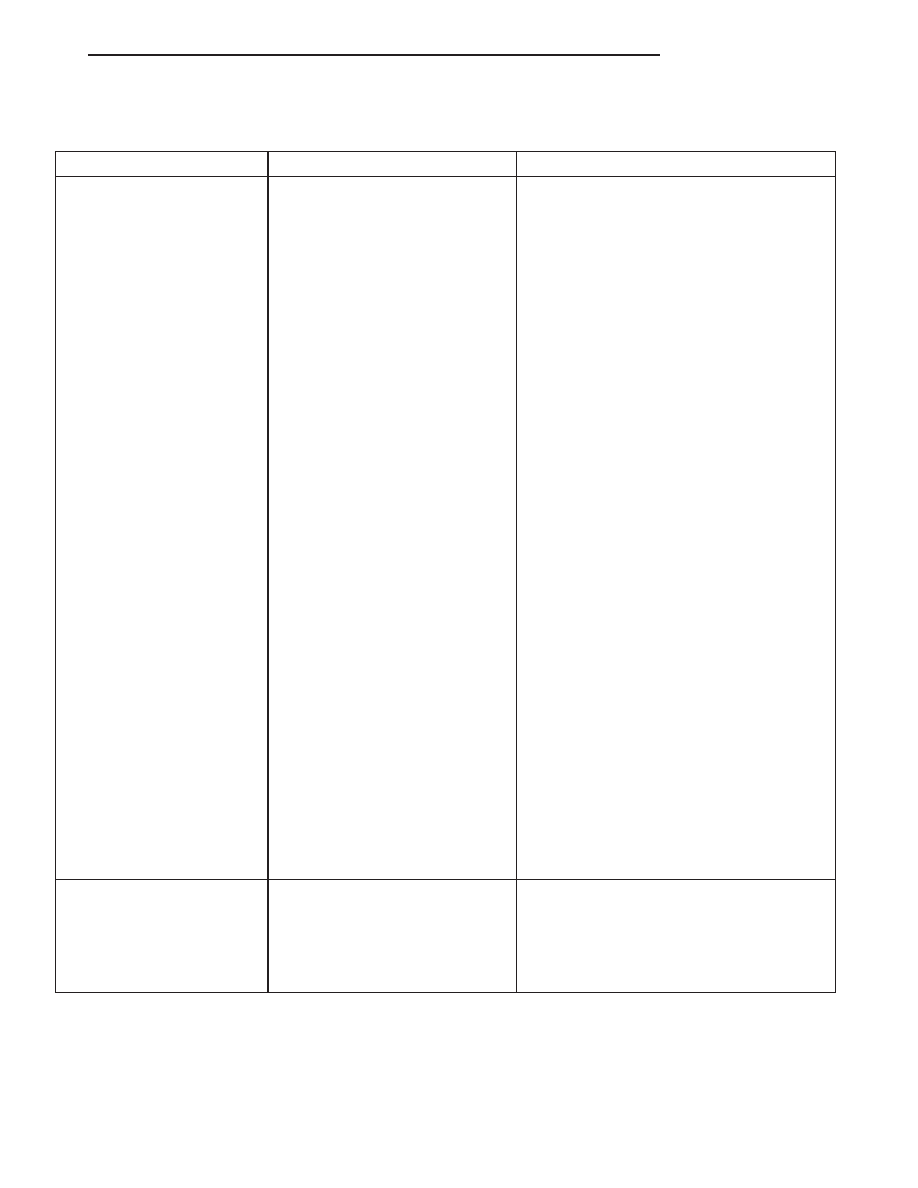
VIDEO SYSTEM DIAGNOSIS

CONDITION

POSSIBLE CAUSES

CORRECTION

NO VIDEO (DVD PLAYER

WILL NOT LOAD OR

EJECT)

1. FUSE INOPERATIVE.

1. CHECK FUSES. REPLACE FUSES IF
REQUIRED.

2. LOOSE OR DAMAGED DVD
PLAYER CONNECTOR

2. CHECK FOR LOOSE OR CORRODED
DVD PLAYER CONNECTOR (16 PIN).
REPAIR OR REPLACE AS REQUIRED.

3. LOOSE OR DAMAGED
WIRING/DVD PLAYER
INOPERATIVE

3. CHECK PIN 1 (B+) AND PIN 9
(GROUND) OF THE 16 PIN CONNECTOR,
THEN CHECK PIN 1 (B+) AND PIN 7
(GROUND) OF THE 12 PIN CONNECTOR.
IF THE 16 PIN CONNECTOT DOES NOT
SHOW VOLTAGE, THE 12 PIN
CONNECTOR WILL NOT SHOW VOLTAGE
(THE 12 PIN IS FED FROM THE 16 PIN). IF
VOLTAGE IS OK ON THE 16 PIN, BUT NOT
PRESENT ON THE 12 PIN, UNPLUG THE
12 PIN HARNESS FROM THE PLAYER
AND CHECK THE CONNECTOR PINSON
THE BACK OF THE PLAYER. IF VOLTAGE
IS PRESENT ON THE 12 PIN
CONNECTOR, THE SCREEN OR THE 12
PIN HARNESS SHOULD BE REPLACED. IF
THERE IS STILL NO VOLTAGE ON THE 12
PIN CONNECTOR, THE DVD PLAYER
SHOULD BE REPLACED.

4. GROUND CONNECTION
DAMAGED

4. CHECK FOR CONTINUITY BETWEEN
DVD PLAYER AND A KNOWN GOOD
GROUND. THERE SHOULD BE
CONTINUITY. REPAIR GROUND IF
REQUIRED.

5. DVD PLAYER DAMAGED

5. EXCHANGE OR REPLACE DVD PLAYER
IF REQUIRED.

6. DVD DAMAGED.
AVOID USING CD’S OR DVD’S
THAT HAVE ADHESIVE TYPE
LABELS, AS THEY MAY CAUSE
THE DISC TO BECOME
JAMMED.

6. INSERT KNOWN GOOD DVD AND TEST
OPERATION.

NO DISPLAY. AUDIO
HEARD THROUGH
SPEAKERS

1. LOOSE OR DAMAGED
CONNECTORS

1. CHECK FOR LOOSE OR CORRODED
DVD PLAYER CONNECTOR (12 PIN).
CHECK FOR LOOSE OR CORRODED
VIDEO SCREEN CONNECTOR. REPAIR IF
REQUIRED. CHECK FOR LOOSE OR
DAMAGED IN-LINE CONNECTOR.

RS

AUDIO/VIDEO

8A - 5

AUDIO/VIDEO (Continued)

CONDITION

POSSIBLE CAUSES

CORRECTION

2. WIRING DAMAGED

2. WITH HARNESS CONNECTED, CHECK
FOR VIDEO SIGNAL VOLTAGE AT DVD
PLAYER AND AT VIDEO SCREEN
HARNESS. PLACE KNOWN GOOD DVD
INTO DVD PLAYER. PLACE POSITIVE
LEAD OF VOLTMETER ON PIN 5 (VIDEO
SIGNAL) OF THE 12 PIN CONNECTOR.
PLACE NEGATIVE LEAD ON PIN 6 (VIDEO
GROUND). READINGS SHOULD BE
BETWEEN 0.1V TO 2V DC.

3. VIDEO SCREEN DAMAGED

3. EXCHANGE OR REPLACE VIDEO
SCREEN IF REQUIRED.

WHITE DISPLAY

1. LOW VOLTAGE

1. CHECK FOR BATTERY VOLTAGE
(9V-16V) AT DVD PLAYER 12 PIN
CONNECTOR (PIN 1-BATTERY, PIN
7-GROUND). DISPLAY WILL BE WHITE IF
VOLTAGE DROPS BELOW 6V.

2. VIDEO SCREEN DAMAGED

2. EXCHANGE OR REPLACE VIDEO
SCREEN IF REQUIRED.

DARK OR BRIGHT SPOTS

ON SCREEN

1. BRIGHTNESS SETTING
REQUIRES ADJUSTMENT.

1. ADJUST BRIGHTNESS SETTING OF
VIDEO SCREEN BY PRESSING BUTTONS
ON SIDE OF VIDEO SCREEN UNTIL
DESIRED LEVEL IS REACHED. START
WITH A BLACK SCREEN, THEN PRESS
BUTTON UP 16-20 TIMES. THERE ARE 64
TOTAL STEPS OF BRIGHTNESS.

BRIGHT OR DARK DISPLAY

1. VIDEO SCREEN DISPLAY
PIXEL DEFECT.

1. THE ACCEPTABLE LEVEL OF DOTS ON
THE SCREEN IS (GREEN-1, RED-2) OR A
TOTAL
(GREEN+RED+BLUE+WHITE+BLACK) = 8.
REPLACE OR EXCHANGE VIDEO
SCREEN IF NECESSARY.

VIDEO SELECTIONS DO

NOT APPEAR FULL

SCREEN WIDTH

1. ASPECT RATIO IS SET
INCORRECTLY.

1. USING MODE BUTTON, ADJUST UNTIL
VIDEO APPEARS CORRECTLY.

2. SOME DVD’S ARE TWO
SIDED. ONE SIDE IS WIDE
SCREEN FORMAT AND THE
OTHER IS FULL SCREEN OR
THERE MAY BE A WIDE
SCREEN OR STANDARD
SCREEN FORMAT ON THE
DISC.

2. ENSURE THAT DVD IS INSERTED
CORRECTLY.

8A - 6

AUDIO/VIDEO

RS

AUDIO/VIDEO (Continued)

CONDITION

POSSIBLE CAUSES

CORRECTION

BUTTONS ON VIDEO

SCREEN INOPERATIVE

1. VIDEO SCREEN DAMAGED.

1. PLACE KNOWN GOOD DVD INTO DVD
PLAYER. ONCE IMAGE APPEARS ON
VIDEO SCREEN, PRESS TOP BUTTON ON
SIDE OF VIDEO SCREEN TO ADJUST
WIDTH OF DISPLAY. PRESS BOTTOM
BUTTONS TO ADJUST BRIGHTNESS.
ONCE DVD MENU APPEARS ON VIDEO
SCREEN, PRESS MIDDLE BUTTON ON
VIDEO SCREEN. HIGHLIGHTED
SELECTION WILL BEGIN TO PLAY. IF ANY
OF THE BUTTONS DO NOT FUNCTION,
REPLACE OR EXCHANGE VIDEO
SCREEN.

AMPLIFIER

REMOVAL

(1) Disconnect and isolate the battery negative

cable.

(2) Remove the right quarter trim panel (Refer to

23 - BODY/INTERIOR/QUARTER TRIM PANEL -
REMOVAL).

(3) Remove the right rear speaker.
(4) Disconnect the two electrical harness retainers

near the amplifier.

(5) Remove the mounting fasteners (Fig. 1).

(6) Disconnect the electrical harness connectors

and remove the amplifier through the right rear
speaker opening.

(7) Remove the bracket from the amplifier.

INSTALLATION

(1) Install bracket to amplifier
(2) Connect the electrical harness connectors, and

position amplifier.

(3) Install and tighten mounting fasteners.
(4) Install the two electrical harness retainers.
(5) Install the right rear speaker.
(6) Install right quarter trim panel (Refer to 23 -

BODY/INTERIOR/QUARTER

TRIM

PANEL

-

INSTALLATION).

(7) Connect the battery negative cable.

ANTENNA BODY AND CABLE

DESCRIPTION

Domestic vehicles use a fixed-length stainless steel

rod-type antenna mast, installed at the right front
fender of the vehicle. The antenna mast is connected
to the center wire of the coaxial antenna cable, and is
not grounded to any part of the vehicle.

OPERATION

To minimize static, the antenna base must have a

good ground. The coaxial antenna cable shield (the
outer wire mesh of the cable) is grounded to the
antenna base and the radio chassis.

The antenna coaxial cable has an additional dis-

connect, located near the right end of the instrument
panel. This additional disconnect allows the instru-
ment panel assembly to be removed and installed
without removing the radio.

Fig. 1 AMPLIFIER

RS

AUDIO/VIDEO

8A - 7

AUDIO/VIDEO (Continued)

DIAGNOSIS AND TESTING

ANTENNA BODY AND CABLE

WARNING: ON VEHICLES EQUIPPED WITH AIR-
BAGS,

REFER

TO

ELECTRICAL,

RESTRAINTS

BEFORE ATTEMPTING ANY STEERING WHEEL,
STEERING

COLUMN,

OR

INSTRUMENT

PANEL

COMPONENT DIAGNOSIS OR SERVICE. FAILURE
TO TAKE THE PROPER PRECAUTIONS COULD
RESULT IN ACCIDENTAL AIRBAG DEPLOYMENT
AND POSSIBLE PERSONAL INJURY.

The ohmmeter test lead connections for each test

are shown in (Fig. 2).

TEST 1

Test 1 determines of the antenna mast is insulated

from the base. Proceed as follows:

(1) Unplug the antenna coaxial cable from the

radio chassis and isolate. Remove the antenna mast.

(2) Connect an ohmmeter test lead to the inside

center of the antenna base. Connect the other test
lead to a metallic portion on the outside of the
antenna base. Check for continuity.

(3) There should be no continuity. If continuity is

found, replace the faulty or damaged antenna base
and cable assembly.

TEST 2

Test 2 checks the antenna for an open circuit as

follows:

(1) Unplug the antenna coaxial cable connector

from the radio chassis. Remove the antenna mast.

(2) Connect an ohmmeter test lead to the inside

center of the antenna base. Connect the other test
lead to the center pin of the antenna coaxial cable
connector.

(3) Continuity should exist (the ohmmeter should

only register a fraction of an ohm). High or infinite
resistance indicates damage to the base and cable
assembly. Replace the faulty base and cable if
required.

TEST 3

Test 3 checks the condition of the ground between

the antenna base and the vehicle body as follows:

(1) Connect one ohmmeter test lead to the fender

on an exposed metal area. Connect the other test
lead to the outer crimp on the antenna coaxial cable
connector.

(2) The resistance should be less than (1) ohm.
(3) If the resistance is more than (1) ohm, clean

and/or tighten the antenna base to the fender mount-
ing hardware.

REMOVAL

(1) Disconnect and isolate the battery negative

cable.

(2) Remove glove box from instrument panel,

(Refer to 23 - BODY/INSTRUMENT PANEL/GLOVE
BOX - REMOVAL).

(3) Disconnect antenna cable connector from exten-

sion cable (Fig. 3).

(4) Remove right kick trim panel.
(5) Disengage rubber grommet insulator from door

hinge pillar.

(6) Pull antenna cable through hinge pillar into

opening between door hinges.

(7) Hoist and support vehicle on safety stands.
(8) Remove front wheel.
(9) Remove front wheelhouse splash shield. (Refer

to

23

-

BODY/EXTERIOR/LF

WHEELHOUSE

SPLASH SHIELD - REMOVAL).

(10) Remove antenna mast from antenna base

(Fig. 4).

(11) Using cap nut tool, remove cap nut holding

antenna base to front fender (Fig. 5).

(12) Remove

antenna

base

from

under

front

fender.

INSTALLATION

(1) Install antenna base to underside of front

fender.

(2) Install cap nut holding antenna base to front

fender.

(3) Install antenna mast to antenna base Ensure

that

the

antenna

mast

is

fully

seated

on

antenna base, and that there is no gap between
the mast and base.
.

Fig. 2 Antenna Test Points

8A - 8

AUDIO/VIDEO

RS

ANTENNA BODY AND CABLE (Continued)


Content   ..  689  690  691  692   ..