Chrysler Pacifica. Manual - part 845


  Index      Chrysler     Chrysler Pacifica - service repair manual 2005 year


Search            


Content   ..  843  844  845  846   ..


Chrysler Pacifica. Manual - part 845


FRONT INNER BELT MOLDING
WEATHERSTRIP

REMOVAL

(1) Remove the door trim panel. (Refer to 23 -

BODY/DOOR - FRONT/TRIM PANEL - REMOVAL).

(2) Rotate the inner belt molding outboard while

pulling up to disengage the retention tabs (Fig. 8).

(3) Remove inner belt molding from door.

INSTALLATION

(1) Place inner belt molding into position.
(2) Press down on inner belt molding to engage the

retention tabs (Fig. 8).

(3) Install the door trim panel. (Refer to 23 -

BODY/DOOR - FRONT/TRIM PANEL - INSTALLA-
TION).

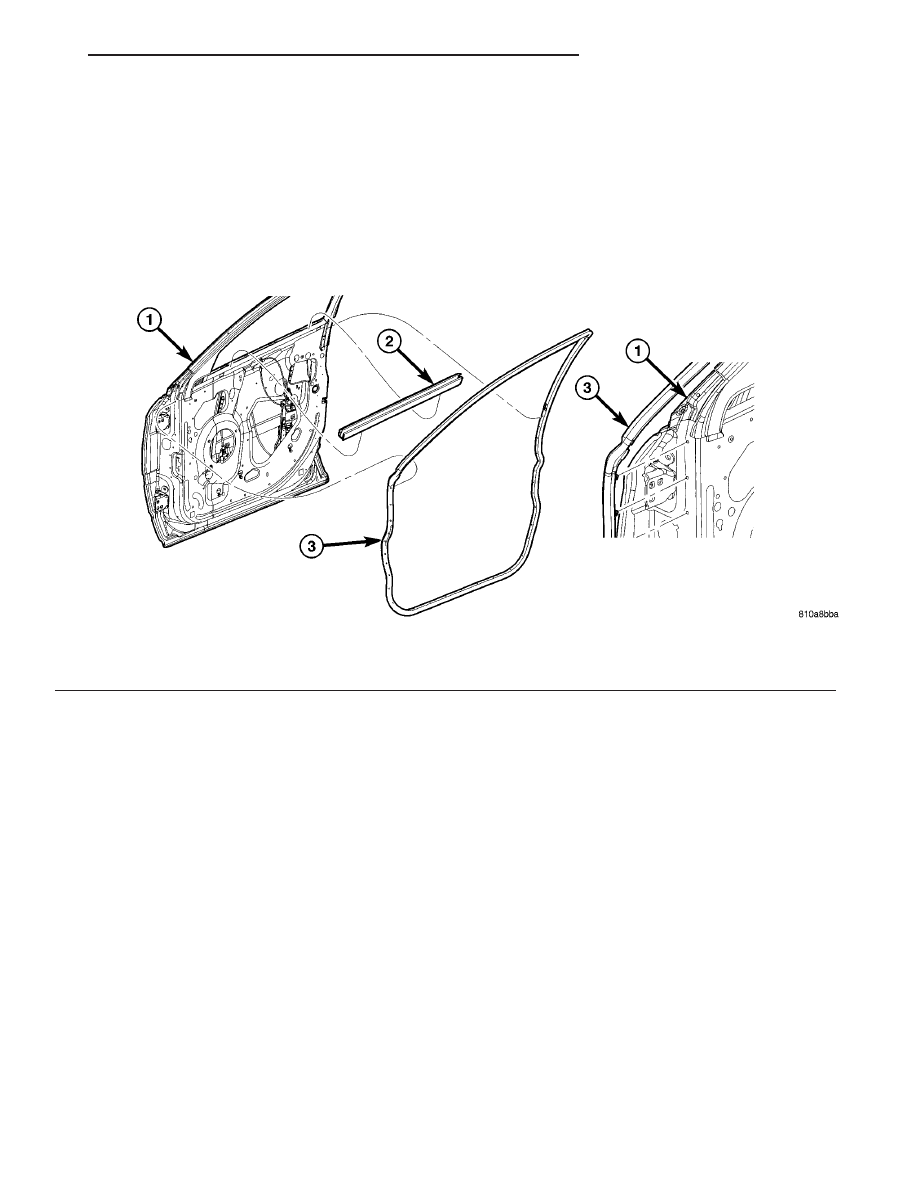
Fig. 8 DOOR BELT INNER AND MOUNTED WEATHERSTRIP

1 - DOOR ASSEMBLY
2 - FRONT DOOR BELT INNER WEATHERSTRIP

3 - FRONT DOOR MOUNTED WEATHERSTRIP

CS

WEATHERSTRIP/SEALS

23 - 175

LIFTGATE OPENING
WEATHERSTRIP

REMOVAL

(1) Open liftgate door.
(2) Remove liftgate sill scuff plate.
(3) Pull Liftgate door weatherstrip from liftgate

opening fence (Fig. 9).

(4) Remove liftgate opening weatherstrip from

vehicle.

INSTALLATION

(1) Place liftgate opening weatherstrip into posi-

tion locate non plug end of weatherstrip to bottom of
liftgate opening at left of center. Align end of weath-
erstrip to second slot left of striker hole (Fig. 9).

(2) Secure weatherstrip to liftgate opening in a

counterclockwise direction around left side of opening
including the left lower and upper corners of the
fence flange.

(3) Align the paint dot on the inner side of weath-

erstrip with right side upper corner of liftgate open-
ing. Be sure to leave slack in the weatherstrip
between the two upper corners of opening.

(4) Secure weatherstrip down the right side of open-

ing including the upper and lower right side corners.

(5) Secure weatherstrip to upper portion of liftgate

opening between the left and right upper corners.

(6) Joint the two end of the weatherstrip together

and ensure complete seating of weatherstrip.

(7) Install liftgate sill scuff plate.
(8) Close liftgate door.

LIFTGATE UPPER
SECONDARY WEATHERSTRIP

REMOVAL

(1) Warm the affected stick on upper secondary

weatherstrip and body metal to approximately 27° C
(80° F) using a suitable heat lamp or heat gun.

(2) Pull stick on weatherstrip from painted sur-

face.

(3) Remove adhesive tape residue from painted

surface of vehicle.

(4) Use a 3M Scotch-Brite™ Molding Adhesive and

Stripe Removal Disc, or equivalent, to clean adhesive
residue from painted surfaces. These products are
available from automotive paint suppliers. Refer to
instructions supplied with the specific product for
proper usage.

INSTALLATION

(1) If

upper

secondary

weatherstrip

is

to

be

reused,

(a) Remove tape residue from molding.
(b) Clean back of molding with Mopar

t Super

Kleen, or equivalent.

(c) Wipe molding dry with lint free cloth.
(d) Apply a single coat of Mopar

t TPO Molding

Prep to tape side of molding and allow to dry thor-
oughly.

(e) Apply new body side molding (two sided

adhesive) tape to back of weatherstrip.

Fig. 9 LIFTGATE OPENING WEATHERSTRIP

1 - LEFT SIDE STARTING POINT
2 - UPPER LIFTGATE OPENING
3 - SECURE UPPER AND LOWER CORNERS

4 - LOWER RIGHT SIDE CORNER AND CONNECTION POINT
5 - ALIGN END OF WEATHERSTRIP TO SECOND SLOT LEFT OF
STRIKER HOLE

23 - 176

WEATHERSTRIP/SEALS

CS

(2) Clean liftgate surface with Mopar

t Super

Kleen, or equivalent. Wipe surface dry with lint free
cloth.

(3) Remove protective cover from tape on back of

upper secondary weatherstrip.

(4) Apply weatherstrip to liftgate between liftgate

hinges. There is less than 1/8 in. clearance between
the hinges.

(5) Using a roller tool, roll weatherstrip onto lift-

gate with enough force to assure adhesion. Do not
apply excessive force, or damage to weatherstrip may
result.

REAR DOOR HEADER
WEATHERSTRIP

REMOVAL

(1) Open rear door.
(2) Using a trim stick C-4755 or equivalent, disen-

gage the push pins attaching rear door header
weatherstrip to door frame (Fig. 10).

(3) Remove weatherstrip from door.

INSTALLATION

(1) Place weatherstrip into position.
(2) Press on weatherstrip push pins to engage rear

door header weatherstrip to door frame (Fig. 10).

(3) Close rear door.

REAR DOOR INNER BELT
MOLDING WEATHERSTRIP

REMOVAL

(1) Remove the door trim panel. (Refer to 23 -

BODY/DOORS - REAR/TRIM PANEL - REMOVAL).

(2) Rotate the inner belt molding outboard while

pulling up to disengage the retention tabs (Fig. 11).

(3) Remove inner belt molding from door.

Fig. 10 DOOR HEADER WEATHERSTRIP

1 - PUSH PINS

2 - HEADER WEATHERSTRIP

Fig. 11 REAR DOOR INNER BELT WEATHERSTRIP

1 - REAR DOOR ASSEMBLY
2 - INNER BELT MOLDING

CS

WEATHERSTRIP/SEALS

23 - 177

LIFTGATE UPPER SECONDARY WEATHERSTRIP (Continued)

INSTALLATION

(1) Place inner belt molding into position.
(2) Press down on inner belt molding to engage the

retention tabs (Fig. 11).

(3) Install the door trim panel. (Refer to 23 -

BODY/DOORS - REAR/TRIM PANEL - INSTALLA-
TION).

REAR DOOR MOUNTED
WEATHERSTRIP

REMOVAL

(1) Open front door.
(2) Using a trim stick C-4755 or equivalent, disen-

gage the push pins attaching rear door mounted
weatherstrip to door frame (Fig. 12).

(3) Remove weatherstrip from door frame.

INSTALLATION

(1) Place rear door mounted weatherstrip into

position (Fig. 12).

(2) Press on attaching push pins fasteners to

attach weatherstrip to lower door and engage upper
rear door mounted weatherstrip to door frame.

(3) Close front door.

Fig. 12 DOOR MOUNTED WEATHERSTRIP

1 - REAR DOOR ASSEMBLY
2 - REAR DOOR BELT INNER WEATHERSTRIP

3 - REAR DOOR MOUNTED WEATHERSTRIP
4 - WEATHERSTRIP PUSH PINS (25)

23 - 178

WEATHERSTRIP/SEALS

CS

REAR DOOR INNER BELT MOLDING WEATHERSTRIP (Continued)


Content   ..  843  844  845  846   ..