Chrysler Stratus Convertible. Manual - part 262
 

  Index      Chrysler     Chrysler Stratus Convertible - service repair manual 1995-2000 year


Search            


Content   ..  260  261  262  263   ..


Chrysler Stratus Convertible. Manual - part 262


INSTALLATION

(1) Position fog lamp in front fascia.
(2) Install nuts attaching fog lamp to front fascia.
(3) Connect wire connector to fog lamp bulb.

CENTER HIGH MOUNTED STOP LAMP
(CHMSL)

REMOVAL

(1) Remove upper deck molding. Refer to Group

23, Body, for proper procedure.

(2) Remove screws attaching CHMSL assembly to

upper deck molding (Fig. 4).

(3) Remove trunk trim panel as necessary to con-

nect CHMSL wire connector.

(4) Remove CHMSL from upper deck molding.

INSTALLATION

(1) Position CHMSL to upper deck molding.
(2) Connect CHMSL wire connector and reposition

trunk trim panel.

(3) Install screws attaching CHMSL assembly to

upper deck molding.

(4) Install upper deck molding. Refer to Group 23,

Body, for proper procedure.

TAIL, BRAKE, TURN SIGNAL, BACKUP AND
SIDE MARKER LAMPS

REMOVAL

(1) Release decklid latch and open decklid.
(2) Remove trunk lining as necessary to gain

access to tail lamp nuts.

(3) Remove plastic nuts attaching tail lamp to rear

closure panel.

(4) Remove lamp from opening in quarter panel

(Fig. 5).

(5) Rotate bulb sockets counterclockwise one quar-

ter turn.

(6) Pull bulb sockets from back of lamp.
(7) Remove tail, brake, turn signal, backup and

side marker lamps from vehicle.

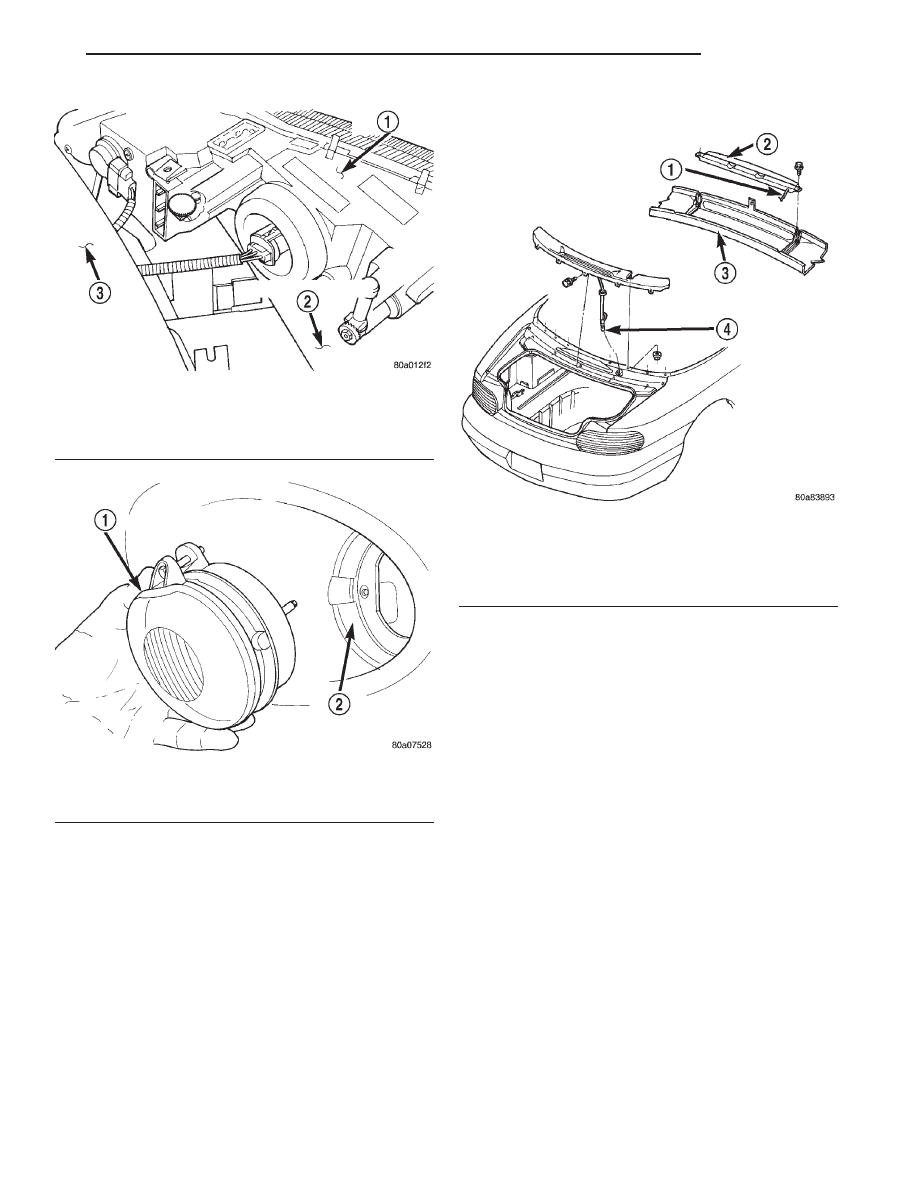
Fig. 2 Headlamp Module

1 – HEADLAMP MODULE
2 – FRONT BUMPER FASCIA
3 – RADIATOR CLOSURE PANEL

Fig. 3 Fog Lamp

1 – FOGLAMP
2 – FASCIA FOGLAMP HOUSING

Fig. 4 Center High Mount Stop Lamp

1 – WIRE HARNESS
2 – CHMSL
3 – UPPER DECK MOLDING
4 – WIRE CONNECTOR

JX

LAMPS

8L - 13

REMOVAL AND INSTALLATION (Continued)

INSTALLATION

(1) Position tail, brake, turn signal, backup and

side marker lamp to vehicle.

(2) Push bulb sockets into back of lamp.
(3) Rotate bulb sockets clockwise one quarter turn.
(4) Position lamp to opening in quarter panel.
(5) Install plastic nuts to attach tail lamp to rear

closure panel in the following sequence: outboard,
center, inboard.

(6) Install trunk lining.

LICENSE PLATE LAMP

REMOVAL

(1) Remove screws attaching license plate lamp to

rear bumper fascia.

(2) Remove license plate lamp from rear fascia

(Fig. 6).

(3) Rotate socket counterclockwise one quarter

turn.

(4) Pull socket from back of lamp.
(5) Remove license plate lamp from vehicle.

INSTALLATION

(1) Position license plate lamp to vehicle.
(2) Push socket into back of lamp.
(3) Rotate socket clockwise one quarter turn.
(4) Position license plate lamp to rear fascia.
(5) Install screws attaching license plate lamp to

rear bumper fascia.

DOOR COURTESY LAMP

REMOVAL

(1) Using a small, flat bladed tool inserted into

rear edge of door courtesy lamp lens, remove lens
(Fig. 7).

(2) Pull courtesy lamp from door trim panel (Fig.

8).

(3) Disengage wire connector from courtesy lamp

bulb socket.

Fig. 5 Tail, Brake, Turn Signal, Backup and Side Marker Lamp

1 – TAIL, STOP, TURN SIGNAL, BACKUP AND SIDEMARKER

LAMP

2 – WIRE HARNESS

Fig. 6 License Plate Lamp

1 – REAR BUMPER FASCIA
2 – LICENSE PLATE LAMP

8L - 14

LAMPS

JX

REMOVAL AND INSTALLATION (Continued)

(4) Remove courtesy lamp from vehicle.

INSTALLATION

(1) Position courtesy lamp from vehicle.
(2) Connect wire connector to courtesy lamp bulb

socket.

(3) Push courtesy lamp into door trim panel (Fig.

8).

(4) Insert front edge of courtesy lamp lens to lamp

housing.

(5) Snap lamp lens into lamp housing.

FRONT MAP LAMP

The front map lamp is not a serviceable compo-

nent. If the front map lamp does not operate prop-
erly, the rear view mirror assembly must be replaced.

ASH RECEIVER/CUP HOLDER LAMP

REMOVAL

(1) Using a small, flat bladed pry tool inserted into

slot in lamp bezel, release tab holding lamp to cubby
bin.

(2) Pull bezel and lamp assembly from cubby bin.
(3) Disconnect wire connector from lamp assembly.
(4) Remove lamp assembly from vehicle.

INSTALLATION

(1) Position lamp assembly to vehicle.
(2) Connect wire connector to lamp assembly.
(3) Push bezel and lamp assembly into cubby bin

to engage tabs.

FLOOR CONSOLE COURTESY LAMP

REMOVAL

(1) Using a small, flat bladed tool inserted into slot

in top edge of courtesy lamp, remove courtesy lamp
from floor console (Fig. 9).

(2) Rotate bulb socket counterclockwise one quar-

ter turn.

(3) Pull bulb socket from courtesy lamp (Fig. 10).
(4) Remove console courtesy lamp from vehicle.

INSTALLATION

(1) Place console courtesy lamp in position.
(2) Push bulb socket into courtesy lamp.
(3) Rotate bulb socket clockwise one quarter turn.
(4) Position lower edge of courtesy lamp to floor

console.

(5) Snap courtesy lamp into floor console.

Fig. 7 Courtesy Lamp Lens

1 – COURTESY LAMP HOUSING
2 – DOOR TRIM PANEL
3 – COURTESY LAMP LENS

Fig. 8 Courtesy Lamp

1 – COURTESY LAMP HOUSING
2 – DOOR TRIM PANEL

Fig. 9 Floor Console Courtesy Lamp

1 – FLOOR CONSOLE
2 – FLOOR CONSOLE COURTESY LAMP

JX

LAMPS

8L - 15

REMOVAL AND INSTALLATION (Continued)

LIGHTED TRANSMISSION RANGE INDICATOR
LETTER BEZEL

REMOVAL

(1) Remove floor console. Refer to Group 23, Body,

for proper procedure.

(2) Disconnect the wire harness connector on bot-

tom-side of floor console.

(3) Disconnect the inverter for lighted Transmis-

sion Range Indicator letter bezel from shifter cover.

(4) Pull bezel downward through access hole in

floor console.

(5) Remove lighted transmission range indicator

letter bezel from vehicle.

INSTALLATION

(1) Position lighted transmission range indicator

letter bezel to vehicle.

(2) Push bezel upward through access hole in floor

console.

(3) Connect inverter for lighted transmission range

indicator letter bezel to shifter cover.

(4) Connect the wire harness connector on bottom-

side of floor console.

(5) Install floor console. Refer to Group 23, Body,

for proper procedure.

SPECIAL TOOLS

LAMP SERVICE

Fig. 10 Floor Console Courtesy Lamp Bulb

1 – FLOOR CONSOLE
2 – BULB
3 – FLOOR CONSOLE COURTESY LAMP

Trim Stick C-4755

8L - 16

LAMPS

JX

REMOVAL AND INSTALLATION (Continued)


Content   ..  260  261  262  263   ..