Chrysler Stratus Convertible. Manual - part 81


  Index      Chrysler     Chrysler Stratus Convertible - service repair manual 1995-2000 year


Search            


Content   ..  79  80  81  82   ..


Chrysler Stratus Convertible. Manual - part 81


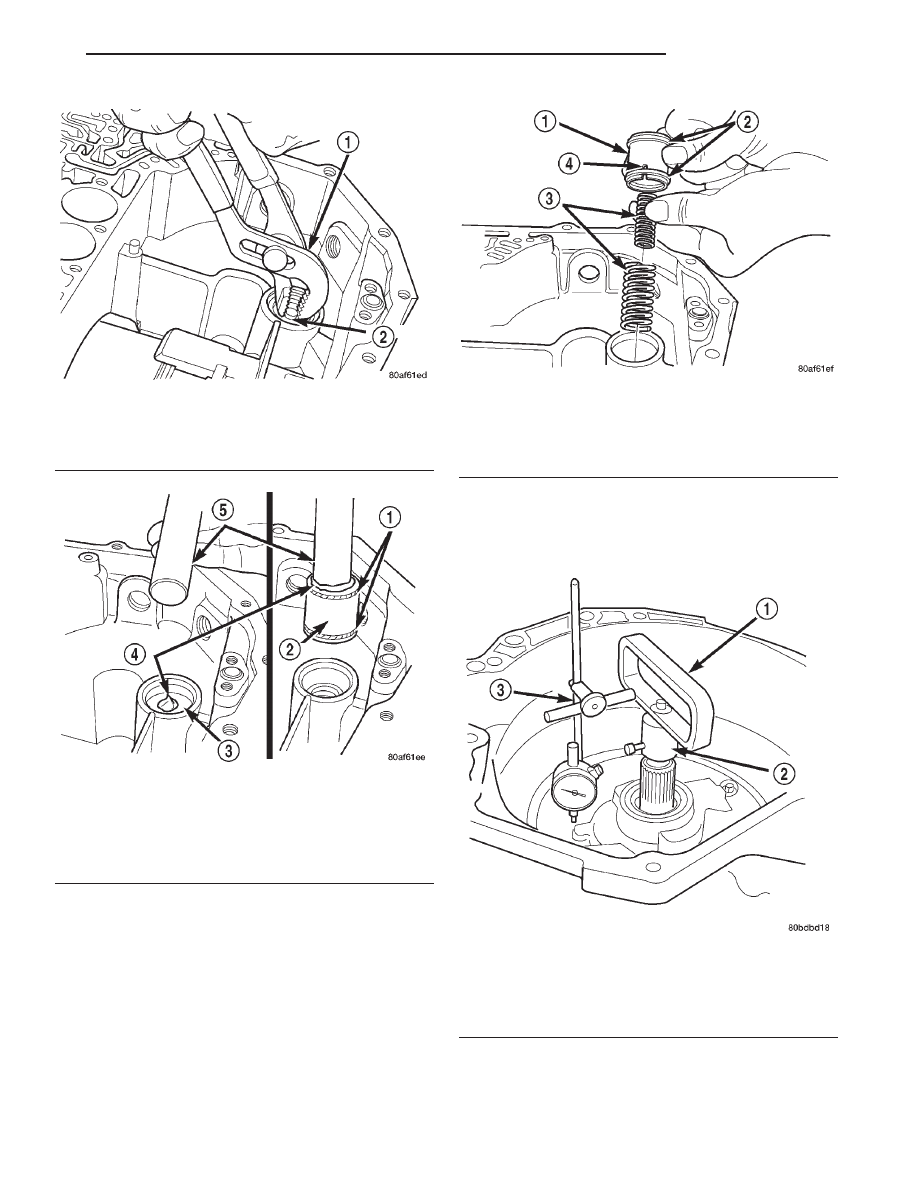
Set up End Play Set 8266 and Dial Indicator Set

C3339 as shown in (Fig. 157). Measure the input
shaft end play with the transaxle in the vertical posi-
tion. This will ensure that the measurement will be
accurate.

Measuring input shaft end play before disassembly

will usually indicate when a #4 thrust plate change
is required. The #4 thrust plate is located behind the
overdrive clutch hub.

Fig. 154 Remove Low/Reverse Accumulator Plug

(Cover)

1 – ADJUSTABLE PLIERS
2 – PLUG

Fig. 155 Remove Low/Reverse Accumulator Piston

1 – SEAL RINGS
2 – PISTON
3 – PISTON
4 – PETROLATUM
5 – SUITABLE TOOL

Fig. 156 Remove Low/Reverse Accumulator

1 – ACCUMULATOR PISTON
2 – SEAL RINGS
3 – RETURN SPRINGS
4 – (NOTE NOTCH)

Fig. 157 Measure Input Shaft End Play Using End

Play Set 8266

1 – TOOL 8266–8
2 – TOOL 8266–2
3 – TOOL C-3339

JX

TRANSAXLE

21 - 63

DISASSEMBLY AND ASSEMBLY (Continued)

Move input shaft in and out to obtain end play

reading. End play specifications are 0.13 to 0.64 mm
(0.005 to 0.025 inch).

Record indicator reading for reference when reas-

sembling the transaxle.

CAUTION: Be sure input speed sensor is removed
before removing oil pump.

Fig. 158 Remove Pump Attaching Bolts

1 – PUMP ATTACHING BOLTS
2 – PUMP HOUSING

Fig. 159 Install Tool C-3752

1 – PULLERS TOOL C-3752
2 – PUMP

Fig. 160 Remove Oil Pump

1 – “PUSH IN” ON INPUT SHAFT WHILE REMOVING PUMP

Fig. 161 Oil Pump Removed

1 – OIL PUMP
2 – GASKET

Fig. 162 Remove Oil Pump Gasket

1 – PUMP GASKET

21 - 64

TRANSAXLE

JX

DISASSEMBLY AND ASSEMBLY (Continued)

OIL PUMP INSPECTION

When disassembling the transaxle it is necessary

to inspect the oil pump for wear and damage.

(1) Remove the reaction shaft support bolts.
(2) Remove reaction shaft support from pump

housing (Fig. 163).

(3) Remove the pump gears and check for wear

and damage.

(4) Install the gears and check clearances.
(5) Measure the clearance between the outer gear

and the pump pocket (Fig. 164). Clearance should be
0.045-0.141mm (0.0018-0.0056 in.)

(6) Position an appropriate piece of Plastigage

across both pump gears.

(7) Align the Plastigage to a flat area on the reac-

tion shaft support housing.

(8) Install the reaction shaft to the pump housing.

Tighten the bolts to 27 N·M (20 ft. lbs.)

(9) Remove bolts and carefully separate the hous-

ings. Measure the Plastigage following the instruc-
tions supplied.

(10) Clearance between outer gear side and the

reaction shaft support should be 0.020-0.046mm
(0.008-0.0018 in.). Clearance between inner gear side
and the reaction shaft support should be 0.020-
0.046mm (0.008-0.0018 in.).

CAUTION: The

cooler

bypass

valve

must

be

replaced if a transaxle failure has occurred. Do not
reuse old valve or attempt to clean old valve. When
installing bypass valve, insert with O-ring end
towards rear of case.

Fig. 163 Reaction Shaft Support

1 – PUMP HOUSING
2 – REACTION SHAFT SUPPORT
3 – PUMP GEARS

Fig. 164 Measure Outer Gear to Pocket

1 – OUTER GEAR
2 – POCKET

Fig. 165 Remove Bypass Valve

1 – COOLER BYPASS VALVE

Fig. 166 Remove Caged Needle Bearing

1 – #1 CAGED NEEDLE BEARING
2 – NOTE: TANGED SIDE OUT

JX

TRANSAXLE

21 - 65

DISASSEMBLY AND ASSEMBLY (Continued)

Fig. 167 Remove Input Clutches Assembly

1 – INPUT CLUTCHES ASSEMBLY
2 – #4 THRUST WASHER

Fig. 168 No. 4 Thrust Plate

1 – OVERDRIVE SHAFT ASSEMBLY
2 – #4 THRUST PLATE (SELECT)
3 – 3 DABS OF PETROLATUM FOR RETENTION

Fig. 169 Remove Front Sun Gear Assembly

1 – FRONT SUN GEAR ASSEMBLY
2 – #4 THRUST WASHER (FOUR TABS)

Fig. 170 Remove Front Carrier and Rear Annulus

Assembly

1 – #6 NEEDLE BEARING
2 – FRONT CARRIER AND REAR ANNULUS ASSEMBLY (TWIST

AND PULL OR PUSH TO REMOVE OR INSTALL).

21 - 66

TRANSAXLE

JX

DISASSEMBLY AND ASSEMBLY (Continued)


Content   ..  79  80  81  82   ..