Chrysler 300M, Dodge Interpid. Manual - part 357


  Index      Chrysler     Chrysler 300M / Concorde / Interpid / LHS, Dodge Interpid - service repair manual 2000-2004 year


Search            


Content   ..  355  356  357  358   ..


Chrysler 300M, Dodge Interpid. Manual - part 357


INSTRUMENT PANEL TOP
COVER

REMOVAL

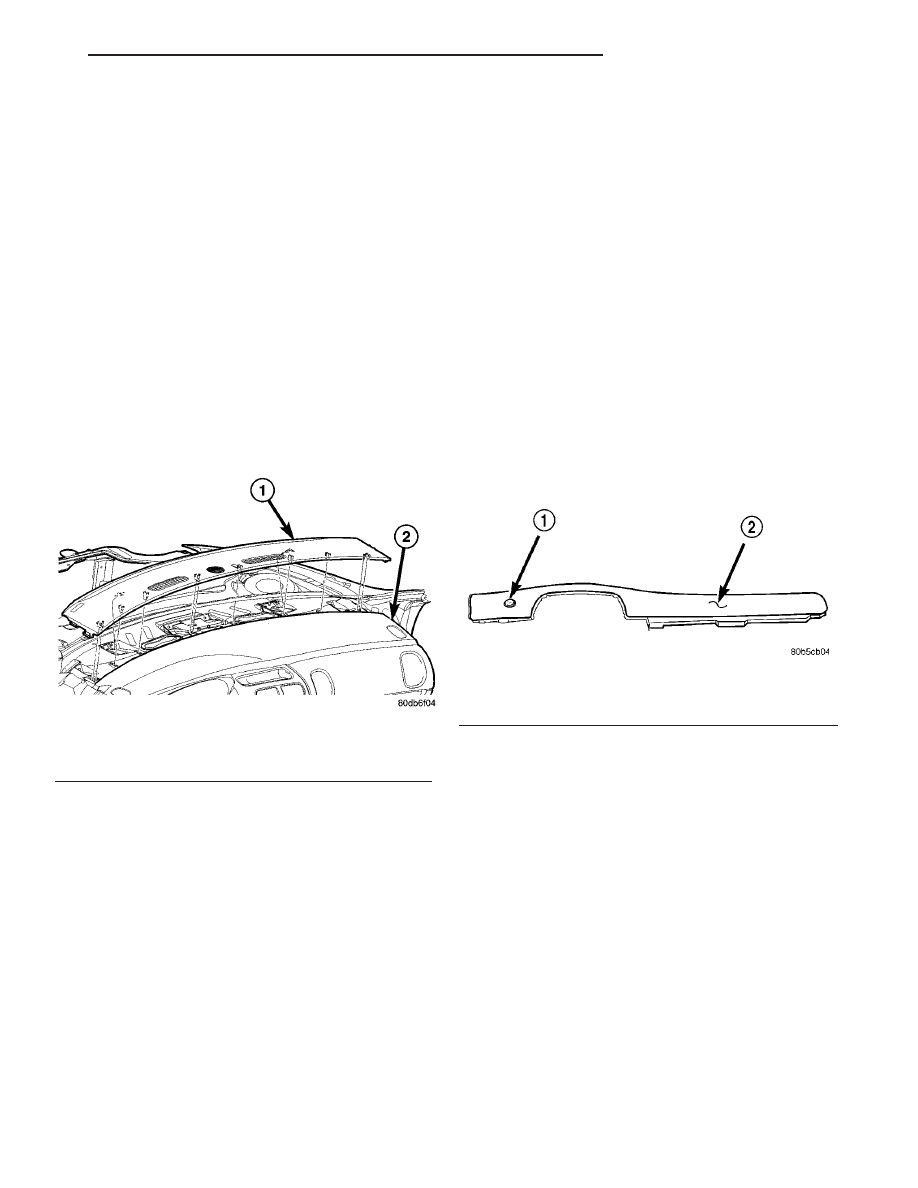
(1) Using a trim stick (special tool #C-4755) or

equivalent, pry out the left and right A-pillar mold-
ings, slide rearward and remove (Fig. 11).

(2) Using a trim stick or equivalent, slip each end

of the instrument panel top cover up to disengaging
clips.

(3) Lift rear edge of the top cover using a trim

stick along the rear edge of the instrument panel top
cover.

(4) Slide the instrument panel top cover rearward

to disengaging the eight clips.

(5) Remove the instrument panel top cover from

vehicle.

INSTALLATION

(1) Place the instrument panel top cover into posi-

tion over the slots for the retaining clips, slide for-
ward and firmly snap into place (Fig. 11).

(2) Firmly push down on the rear of the instru-

ment panel top cover to engage clips.

(3) Place the left and right A-pillar moldings into

position over the retaining clip slots, slide forward
and firmly snap into place.

UPPER RIGHT TRIM
BEZEL(300M)

REMOVAL

(1) Open hood and disconnect the negative battery

cable remote terminal from the remote battery post
(Fig. 1).

(2) Using a trim stick (special tool #C-4755) or

equivalent, gently pry out on center instrument
panel bezel.

(3) Open glove box and remove four screws along

bottom edge of trim bezel.

(4) Remove one screw in center bezel area.
(5) Loosen the lower right edge of steering column

cover, then loosen upper right corner of steering col-
umn cover.

(6) Using a trim stick or equivalent, gently pry

bezel away from the instrument panel and disconnect
the traction control switch connector.

(7) Remove upper right trim bezel from vehicle

(Fig. 12).

INSTALLATION

(1) Position upper right trim bezel over slots in

instrument panel and firmly snap into place. If
equipped with traction control, connect connector.

(2) Tighten the lower right edge of steering column

cover, then tighten upper right corner of steering col-
umn cover.

(3) Install the one screw in center bezel area.
(4) Install the four screws along bottom edge of

trim bezel and close glove box.

(5) Position center instrument panel bezel over

slots and firmly snap into place.

(6) Connect the negative battery cable remote ter-

minal to the remote battery post (Fig. 1).

Fig. 11 INSTRUMENT PANEL TOP COVER

1 - INSTRUMENT PANEL TOP COVER
2 - INSTRUMENT PANEL

Fig. 12 UPPER RIGHT TRIM BEZEL

1 - TRACTION CONTROL SWITCH
2 - UPPER RIGHT TRIM BEZEL

LH

INSTRUMENT PANEL

23 - 57

STORAGE BIN - 5 PASSENGER
VEHICLES

REMOVAL

(1) Open hood and disconnect the negative battery

cable remote terminal from the remote battery post
(Fig. 1).

(2) Remove ash receiver (if applicable).
(3) Using a trim stick (special tool #C-4755), gently

pry out on center trim bezel. Disconnect wiring connec-
tors to HVAC controls, cigar lighter/auxiliary power out-
let and traction control switch (if equipped).

(4) Remove instrument panel center trim bezel.
(5) Remove two retaining screws to the storage bin

and remove.

INSTALLATION

(1) Install the two retaining screws to the storage

bin.

(2) Install the instrument panel center trim bezel.
(3) Connect wiring connectors to HVAC controls,

cigar lighter/auxiliary power outlet and traction con-
trol switch (if equipped).

(4) Firmly snap the center trim bezel into place.
(5) Install the ash receiver (if applicable).
(6) Connect the negative battery cable remote ter-

minal to the remote battery post (Fig. 1).

STORAGE BIN - 6 PASSENGER
VEHICLES

REMOVAL

(1) Remove one screw and one push pin to the

lower instrument panel (Fig. 13).

(2) Pull rearward and remove the floor bin.

INSTALLATION

(1) Place the instrument panel bin into position

and firmly snap into place.

(2) Install one screw and one push pin to the lower

instrument panel.

STEERING COLUMN COVER

REMOVAL

(1) Remove the left end cover.
(2) Remove two screws attaching steering column

cover (Fig. 14).

(3) Pull rearward on steering column cover to

release the retaining clips on the top and right edge.

INSTALLATION

(1) Place steering column cover into position (Fig.

14).

(2) Push on steering column cover till retaining

clips lock into position.

(3) Install two attaching screws to the side of the

steering column cover.

(4) Install end cover.

Fig. 13 CENTER FLOOR BIN

1 - INSTRUMENT PANEL
2 - INSTRUMENT PANEL FLOOR BIN

Fig. 14 STEERING COLUMN COVER

1 - INSTRUMENT PANEL
2 - STEERING COLUMN COVER

23 - 58

INSTRUMENT PANEL

LH

STEERING COLUMN COVER
REINFORCEMENT

REMOVAL

(1) Remove steering column cover (Refer to 23 -

BODY/INSTRUMENT PANEL/STEERING COLUMN
OPENING COVER - REMOVAL).

(2) Remove four bolts attaching steering column

cover reinforcement (Fig. 15).

(3) Remove diagnostic connector from the steering

column cover reinforcement.

(4) Remove steering column cover reinforcement

from vehicle.

INSTALLATION

(1) Place steering column cover reinforcement in

position.

(2) Connect diagnostic connector to the steering

column cover reinforcement.

(3) Install the four bolts attaching steering column

cover reinforcement (Fig. 15).

(4) Install steering column cover (Refer to 23 -

BODY/INSTRUMENT PANEL/STEERING COLUMN
OPENING COVER - INSTALLATION).

Fig. 15 STEERING COLUMN COVER

REINFORCEMENT

1 - INSTRUMENT PANEL
2 - STEERING COLUMN BRACKET
3 - CROSS CAR BEAM
4 - STEERING COLUMN COVER REINFORCEMENT

LH

INSTRUMENT PANEL

23 - 59

INTERIOR

TABLE OF CONTENTS

page

page

A-PILLAR TRIM

REMOVAL

. . . . . . . . . . . . . . . . . . . . . . . . . . . . . 61

INSTALLATION

. . . . . . . . . . . . . . . . . . . . . . . . . 61

ASSIST HANDLE

REMOVAL

. . . . . . . . . . . . . . . . . . . . . . . . . . . . . 61

INSTALLATION

. . . . . . . . . . . . . . . . . . . . . . . . . 61

BODY VENT

REMOVAL

. . . . . . . . . . . . . . . . . . . . . . . . . . . . . 61

INSTALLATION

. . . . . . . . . . . . . . . . . . . . . . . . . 61

B-PILLAR LOWER TRIM

REMOVAL

. . . . . . . . . . . . . . . . . . . . . . . . . . . . . 62

INSTALLATION

. . . . . . . . . . . . . . . . . . . . . . . . . 62

B-PILLAR UPPER TRIM

REMOVAL

. . . . . . . . . . . . . . . . . . . . . . . . . . . . . 62

INSTALLATION

. . . . . . . . . . . . . . . . . . . . . . . . . 62

CROSS CAR BEAM

REMOVAL

. . . . . . . . . . . . . . . . . . . . . . . . . . . . . 62

INSTALLATION

. . . . . . . . . . . . . . . . . . . . . . . . . 62

CARPETS

REMOVAL

. . . . . . . . . . . . . . . . . . . . . . . . . . . . . 63

INSTALLATION

. . . . . . . . . . . . . . . . . . . . . . . . . 63

CENTER CONSOLE ARMREST LID ASSEMBLY

REMOVAL

. . . . . . . . . . . . . . . . . . . . . . . . . . . . . 64

INSTALLATION

. . . . . . . . . . . . . . . . . . . . . . . . . 64

CENTER CONSOLE BEZEL

REMOVAL

. . . . . . . . . . . . . . . . . . . . . . . . . . . . . 64

INSTALLATION

. . . . . . . . . . . . . . . . . . . . . . . . . 64

CENTER CONSOLE BEZEL - WOOD TRIM

REMOVAL - WOOD TRIM

. . . . . . . . . . . . . . . . . 65

INSTALLATION - WOOD TRIM

. . . . . . . . . . . . . 65

CENTER CONSOLE CUPHOLDER ASSEMBLY

REMOVAL - CONCORD

. . . . . . . . . . . . . . . . . . 66

INSTALLATION

. . . . . . . . . . . . . . . . . . . . . . . . . 66

CENTER CONSOLE LID LATCH

REMOVAL

. . . . . . . . . . . . . . . . . . . . . . . . . . . . . 66

INSTALLATION

. . . . . . . . . . . . . . . . . . . . . . . . . 66

CENTER CONSOLE REAR BEZEL

REMOVAL

. . . . . . . . . . . . . . . . . . . . . . . . . . . . . 66

INSTALLATION

. . . . . . . . . . . . . . . . . . . . . . . . . 66

CENTER CONSOLE SIDE PANELS

REMOVAL

REMOVAL - CONCORD

. . . . . . . . . . . . . . . . . 67

REMOVAL

. . . . . . . . . . . . . . . . . . . . . . . . . . . 67

INSTALLATION

INSTALLATION - CONCORD

. . . . . . . . . . . . . 67

INSTALLATION

. . . . . . . . . . . . . . . . . . . . . . . 67

DOOR SILL TRIM

REMOVAL

. . . . . . . . . . . . . . . . . . . . . . . . . . . . . 67

INSTALLATION

. . . . . . . . . . . . . . . . . . . . . . . . . 67

FLOOR CONSOLE

REMOVAL

. . . . . . . . . . . . . . . . . . . . . . . . . . . . . 67

INSTALLATION

. . . . . . . . . . . . . . . . . . . . . . . . . 68

FRONT DOOR WINDOW FRAME MOLDING

REMOVAL

. . . . . . . . . . . . . . . . . . . . . . . . . . . . . 69

INSTALLATION

. . . . . . . . . . . . . . . . . . . . . . . . . 69

HEADLINER

REMOVAL

. . . . . . . . . . . . . . . . . . . . . . . . . . . . . 69

INSTALLATION

. . . . . . . . . . . . . . . . . . . . . . . . . 70

ROOF STRUCTURAL MEMBRANE

REMOVAL

. . . . . . . . . . . . . . . . . . . . . . . . . . . . . 70

INSTALLATION

. . . . . . . . . . . . . . . . . . . . . . . . . 71

LOWER QUARTER TRIM

REMOVAL

. . . . . . . . . . . . . . . . . . . . . . . . . . . . . 71

INSTALLATION

. . . . . . . . . . . . . . . . . . . . . . . . . 71

REAR SHELF TRIM PANEL

REMOVAL

. . . . . . . . . . . . . . . . . . . . . . . . . . . . . 71

INSTALLATION

. . . . . . . . . . . . . . . . . . . . . . . . . 72

REAR VIEW MIRROR

REMOVAL

. . . . . . . . . . . . . . . . . . . . . . . . . . . . . 72

INSTALLATION

INSTALLATION

. . . . . . . . . . . . . . . . . . . . . . . 72

INSTALLATION - REARVIEW MIRROR

SUPPORT BRACKET . . . . . . . . . . . . . . . . . . . 72

REAR SEAT GRAB HANDLE/READING LAMP

REMOVAL

. . . . . . . . . . . . . . . . . . . . . . . . . . . . . 73

INSTALLATION

. . . . . . . . . . . . . . . . . . . . . . . . . 73

SUN VISOR

REMOVAL

. . . . . . . . . . . . . . . . . . . . . . . . . . . . . 73

INSTALLATION

. . . . . . . . . . . . . . . . . . . . . . . . . 73

TRUNK LINING

REMOVAL

. . . . . . . . . . . . . . . . . . . . . . . . . . . . . 74

INSTALLATION

. . . . . . . . . . . . . . . . . . . . . . . . . 74

UPPER QUARTER TRIM

REMOVAL

. . . . . . . . . . . . . . . . . . . . . . . . . . . . . 74

INSTALLATION

. . . . . . . . . . . . . . . . . . . . . . . . . 74

UNDER REAR SHELF SILENCER

REMOVAL

. . . . . . . . . . . . . . . . . . . . . . . . . . . . . 74

INSTALLATION

. . . . . . . . . . . . . . . . . . . . . . . . . 74

WHEELHOUSE SILENCER

REMOVAL

. . . . . . . . . . . . . . . . . . . . . . . . . . . . . 75

INSTALLATION

. . . . . . . . . . . . . . . . . . . . . . . . . 75

23 - 60

INTERIOR

LH


Content   ..  355  356  357  358   ..