Chrysler 300/300 Touring/300C, Dodge Magnum. Manual - part 2125


  Index      Chrysler     Chrysler 300/300 Touring/300C, Dodge Magnum - service repair manual


Search            


Content   ..  2123  2124  2125  2126   ..


Chrysler 300/300 Touring/300C, Dodge Magnum. Manual - part 2125


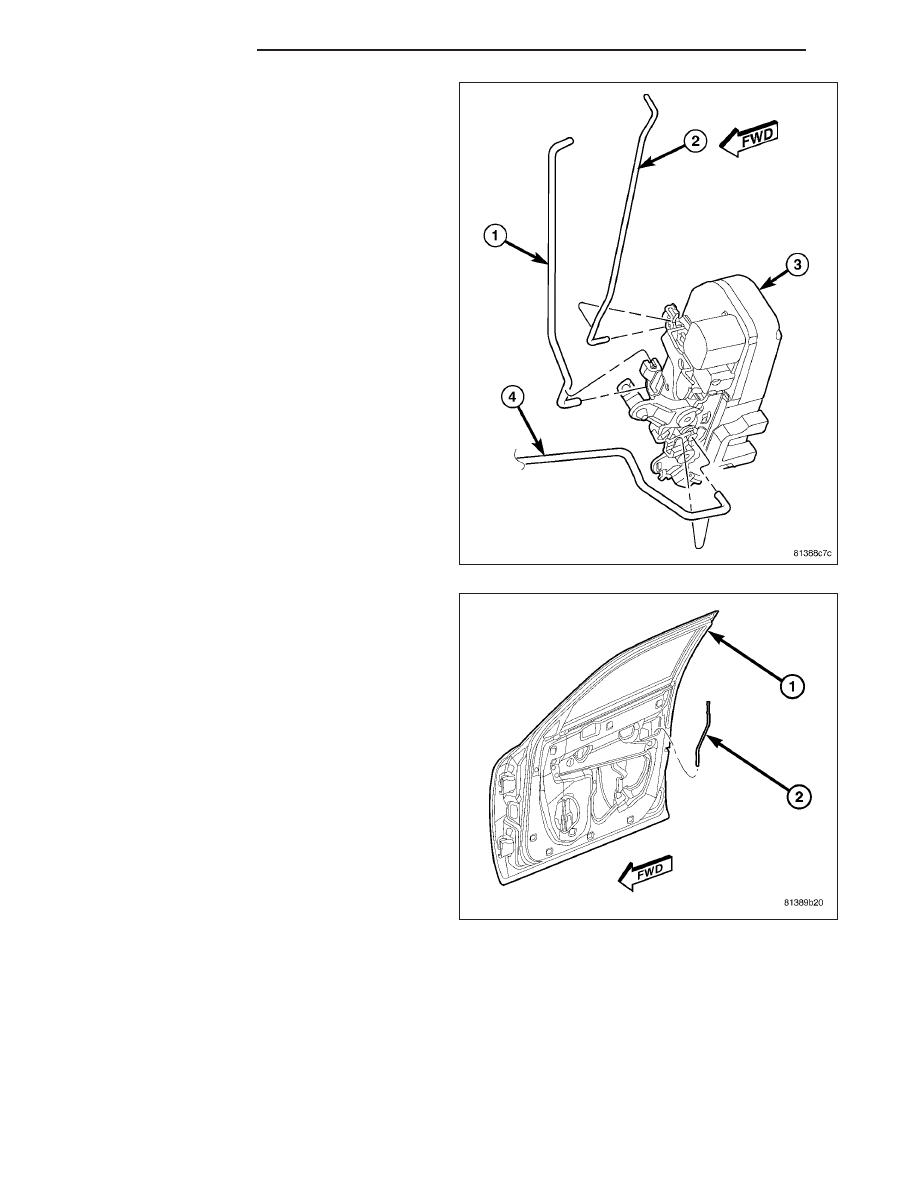
4. For the driver side front door only, reach into the

back of the door shell to engage the lock cylinder
actuator link (2) to the latch lever and snap the
plastic clip over the link to secure it to the latch (3).

5. Reach into the back of the door shell to engage the

exterior door handle latch release link (1) to the
latch lever and snap the plastic clip over the link to
secure it to the latch.

6. Reach into the back of the door shell to engage the

end of the interior door handle latch release link (4)
to the latch lever and snap the plastic clip over the
link to secure it to the latch.

7. Position the interior door latch lock link and knob

unit (2) into the front door (1).

23 - 48

DOOR - FRONT

LX

8. Reach into the back of the door shell to engage the

end of the interior door latch lock link (1) to the
latch lever and snap the plastic clip over the link to
secure it to the latch (2).

9. With the upper screw (1) hand-started into the pull

cup bracket (2), position the screw into the keyed
hole on the inside of the front door.

10. Install and tighten the screw (3) that secures the

bottom of the pull cup bracket and the bottom of
the window regulator rear rail to the inside of the
front door. Tighten the screw to 11 N·m (100 in.
lbs.).

11. Tighten the screw that secures the top of the pull

cup bracket to the inside of the front door. Tighten
the screw to 10 N·m (90 in. lbs.).

12. Reinstall the watershield onto the inside of the

front door. (Refer to 23 - BODY/DOOR - FRONT/
WATERSHIELD - INSTALLATION).

13. Reinstall the speaker onto the inside of the front

door.

(Refer

to

8

-

ELECTRICAL/AUDIO/

SPEAKER - INSTALLATION).

14. Reinstall the trim panel onto the inside of the front

door. (Refer to 23 - BODY/DOOR - FRONT/TRIM
PANEL - INSTALLATION).

15. Use a wrench inserted through the access slot on

the outer latch face of the front door shell (1) to
loosen the hex socket latch release adjusting
screw (3) on the latch (2).

16. Cycle the door outside latch release handle

through its full travel two or three times.

17. Tighten the adjusting screw.

LX

DOOR - FRONT

23 - 49

LOCK CYLINDER

REMOVAL

NOTE: A door lock cylinder is used only on the
driver side front door exterior handle.

1. Remove the handle (1) from the outside of the

driver side front door. (Refer to 23 - BODY/DOOR -
FRONT/EXTERIOR HANDLE - REMOVAL).

2. Using hand pressure, push on the face of the lock

cylinder (2) until it pops out of the cavity in the
back of the door handle.

INSTALLATION

NOTE: A door lock cylinder is used only on the
driver side front door exterior handle.

1. Insert the lock cylinder (2) into the cavity on the

back of the door handle (1).

2. Align the lock cylinder in the handle by engaging

the tab (3) on the outer circumference of the cylin-
der in the slot of the tab (4) on the wall of the han-
dle cavity.

3. Reinstall the handle onto the outside of the driver

side front door. (Refer to 23 - BODY/DOOR -
FRONT/EXTERIOR HANDLE - INSTALLATION).

23 - 50

DOOR - FRONT

LX

STRIKER

REMOVAL

1. Open the front door.

2. Mark the front door latch striker (3) location on the

face of the outer B-pillar (1) to aid reinstallation.

3. Remove the two screws (2) that secure the striker

to the B-pillar.

4. Remove the striker from the B-pillar.

INSTALLATION

1. Position the front door latch striker (3) on the face

of the outer B-pillar (1).

2. Install and tighten the two screws (2) that secure

the striker to the B-pillar. Tighten the screws to 33
N·m (24 ft. lbs.).

3. Adjust the latch striker position as necessary to

achieve proper door spacing and latch operation.

LX

DOOR - FRONT

23 - 51


Content   ..  2123  2124  2125  2126   ..