Chery Tiggo 5 (T21). Manual - part 255


  Index      Chery     Chery Tiggo 5 (T21) - service repair manual 2014 year


Search            


Content   ..  253  254  255  256   ..


Chery Tiggo 5 (T21). Manual - part 255


23–

15

23

Disassembly

HINT:

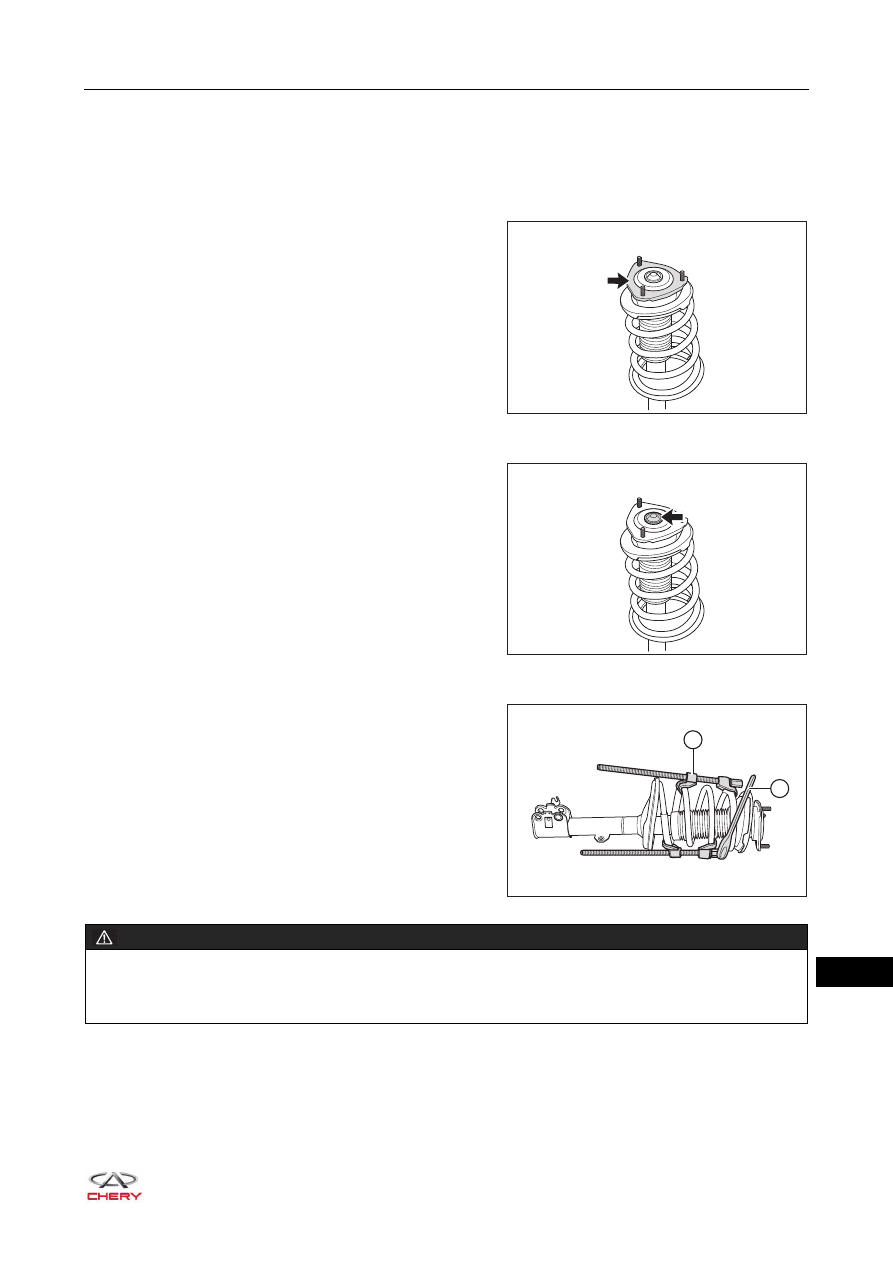
 Use the same procedures for the right side and left side.

 Procedures listed below are for the left side.
1. Remove the front shock absorber cushion.

a. Remove the front cushion (arrow) from front left shock 

absorber assembly.

2. Remove the front shock absorber upper cover.

a. Remove the front shock absorber upper cover (arrow) 

from front left shock absorber assembly.

3. Remove the locking nut from front shock absorber assembly.

a. Install the spring compressor (1), and tighten the end 

lever of spring compressor with a wrench (2) to 
compress the front coil spring.

RT21230070

RT21230080

RT21230090

1

2

WARNING

 When removing front coil spring, compress spring until locking nut can be rotated. DO NOT compress 

the coil spring more than necessary, avoid damaging the spring and personal injury.

23–

16

23

b. Hold the end of front left shock absorber assembly 

lever with an inner hexagon wrench, and then remove 
the locking nut (arrow) from front left shock absorber 
assembly with a fixing wrench.

(Tightening torque: 82 ± 5 N·m)

4. Remove the connecting bracket assembly.

a. Remove the connecting bracket assembly (arrow) 

from upper part of front left shock absorber assembly.

5. Remove the bearing washer.

a. Remove the bearing washer (arrow) from upper part 

of front left shock absorber assembly.

6. Remove the front spring upper tray.

a. Remove the front spring upper tray (arrow) from upper 

part of front left shock absorber assembly.

RT21230100

RT21230110

RT21230120

RT21230130

23–

17

23

7. Remove the dust boot.

a. Remove the dust boot (arrow) from upper part of front 

left shock absorber assembly.

8. Remove the front coil spring.

a. Remove the front left coil spring (1) with spring 

compressor (arrow) from front left shock absorber 
assembly.

b. Slowly loosen the spring compressor, and carefully remove the front left coil spring.

9. Remove the front buffer block.

a. Detach and remove the front buffer block (arrow) from 

front left shock absorber assembly.

10.Remove the front spring lower cushion.

a. Detach the front spring lower cushion (arrow) from 

positioning hole at the lower end of front left shock 
absorber assembly strut and remove it.

RT21230140

RT21230150

1

RT21230160

RT21230170

23–

18

23

Inspection

1. Check front shock absorber assembly.

Manual inspection:
a. Install the locking nut (1) to the upper end of front 

shock absorber assembly strut, and then install the 
T-wrench (2) or equivalent.

b. Compress and extend the front shock absorber 

assembly strut several times by hands in the direction 
of arrow as shown in the illustration. Check that there 
is no abnormal resistance or unusual sound during 
operation. If there is any abnormality, replace the front 
shock absorber assembly with a new one.

2. Check the other components of front shock absorber assembly.

a. Check front shock absorber upper cover, front shock absorber cushion, bearing washer, dust boot, front 

buffer block and front spring lower cushion for cracks, wear or deformation. Replace as necessary.

b. Check connecting bracket assembly and front spring upper tray for damage. Replace as necessary.
c. Check front coil spring for wear, cracks or deformation. Replace as necessary.

Assembly

Assembly is in the reverse order of disassembly.

Installation

Installation is in the reverse order of removal.

RT21230180

2

1

CAUTION

 Make sure to align protrusion of front spring lower cushion and positioning hole at the lower end of front 

shock absorber assembly strut during installation.

CAUTION

 Always tighten coupling bolts and nuts to the specified torque.
 Check wheel alignment after installation is completed. Adjust the wheel alignment to standard range as 

necessary.


Content   ..  253  254  255  256   ..