Chery QQ6 (S21) / S12LHD. Manual - part 135


  Index      Chery     Chery QQ6 (S21) / S12LHD - service repair manual


Search            


Content   ..  133  134  135  136   ..


Chery QQ6 (S21) / S12LHD. Manual - part 135


3. Notes 

3.1.  Please  wear  necessary  labour  protection  supplies  to  avoid  any 
accident. 
3.2.  Disconnect  the  battery  to  avoid  damaging  the  eletrical 
equipment.   
3.3 Use the correct method to disassemble and assemble the glass to 
avoid damage. 

4. Removal Steps 

4.1. Remove the left-front vehicle door weather strip. The fixing clip 
of  the  vehicle  door  weather  strip  are  “-”  shaped,  and  when 
disassembling  it,  press  the  weather  strip  downward,  and  then  push 
the weather strip to one side till you can see part of the clip. And go 
on  to  push  it  to  the  opposite  direction  to  show  another  part  of  it. 
Don’t  pull  the  weather  strip  vertically  so  as  not  to  damage  the 
weather strip. 


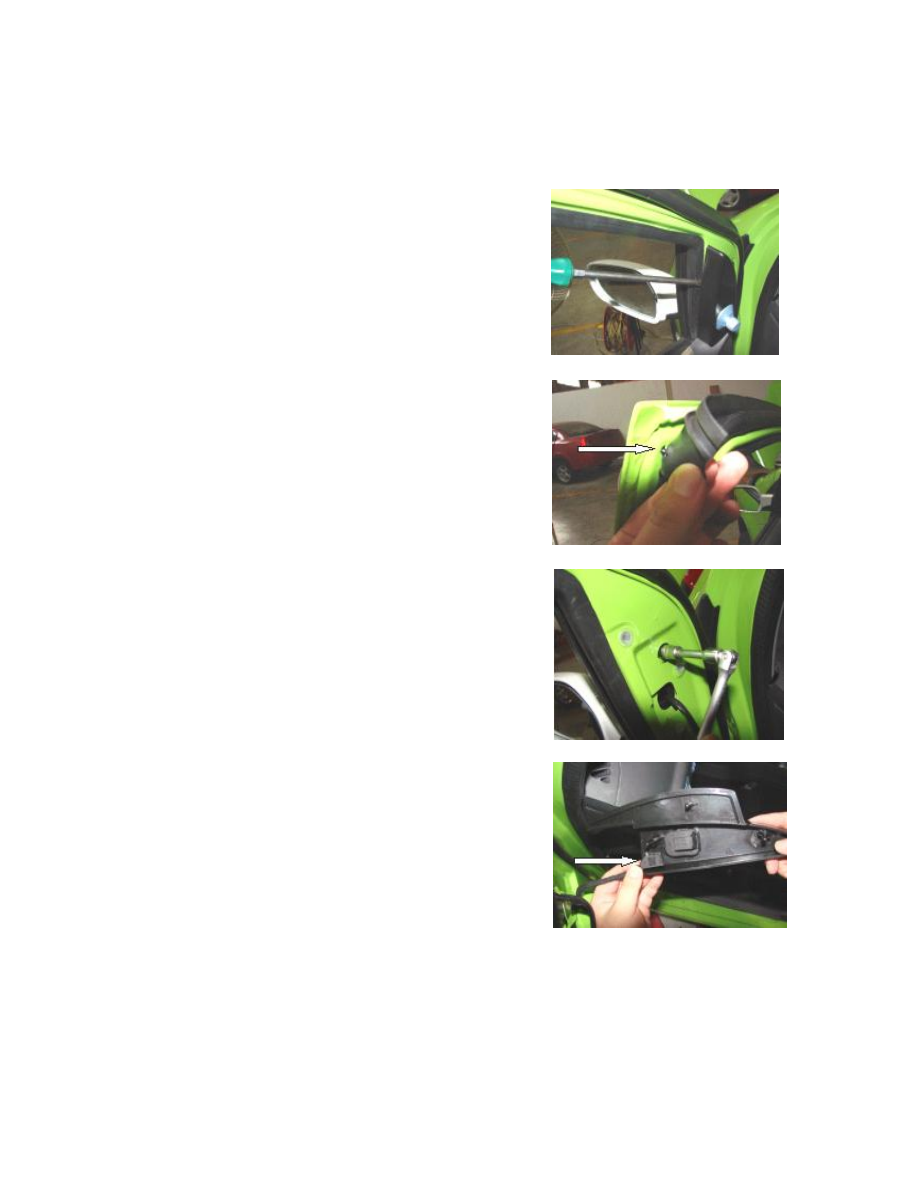
4.2.  Use  a  flat  head  screwdriver  to  pry  up  the  plastic  decorative 
block fixing the rearview mirror outside the vehicle door. 


4.3. Use a 10# sleeve wrench to loosen off the two screws fixing the 
outside rearview mirror. 


4.4.  Pull  off  the  electrically-adjustable  outside  rearview  mirror 
harness connector and take off the outside rearview mirror assembly. 


4.5. Use a cross head screwdriver to loosen  off the  four screws that 
fix the shield inside the door. 


4.6. Use a cross head screwdriver to loosen  off the screw that  fixes 
the handle inside the vehicle door. 


4.7.  Use  a  flat  head  screwdriver  to  pry  off  the  plastic  cover  of  the 
screw  hole  for  the  handle  inside  the  vehicle  door,  and  then  remove 
the  fixing screw with a cross head screwdriver so as to  disassemble 
the lock assembly inside the door. 


4.8. Pull of the vehicle alarm connector.   


4.9. Remove the shield inside the door.   


4.10. Pull off the power window up-down switch connector. 


4.11.  Use  a  cross  head  screwdriver  to  loosen  off  the  two  screws  of 
the front door handle fixing mount. 


4.11. Tear off the anti-water plastic sheeting on the left-front door.   


4.12.  Connect  the  battery  and  plug  in  the  window  up-down  switch 
plug, lower the window glass to a proper position and loosen off the 
two screws that fix the glass. 


4.13. Take out the glass carefully. 


4.14.  Use  a  10#  sleeve  to  loosen  off  the  five  screws  that  fix  the 
window glass up-down regulator. 


4.15.  Loosen  off  the  screws,  and  then  pull  off  the  window  glass 
up-down  motor  connector  to  take  out  the  window  glass  up-down 
regulator assembly. 


Content   ..  133  134  135  136   ..