Acura RSX Honda Integra. Manual - part 318


  Index      Acura     Acura RSX Honda Integra - service repair manual 2002-2006 year


Search            


Content   ..  316  317  318  319   ..


Acura RSX Honda Integra. Manual - part 318


12

13

*01

14-398

Transmission End Cover

End Cover Installation (cont’d)

6 x 1.0 mm
12 N·m
(1.2 kgf·m, 8.7 lbf·ft)

D

A

B

C

6 x 1.0 mm
12 N·m (1.2 kgf·m, 8.7 lbf·ft)

A

C

D

B

E

6 x 1.0 mm
12 N·m
(1.2 kgf·m,
8.7 lbf·ft)

F

F

E

D

B, C

A

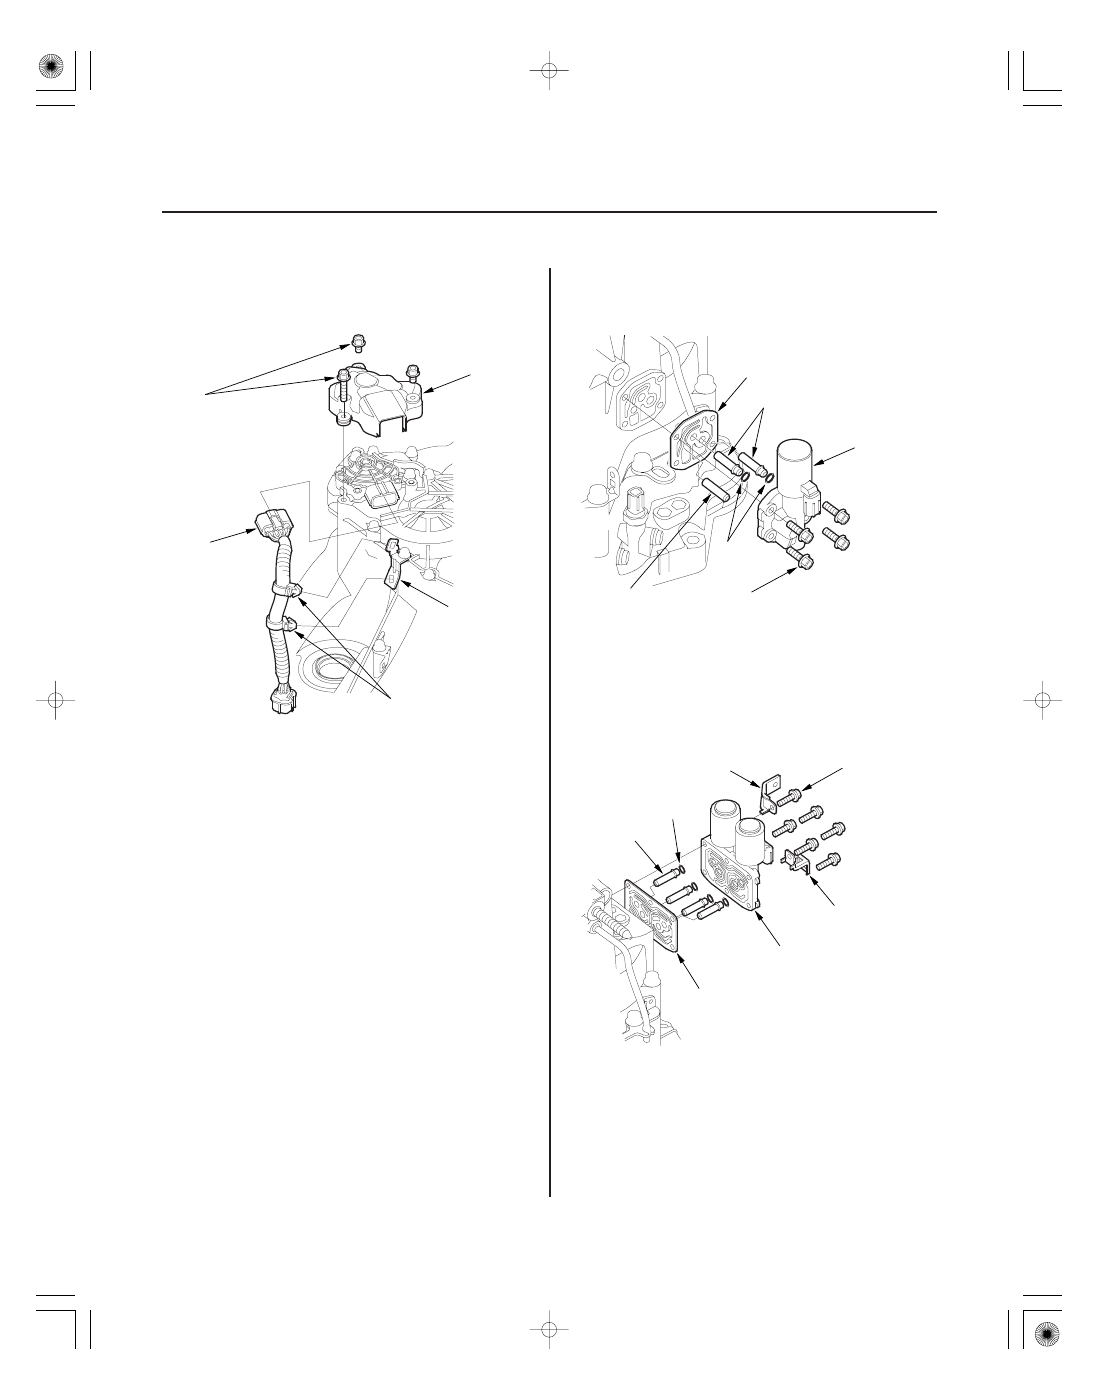
26. Connect the transmission range switch connector

(A) securely, then install the harness clamps (B) on
the clamp bracket (C).

27. Install the transmission range switch cover (D).

28. Install the new gasket (A) on the transmission

housing, and install the ATF pipe (B) and ATF joint
pipes (C).

29. Install the new O-rings (D) over the ATF joint pipes.

30. Install the A/T clutch pressure control solenoid

valve A (E).

31. Install the new gasket (A) on the transmission

housing, and install the ATF joint pipes (D).

32. Install the new O-rings (E) over the ATF joint pipes.

33. Install the A/T clutch pressure control solenoid

valves B and C, and harness clamp brackets (F).

05/06/27 17:59:59 61S6M040_140_0399

02

15

14-399

A

C

F

E

D

12 x 1.25mm
28 N·m
(2.9 kgf·m,
21 lbf·ft)

6 x 1.0mm
12 N·m
(1.2 kgf·m, 8.7 lbf·ft)

12 x 1.25mm
28 N·m (2.9 kgf·m, 21 lbf·ft)

B

B

A

E

C

D

34. Install the ATF cooler inlet line (A) with the new

sealing washers (B), and install the bracket (C) of
the ATF cooler inlet line on the shift solenoid valve
cover hole (D) in Shaft Assembly and Housing
Installation (see step 22 on page 14-393).

35. Install the ATF cooler outlet line (E) with the new

sealing washers (F).

36. Install the breather tube (A) with facing the dot (B)

on the tube in a rearward position (differential side),
then install the other end (C) in the slot (D) of the
transmission hanger (E).

37. Install the ATF dipstick.

05/06/27 18:00:00 61S6M040_140_0400

*01

S6M6A02E10411600000DAAT00

01

S6M6A02E10411619621MAAT00

Standard: 0.05

0.15 mm (0.002

0.006 in.)

14-400

14-400

A/T Differential

Component Location Index

Backlash Inspection

THRUST SHIM, 76 mm

THRUST WASHER, 76.2 mm

BEARING OUTER RACE

CARRIER BEARING

FINAL DRIVEN GEAR

DIFFERENTIAL CARRIER

CARRIER BEARING

THRUST WASHER, 80 mm

BEARING OUTER RACE

B

A

A

1. Install the driveshaft and intermediate shaft on the

differential, then place the axles on V-blocks.

2. Check the backlash of the pinion gears (A) with a

dial indicator (B).

3. If the backlash is out of standard, replace the

differential carrier.

Selection, page 14-405

Replacement, page 14-403

Replacement, page 14-401

Replacement,

page 14-401

Backlash Inspection,

page 14-400

Replacement, page 14-401

Replacement, page 14-401

Replacement, page 14-403

05/06/27 18:00:01 61S6M040_140_0401

01

02

S6M6A02E10411619611KBAT00

01

S6M6A02E10411619621KBAT10

Special Tools Required

14-401

14-401

Carrier Bearing Replacement

Differential Carrier, Final Driven
Gear Replacement

B

C

D

A

07LAD-PW50601

10 x 1.0 mm
103 N·m
(10.5 kgf·m,
75.9 lbf·ft)

A

B

Attachment, 40 x 50 mm 07LAD-PW50601

NOTE:

• The bearing and bearing outer race should be

replaced as a set.

• Inspect and adjust the carrier bearing preload

whenever bearing is replaced.

• Check the bearing for wear and rough rotation. If the

bearing is OK, removal is not necessary.

1. Remove the carrier bearing (A) with a commercially

available puller (B), bearing separator (C), and
stopper adapter (D).

2. Install the new bearings with the special tool using

the small end and a press until it bottoms. Press the
bearing on securely so there is no clearance
between the bearing and the differential carrier.

1. Remove the final driven gear from the differential

carrier, and replace the differential carrier or final
driven gear.

2. Install the final driven gear (A) in the direction

shown on the differential carrier (B).

NOTE: Differential carrier bolts have left-hand
threads.

05/06/27 18:00:02 61S6M040_140_0402


Content   ..  316  317  318  319   ..