Acura RL (1996-2004 year). Manual - part 715


  Index      Acura     Acura RL 1996-2004 year - service repair manual


Search            


Content   ..  713  714  715  716   ..


Acura RL (1996-2004 year). Manual - part 715


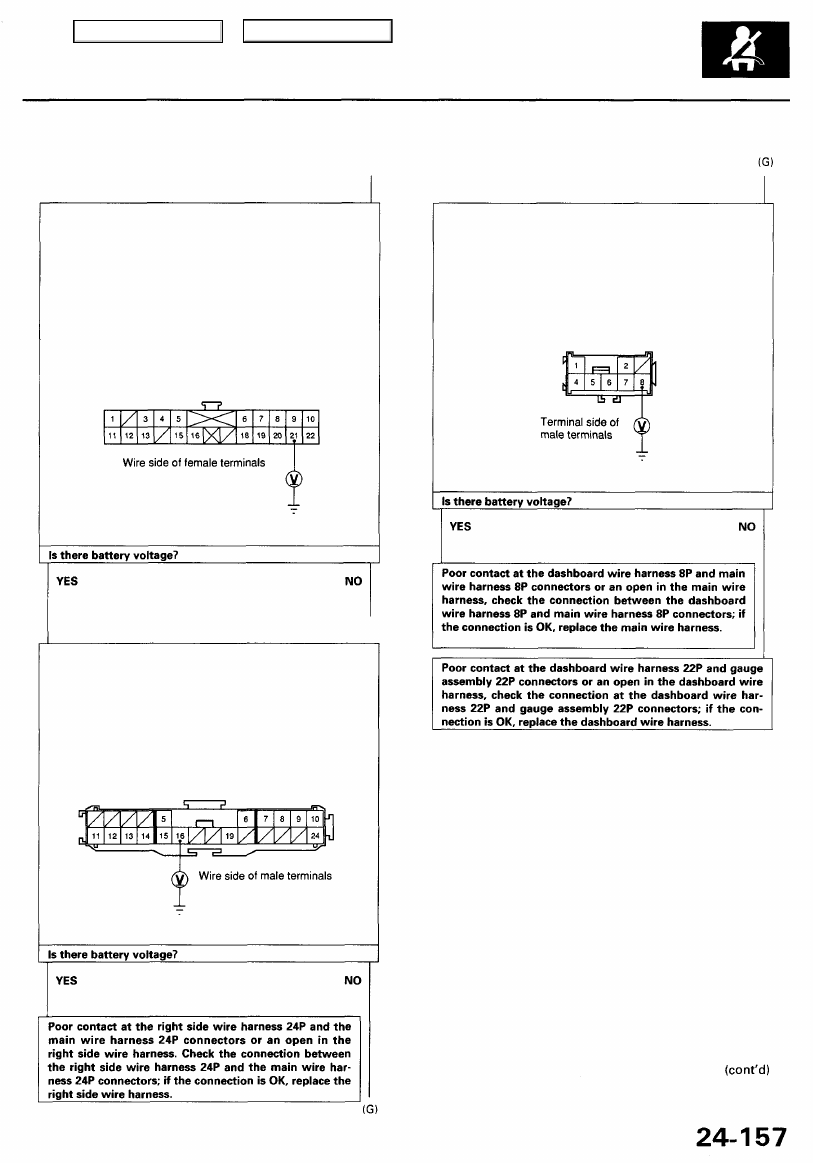
Check for an open between the dashboard wire harness and
the main wire harness:

1. Turn the ignition switch OFF.

2. Disconnect the main wire harness 24P connector from

the right side wire harness (see page 

24-97

).

3. Turn the ignition switch ON (II).

4. Check for voltage between the No. 16 terminal of main

wire harness 24P connector and body ground.
There should be battery voltage.

To page 

24-158

 (F)

Check for an open in the dashboard wire harness:

1. Turn the ignition switch OFF.

2. Disconnect the dashboard wire harness 8P connector

from the main wire harness (see page 

24-93

).

3. Turn the ignition switch ON (II).
4. Check for voltage between the No. 8 terminal of the

dashboard wire harness 8P connector and body ground.
There should be battery voltage.

From page 

24-157

 (D)

Check for an open between the left engine compartment
wire harness and the dashboard wire harness:

1. Turn the ignition switch OFF.

2. Touch a tester positive probe to the No. 21 terminal of

the dashboard wire harness 22P connector. Do not dis-
connect the dashboard wire harness 22P connector from
the gauge assembly.

3. Turn the ignition switch ON (II).
4. Check for voltage between the No. 21 terminal of the

d a s h b o a r d wire  h a r n e s s 22P connector and body
ground.
There should be battery voltage.

Main Menu

Table of Contents

DTC 15-2 (cont'd)

Troubleshooting - '99 - 01 Models

From page 

24-157

 (F)

Check for an open between the left engine compartment
wire harness and the dashboard wire harness.

1. Turn the ignition switch OFF.

2. Disconnect the dashboard wire harness 22P connector

from the gauge assembly (see page 

24-93

).

3. Turn the ignition switch ON (II).
4. Check for voltage between the No. 22 terminal of the

dashboard wire harness 22P connector and body
ground.
There should be battery voltage.

Check for a short to ground (2):

1. Turn the ignition switch OFF.

2. Disconnect the right side wire harness 24P connector

(see page 

24-97

).

3. Turn the ignition switch ON (II).

Check for a short to ground (3):

1. Turn the ignition switch OFF.

2. Disconnect the dashboard wire harness 8P connector

from the main wire harness (see page 

24-93

).

3. Turn the ignition switch ON (II).

Check for a short to ground (4):

1. Turn the ignition switch OFF.

2. Disconnect the dashboard wire harness 22P connector

from the gauge assembly (see page 

24-93

).

3. Turn the ignition switch ON (II).

From page 

24-155

 (B)

Open between the left engine compartment wire harness
and the dashboard wire harness; refer to 

section 23

 and

continue troubleshooting.

Check for a short to ground (1):

1. Turn the ignition switch OFF.

2. Disconnect the OPDS unit wire harness 8P connector

from the OPDS unit (see page 

24-92

).

3. Turn the ignition switch ON (II).

Main Menu

Table of Contents

DTC15-3

CAUTION: Whenever the ignition switch is ON (II), or has
been turned OFF for less than 3 minutes, be careful not
to bump the SRS unit or the side impact sensor; the
airbags could accidentally deploy and cause damage or
injuries.

Main Menu

Table of Contents

Airbag

Replacement

Store a removed airbag with the pad sur-

face up. If the airbag is improperly stored face down,
accidental deployment could propel the unit with
enough force to cause serious injury.

CAUTION:

• Do not install used SRS parts from another vehicle.

When repairing, use only new SRS parts.

• Carefully inspect the airbag before you install it. Do

not install an airbag that shows signs of being
dropped or improperly handled, such as dents,
cracks or deformation.

• Always disconnect the airbag connector(s) when the

harness is disconnected.

• Do not disassemble or tamper with the airbag.

1. Make sure you have the anti-theft code for the

radio, then write down the frequencies for the
radio's preset buttons.

2. Disconnect the battery negative cable, then discon-

nect the positive cable from the battery, and wait at
least 3 minutes.

3. Disconnect the airbag connector(s):

Driver's Airbag:
• Remove the access panel from the steering wheel,

then disconnect the 2P connector between the driv-
er's airbag and cable reel.

'96 - 98 Models

Front Passenger's Airbag:
• Remove the glove box (see 

section 20

).

• Disconnect the 2P ('96 - 98 Models) or 4P ('99 - 01

Models) connector between the front passenger's
airbag and SRS main harness.

NOTE: When disconnected, the airbag connector is
automatically shorted.

Main Menu

Table of Contents


Content   ..  713  714  715  716   ..