Acura RL (1996-2004 year). Manual - part 486


  Index      Acura     Acura RL 1996-2004 year - service repair manual


Search            


Content   ..  484  485  486  487   ..


Acura RL (1996-2004 year). Manual - part 486


SLEEVE SEAL RING GUIDE

07SAG - SW50100

 or

07SAG - SW5010A

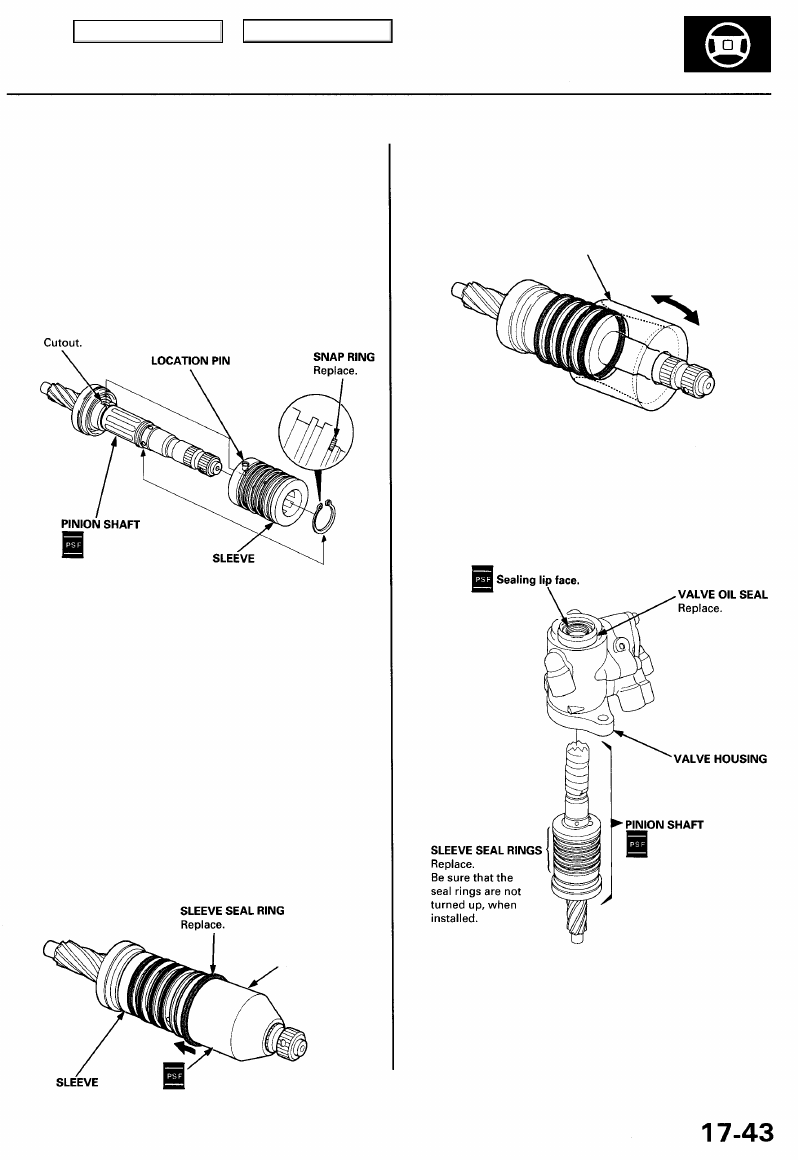
27. Insert the pinion shaft into the valve housing.

CAUTION: Be careful not to damage the valve seal
rings.

28. Remove the vinyl tape from the pinion shaft.

(cont'd)

20. Apply power steering fluid to the surface of the pin-

ion shaft. Assemble the sleeve over the pinion shaft
by aligning the locating pin on the inside of the
sleeve with the cutout in the shaft. Then install the

new snap ring securely in the pinion shaft groove.

NOTE:
• Be careful not to damage the valve seal ring

when inserting the sleeve.

• Install the snap ring with its radiused side facing

in.

23. Apply power steering fluid to the seal rings on the

sleeve, and to the entire inside surface of the spe-
cial tool.

PISTON SEAL RING
SIZING TOOL

07GAG - SD40200

o

07GAG - SD4020A

24. Insert the sleeve into the special tool slowly.
25. Move the sleeve each direction several times to

make the seal rings snugly fit in the sleeve.

NOTE: Be sure that the seal rings are not turned up.

26. Apply vinyl tape to the pinion shaft, then coat the

vinyl tape with power steering fluid.

21. Apply power steering fluid to the surface of the spe-

cial tool. Set the new seal rings over the special tool
from the smaller diameter end of the tool, and
expand the seal rings.

NOTE:
• Do not over-expand the seal ring. Install the resin

seal rings with care so as not to damage them.
After installation, be sure to contract the seal

rings using the special tool (sizing tool).

• There are two types of sleeve seal rings: black

and brown. Do not mix the different types of
sleeve seal rings as they are not compatible.

22. Set the special tool in the grooves in the sleeve, and

set each ring in each groove securely.

NOTE: After installation, compress the seal rings

with your fingers temporarily.

Main Menu

Table of Contents

33. Position the new O-ring and new piston seal ring on

the special tool, then slide them down toward the

big end of the tool.

NOTE:
• Do not over expand the resin seal rings. Install

the resin seal rings with care so as not to dam-
age them. After installation, be sure to contract
the seal ring using the special tool (sizing tool).

• Replace piston's O-ring and seal ring as a set.

34. Pull the O-ring off into the piston groove, then pull

the piston seal ring off into the piston groove on top

of the O-ring.

PISTON SEAL RING
GUIDE

07LAG - SM40100

 or

07LAG - SM4010A

32. Coat the piston seal ring guide with power steering

fluid, and slide it onto the rack, big end first.

30. Apply steering grease on the valve oil seal, and

install the pinion dust cover on the valve body unit.

Steering Rack Installation

31. If the rubber stop was removed, position the new

rubber stop in the gearbox housing, then press it in
using a hydraulic press and the special tools as
shown.

NOTE: Make sure that the special tool presses
against the metal portion of the rubber stop.

Power Steering Gearbox

Reassembly (cont'd)

29. Press the pinion shaft/sleeve into the valve housing

using a hydraulic press as shown.

DRIVER

07749-0010000

ATTACHMENT,
32 x 35 mm

07746-0010100

Main Menu

Table of Contents

40. Install the cylinder end seal onto the steering rack

with its grooved side toward the piston.

CAUTION: When installing the cylinder end seal,
be careful not to damage the sealing lip face of the
seal with the edges or teeth of the steering rack.

41. Remove the vinyl tape from the steering rack.

Remove any residue of tape adhesive.

42. Install the new backup ring on the steering rack,

then place the cylinder end seal to piston.

36. Carefully slide the tool onto the rack and over the

piston seal ring.

37. Move the special tool back and forth several times

to make the piston seal ring fit snugly in the piston.

38. Wrap vinyl tape around the rack teeth and rack end

edges, then coat the surface of the tape with the

power steering fluid.

NOTE: Make sure that the vinyl tape is wrapped

carefully so that there is no stepped portion.

PISTON SEAL RING

SIZING TOOL

07LAG-SM40200

 or

07LAG-SM4020A

39. Coat the inside surface of the new cylinder end seal

with power steering fluid.

35. Coat the piston seal ring and the inside of the special

tool with power steering fluid.

Main Menu

Table of Contents

44. Insert 6" long 3/8" drive extension and the special

tool into the steering rack as shown.

45. Install the cylinder end seal into the bottom of the

cylinder by pressing on the tool with a press as
shown.

CAUTION: Do not push on the tool with excessive

force as it may damage the cylinder end seal.

47. Coat the inside surface of the new cylinder end seal

with power steering fluid.

48. Install the cylinder end seal onto the steering rack

with its grooved side toward the piston.
CAUTION: When installing the cylinder end seal,
be careful not to damage the sealing lip face of the
seal with the edges of the steering rack.

49. Remove the vinyl tape from the steering rack, then

push in the cylinder end seal with your finger.
NOTE:
• Remove any residue of tape adhesive.
• Take care not to damage the cylinder end seal

with the threads and burrs at the staked position
of the gearbox housing.

50. Install the special tool to the gearbox housing, then

clamp the tool in a vise with soft jaws as shown.
CAUTION: Do not clamp the cylinder.

CYLINDER END SEAL

REMOVER ATTACHMENT

07NAD-SR3020A

Power Steering Gearbox

Reassembly (cont'd)

43. Grease the steering rack teeth, then insert the steer-

ing rack into the gearbox housing.

CAUTION: Be careful not to damage to inner sur-
face of the cylinder wall with the rack edges.

46. Wrap vinyl tape around the rack end edges, and

coat the surface of the tape with the power steering
fluid.

NOTE: Make sure that the vinyl tape is wrapped care-

fully so that there is no stepped portion.

Main Menu

Table of Contents


Content   ..  484  485  486  487   ..