Acura RL (1996-2004 year). Manual - part 316


  Index      Acura     Acura RL 1996-2004 year - service repair manual


Search            


Content   ..  314  315  316  317   ..


Acura RL (1996-2004 year). Manual - part 316


4.

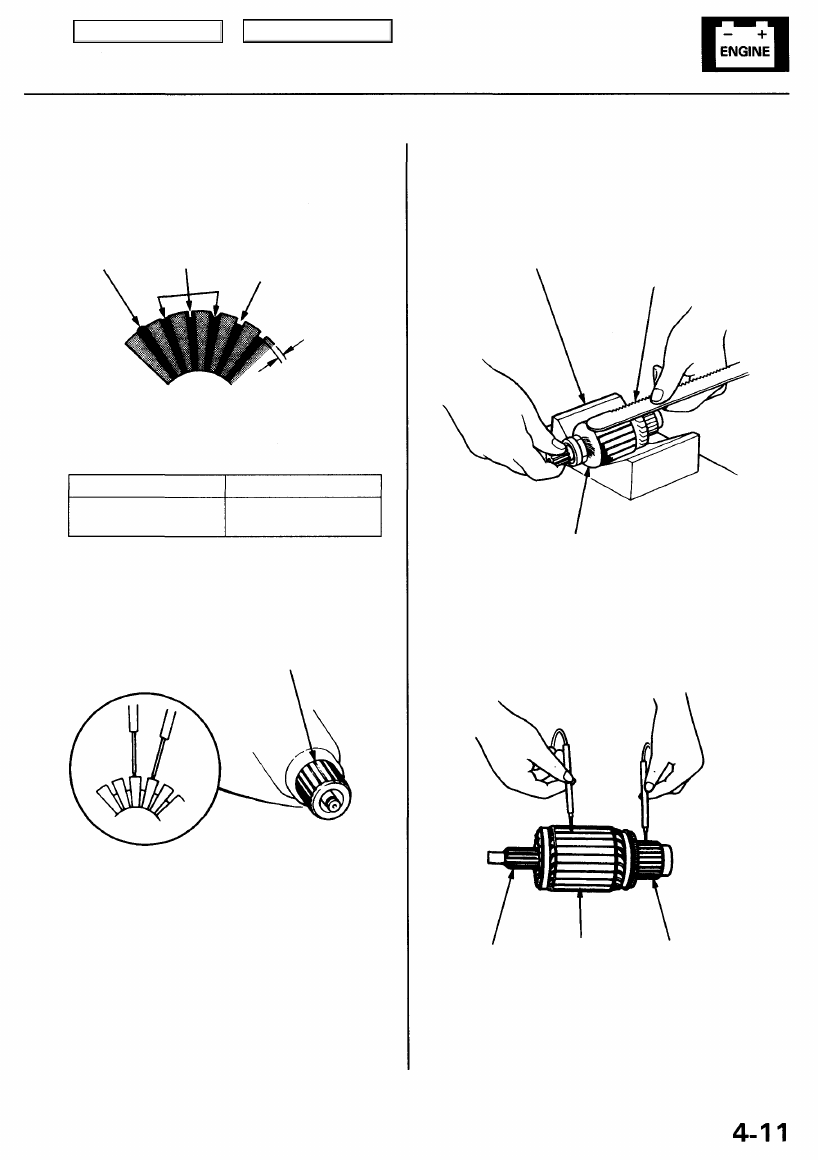
Check for mica depth. If necessary, undercut the mica

with a hacksaw blade to achieve proper depth. If the
service limit cannot be maintained, replace the arma-
ture.

NO-GOOD

GOOD

MICA DEPTH

Commutator Mica Depth

Standard (NEW)

0.5-0.8 mm

(0.020-0.031 in)

Service Limit

0.20 mm

(0.008 in)

5.

Check for continuity between the segments of the
commutator. If an open circuit exists between any
segments, replace the armature.

COMMUTATOR SEGMENT

6.

Place the armature on an armature tester. Hold a
hacksaw blade on the armature core. If the blade is

attracted to the core or vibrates while the core is
turned, the armature is shorted. Replace the arma-
ture.

ARMATURE TESTER

HACKSAW BLADE

ARMATURE

7. With an ohmmeter, check that no continuity exists

between the commutator and armature coil core,
and between the commutator and armature shaft. If
there is continuity, replace the armature.

SHAFT

COIL CORE

COMMUTATOR

HIGH
MICA

Main Menu

Table of Contents

Starting System

Starter Brush Holder Test

1.

Check that there is no continuity between the and

brush holders. If there is continuity, replace the

brush holder assembly.

BRUSH HOLDER

BRUSH HOLDER

BRUSH HOLDER

2.

Insert the brush into the brush holder, and bring the
brush into contact with the commutator, then attach
a spring scale to the spring. Measure the spring ten-
sion at the moment the spring lifts off the brush.

SPRING SCALE
(Commercially available)

SPRING

BRUSH

Spring Tension

29.1 - 37.8 N (2.97 - 3.85 kgf, 6.548 - 8.488 Ibf)

Starter Brush Inspection

Measure the brush length. If the length not within the

service limit, replace the brush holder assembly.

Brush Length

Standard (NEW)

18 mm

(0.71 in)

Service Limit

10 mm

(0.39 in)

BRUSH

NOTE: To seat new brushes after installing them in their
holders, slip a strip of #500 or #600 sandpaper, with the

grit side up, over the commutator, and smoothly rotate
the armature. The contact surface of the brushes will be
sanded to the same contour as the commutator.

BRUSH HOLDER

Main Menu

Table of Contents

Planetary Gear Inspection

Check if the planetary gears are worn or damaged. If they
are, also check the condition of the armature shaft gear
and ring gear.

ARMATURE
SHAFT GEAR

RING
GEAR

PLANETARY GEARS

Overrunning Clutch Inspection

Slide the overrunning clutch along the shaft.
Does it move freely? If not, replace it.

1.

2.

Rotate the overrunning clutch both ways.
Does it lock in one direction and rotate smoothly in
reverse? If it does not lock in either direction or it
locks in both directions, replace it.

SHAFT

3.

4.

DRIVE GEAR

If the starter drive gear is worn or damaged, replace

the overrunning clutch assembly; the gear is not avail-
able separately.

Check the condition of the torque converter ring gear
if the starter drive gear teeth are damaged.

Main Menu

Table of Contents

Starting System

Overrunning Clutch Removal

1. Put the end of a pipe (inner diameter 13 mm (0.51 in))

against the pinion stop, and strike the pipe to force

the pinion stop over the spring clip.

A: 13 mm (0.51 in)

PINION STOP

PIPE

SPRING CLIP

PLANETARY GEAR SHAFT

NOTE: Be careful not to damage the planetary gear

shaft when striking the pipe.

2. Remove the spring clip then pull the pinion stop

and overrunning clutch off the shaft.

SPRING CLIP

PINION STOP

Starter Reassembly

NOTE: Use the illustration on page 

4-8

 as reference for

reassembly.

1. Pry back each brush spring with a screwdriver, then

position the brush about halfway out of its holder,
and release the spring to hold it there.

2. Install the armature in the housing. Next pry back

each brush spring again and push the brush down

until it seats against the commutator, then release

the spring against the end of the brush.

3. Install the end cover on the brush holder.

END COVER

BRUSH HOLDER

Main Menu

Table of Contents


Content   ..  314  315  316  317   ..