Acura RL (1996-2004 year). Manual - part 277


  Index      Acura     Acura RL 1996-2004 year - service repair manual


Search            


Content   ..  275  276  277  278   ..


Acura RL (1996-2004 year). Manual - part 277


Evaporative Emission (EVAP) Controls

Description

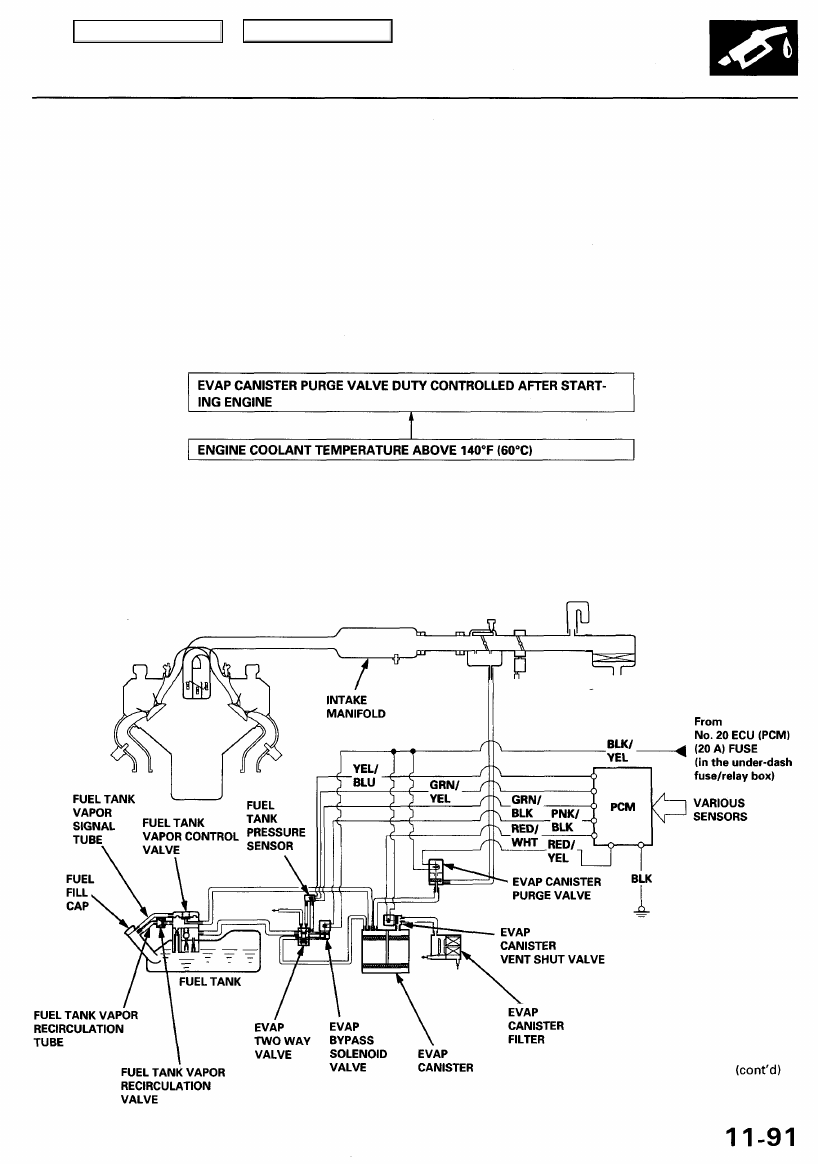
The evaporative emission controls are designed to minimize the amount of fuel vapor escaping to the atmosphere. The
system consists of the following components:

A. Evaporative Emission (EVAP) Canister

An EVAP canister is used for the temporary storage of fuel vapor until the fuel vapor can be purged from the EVAP
canister into the engine and burned.

B. Vapor Purge Control System

EVAP canister purging is accomplished by drawing fresh air through the EVAP canister and into a port on the throttle
body. The purging vacuum is controlled by the EVAP canister purge valve.

C. Fuel Tank Vapor Control System

When fuel vapor pressure in the fuel tank is higher than the set value of the EVAP two way valve, the valve opens and

regulates the flow of fuel vapor to the EVAP canister.

During refueling, the fuel tank vapor control valve opens with the pressure in the fuel tank, and feeds the fuel vapor to

the EVAP canister.

Main Menu

Table of Contents

Emission Control System

Evaporative Emission (EVAP) Controls (cont'd)

The HDS or the scan tool indicates Diagnostic Trouble Code (DTC) P1456: Evaporative Emission (EVAP) control

system leak detected (fuel tank system).

Troubleshooting Flowchart

Is the proper fuel fill cap installed
and properly tightened?

YES

Check the fuel fill cap seal:
Check the fuel fill cap seal.

Is the fuel fill cap seal missing or

damaged?

NO

Is the fuel filler pipe damaged?

NO

Fuel fill cap is OK. Do the EVAP
canister purge valve test (see
page 

11-93

).

Replace or tighten the cap.

Replace the fuel fill cap (gray col-
ored cap).

Replace the fuel filler pipe.

11-92

— The MIL has been reported on.
— DTC P1456 is stored.

Check the fuel fill cap:
Check the fuel fill cap (the cap
must be a Honda cap and be
tightened at least three "clicks" to
properly seal the system).

Main Menu

Table of Contents

EVAP canister purge valve test.

Check the EVAP canister purge
valve:

1. Disconnect the vacuum hose

from the EVAP canister purge
valve, and connect a hose and
a vacuum pump to the EVAP
canister purge valve.

2. Turn the ignition switch ON (II).
3. Apply vacuum to the hose.

Dose the valve hold vacuum?

Is there continuity?

YES

Check for a short in the wire (PCS
line):

1. Disconnect the PCM connector

A (26P).

2. Check for continuity between

the EVAP canister purge valve

2P connector terminal No. 1
and body ground.

Is there continuity?

NO

Substitute a known-good PCM
and recheck. If symptom/indica-
tion goes away, replace the origi-
nal PCM.

EVAP canister purge valve is OK.
Do the EVAP bypass solenoid

valve test (see page 

11-94

).

Replace the EVAP canister purge
valve.

Repair short in the wire between
PCM (A23) and EVAP canister
purge valve.

Check the EVAP canister purge
valve:

1. Turn the ignition switch OFF.

2. Disconnect the EVAP canister

purge valve 2P connector.

3. Check for continuity between

the EVAP canister purge valve
2P connector terminal No. 1
and body ground.

Main Menu

Table of Contents

Emission Control System

Evaporative Emission (EVAP) Controls (cont'd)

EVAP bypass solenoid valve test.

Check the EVAP bypass solenoid
valve:

1. Disconnect the vacuum hose

from the EVAP two-way
valve, and connect a vacuum

pump to the hose.

2. Connect the PCM connector

terminal F1 to the body
ground with a jumper wire.

3. Turn the ignition switch ON (II).
4. Apply vacuum to the hose.

Dose the valve hold vacuum?

Is there battery voltage?

EVAP TWO-WAY
VALVE

VACUUM

PUMP/
GAUGE,
0 - 30 in.Hg

A973X -
041-
XXXXX

EVAP
BYPASS
SOLENOID
VALVE

EVAP bypass solenoid valve/
EVAP two-way valve is OK. Do
the EVAP canister vent shut
valve test
 (see page 

11-95

).

NO

Repair open in the wire between

the EVAP bypass solenoid valve
and PCM (F1).

Replace the EVAP bypass solenoid
valve and O-rings.

Is there continuity?

Check for an open in the wire (IG1
line):

1. Turn the ignition switch ON (II).

2. Measure voltage between the

EVAP bypass solenoid valve
2P connector terminal No. 1
and body ground.

Repair open in the wire between

the EVAP bypass solenoid valve
and No. 20 ECU (PCM) (20 A).

Main Menu

Table of Contents


Content   ..  275  276  277  278   ..