Acura CSX. Manual - part 675


  Index      Acura     Acura CSX - P/NO. 61SNR03 - service repair manual 2006-2009 year


Search            


Content   ..  673  674  675  676   ..


Acura CSX. Manual - part 675


13

03

15

04

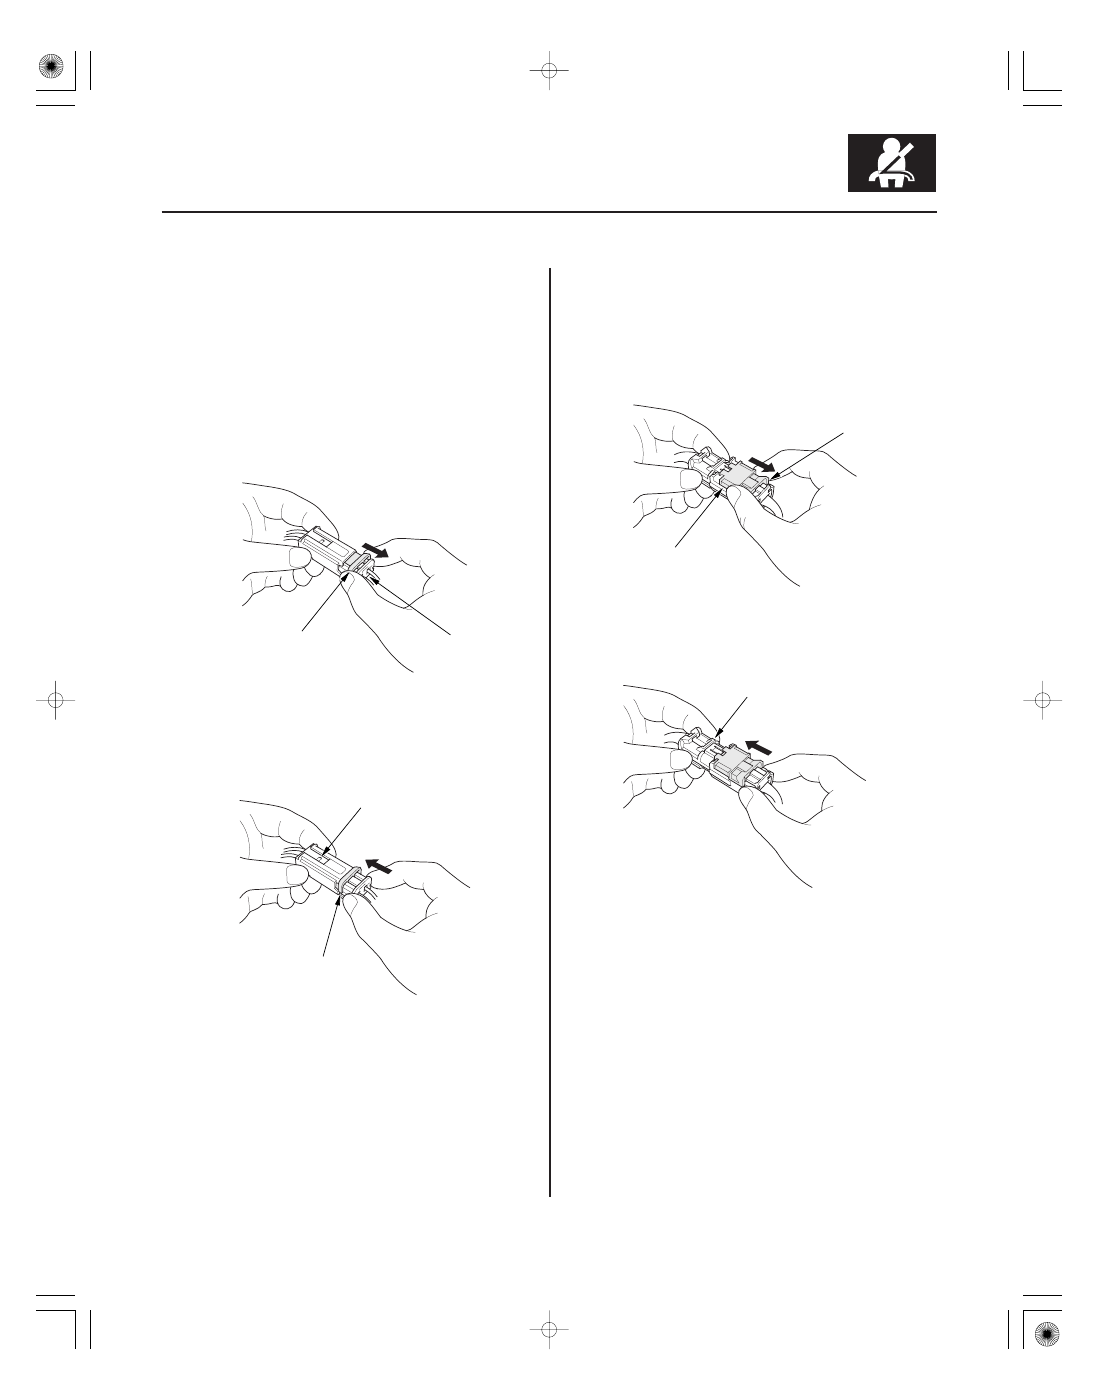
Spring-loaded Lock Connector

Front Airbag Connectors

Disconnecting

Connecting

Side Airbag Connector

Disconnecting

Connecting

24-17

A

B

B

A

A

B

A

Some SRS system connectors have a spring-loaded
lock.

To release the lock, pull the spring-loaded sleeve (A)
toward the stop (B) while holding the opposite half of
the connector. Then pull the connector halves apart. Be
sure to pull on the sleeve and not on the connector.

To reconnect, hold the pawl-side connector, and press
on the back of the sleeve-side connector in the direction
shown. As the two connector halves are pressed
together, the sleeve (A) is pushed back by the pawl (B).
Do not touch the sleeve.

To release the lock, pull the spring-loaded sleeve (A)
toward the stop (B) while holding the opposite half of
the connector. Then pull the connector halves apart. Be
sure to pull on the sleeve and not on the connector half.

Hold both connector halves, and press them firmly
together until the projection (A) of the sleeve-side
connector clicks.

08/08/21 13:54:20 61SNR030_240_0017

*01

18

19

Opening the SRS Unit Shorting Connectors
for Diagnosis

Special Tools Required

24-18

SRS

B

070AZ-SAA0100

SRS UNIT

A

SRS UNIT CONNECTOR A (28P)

SRS UNIT CONNECTOR B (28P)

SRS short canceller 070AZ-SAA0100

NOTE:

• To prevent damage to the connector cavity, insert

short canceller straight into the cavity from the
terminal side.

• Before installing a short canceller, wash it with

electrical contact cleaner, then dry it with
compressed air.

• Do not use a short canceller if it is damaged.
• Make sure to remove the short canceller before

reconnection.

• Some systems store data in memory that is lost when

the battery is disconnected. Before disconnecting the
battery, refer to Battery Terminal Disconnection and
Reconnection (see page 22-68).

When SRS unit connectors A (28P) and B (28P) are
disconnected, a short circuit is automatically created in
the connector by its own function to prevent an airbag
deployment. The circuit may need to be open
sometimes when testing the system. Insert a short
canceller (070AZ-SAA0100) in the specified cavities
when necessary to keep the circuit open for testing.

Terminal numbers are shown from the wire side of the
female terminals. Insert the short canceller(s) into the
cavities on the terminal side of connector.

Terminal side of
female terminals

Wire side of female terminals

Insert short canceller(s) here.

Wire side of female terminals

Insert short canceller(s) here.

08/08/21 13:54:20 61SNR030_240_0018

20

*02

Seats with Side Airbags

Disconnecting System Connectors

Driver’s Airbag

24-19

SIDE AIRBAG
LABEL

A

B

Seats with side airbags have a ‘‘SIDE AIRBAG’’ label on
the seat-back.

• Clean the seats with a damp cloth. Do not soak the

seats with liquid. Do not spray steam on the seats.

• Do not repair a torn or frayed seat-back cover.

Replace the seat-back cover if it is damaged.

• After a collision in where the side airbag was

deployed, replace the side airbag and the seat frame
with new parts. If the seat-back cushion is split, it
must be replaced.

• Never put aftermarket accessories on the seats

(covers, pads, seat heaters, lights, etc.).

1. Disconnect the negative cable from the battery,

when wait at least 3 minutes.

2. Remove the access panel (A) from the steering

wheel, then disconnect the driver’s airbag 4P
connector (B) from the cable reel.

08/08/21 13:54:20 61SNR030_240_0019

05

24

25

Front Passenger’s Airbag

Side Airbag

Side Curtain Airbag

24-20

SRS

A

A

A

3. Remove the lower glove box (see page 20-104),

then disconnect the front passenger’s airbag 4P
connector (A) from the dashboard wire harness.

4. Disconnect the driver’s and the front passenger’s

side airbag 2P connectors (A) from the floor wire
harness.

5. Remove the headliner (see page 20-84).

6. Disconnect both floor wire harness 2P connectors

(A) from the side curtain airbags.

08/08/21 13:54:21 61SNR030_240_0020


Content   ..  673  674  675  676   ..