Acura CSX. Manual - part 630


  Index      Acura     Acura CSX - P/NO. 61SNR03 - service repair manual 2006-2009 year


Search            


Content   ..  628  629  630  631   ..


Acura CSX. Manual - part 630


*07

SNR9ANGJ10300000000FAAT27

YES

NO

YES

NO

YES

NO

Audio disc cannot be inserted and/or ejected
(with navigation)

23-233

23-233

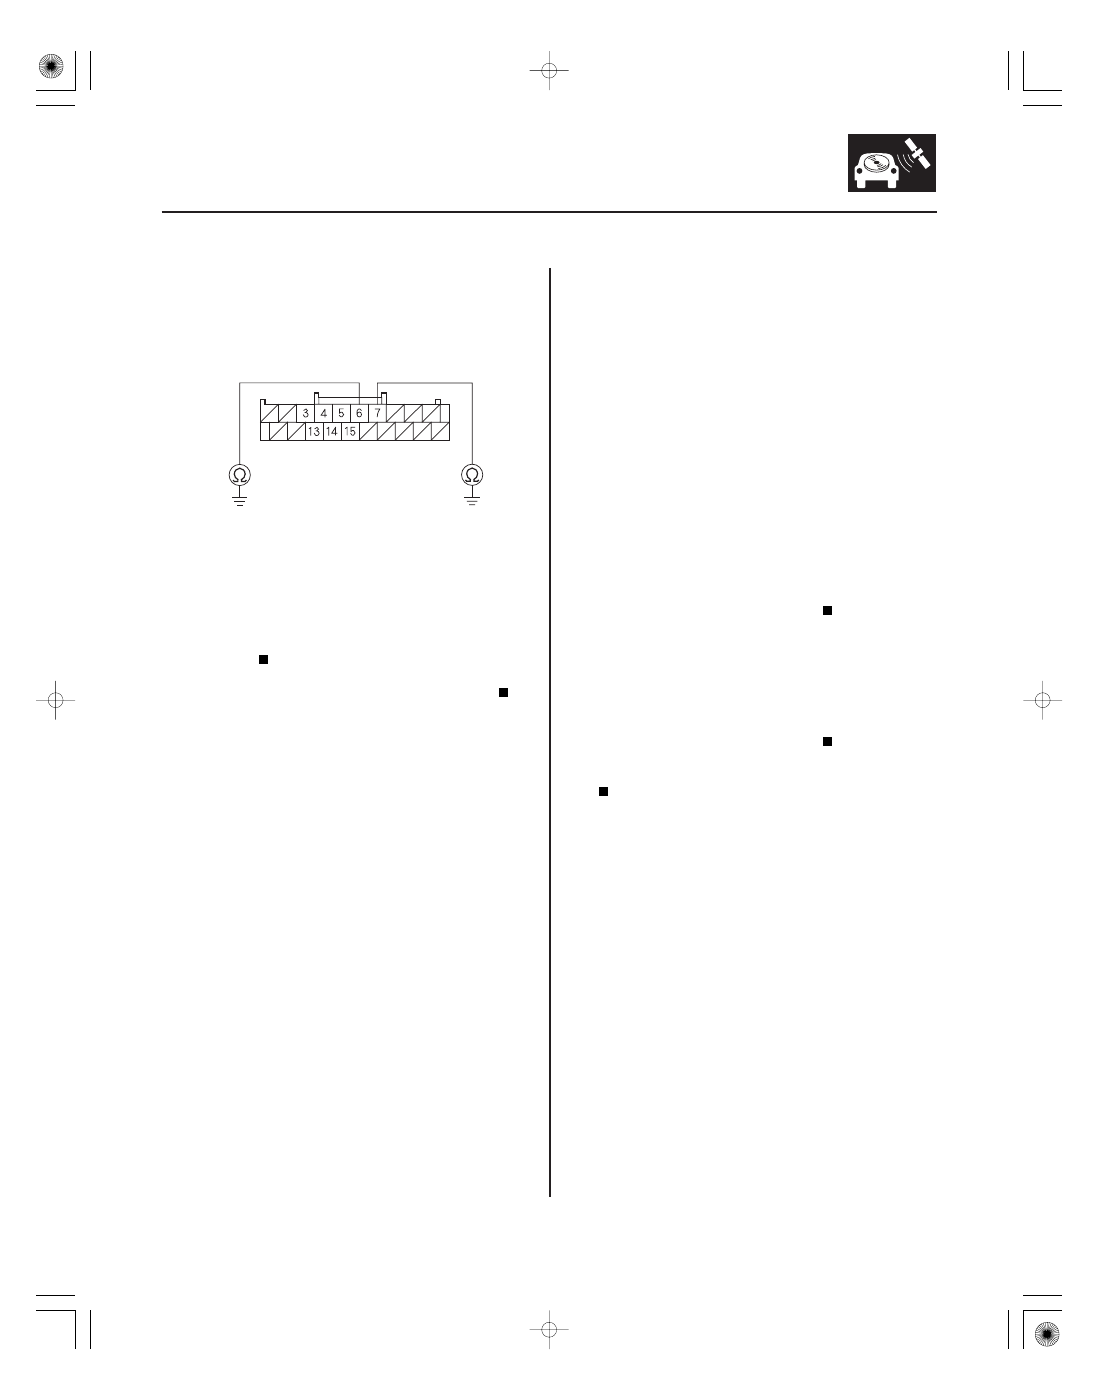
AUDIO UNIT CONNECTOR B (20P)

AUDIO REMOTE SW (PNK)

AUDIO REMOTE GND (BRN)

5. Check for continuity between audio unit connector

B (20P) terminals No. 6 and No. 7 and body ground
individually.

Repair short to body ground in the circuit

between audio unit and the audio remote switch. If
the wires are OK, replace the cable reel (see page
24-200).

Replace the audio unit (see page 23-256).

NOTE:

• Check the vehicle battery condition first.
• Check the connectors for poor connections or loose

terminals.

• Disc labels should not be used in the navigation unit

or audio unit. They may damage the player
mechanism.

• Make sure the disc is compatible with the system (see

the owner’s manual for more information).

1. Press the OPEN/CLOSE button to open the

navigation display.

2. Try inserting an audio CD.

The system is OK at this time.

Go to step 3.

3. Press the CD eject button.

The system is OK at this time.

Replace the navigation unit (see page 23-355).

Wire side of female terminals

Is ther e continuity?

Does the player accept the CD?

Does the player eject the CD?

08/08/21 14:10:52 61SNR030_230_0236

SNR9ANGJ10300000000FAAT29

PC card will not play/card icon on audio
screen cannot be selected (with navigation)

23-234

Audio System

Unfortunately there are no error messages, and no
diagnostics for the PC card. There are many reasons
why a card won’t play audio files in the audio unit.

• The card may not be fully inserted into the slot. Eject

the card, and inspect for warping or damage to the
edge connector. Never use excessive force to insert a
card. This can result in damage to the pins in the rear
of the slot.

• The client’s card may contain audio files that are not

recognized by the system. Only MP3, and WMA
music files are played.

• The flash card type may not be accepted by the

system. Only Compact Flash and ATA cards have
been tested.

• The card’s PCMCIA adaptor may be preventing a

known-good card from playing. New PCMCIA
adaptors are constantly being released, and have not
been tested.

• The card’s capacity may exceed 1 GB. Only cards

with capacities of up to 1 GB (1000 MB) have been
tested.

• There may not be any files on the card. Some cards

have write protection, make sure it is turned off
before putting files on the card.

• Although flash memory chips are reliable,

occasionally they develop bad sectors or other
formatting errors that prevents them from playing.
The client should re-format the card using the FAT, or
FAT32 format.

• The card may have been damaged by heat. Suggest

that the client remove their card when exiting the
vehicle.

• The client may have formatted the card using the

format NTFS. Only the formats FAT, and FAT32 are
accepted by the system.

• Hard Disc Drive (HDD) cards may not work properly in

the system and can overheat and quit functioning,
particularly in a hot vehicle. They are not
recommended.

• The filing structure of the card may exceed the

specification of 8 folder levels deep, 99 folders
maximum, and 999 total tracks maximum. If any of
these limitations is exceeded, the system may not
properly display or play the tracks.

NOTE: A delay when first inserting a card is normal.
The system is reading the File Tag information for
album names, artist, and song titles and there is no
hour glass, The delay length depends on the number of
tracks, and the complexity of the folder structure.
See the audio section glossary for an explanation of the
terms used above.

08/08/21 14:10:52 61SNR030_230_0237

*29

*30

SNR9ANGJ10300000000FAAT30

USB input sound is low or cannot be heard
(with navigation)

YES
NO

YES
NO

YES
NO

Navigation unit connector

Wire color

YES

NO

From terminal

To terminals

YES

NO

23-235

NAVIGATION UNIT CONNECTOR E (14P)

NAVIGATION UNIT CONNECTOR E (14P)

NOTE:

• Check the vehicle battery condition first.
• Check the connectors for poor connections or loose

terminals.

1. Turn the ignition switch to ON (II).

2. Do the speaker check mode with the self-diagnostic

mode.

Go to step 3.

Go to no sound is heard from speaker(s).

3. Turn the ignition switch to LOCK (0).

4. Connect the client’s USB device to a known-good

vehicle that equipped with the USB adapter, and
check the USB device operation.

Go to step 5.

USB device is faulty. Also check the USB

cable and USB adapter connector condition.

5. On the client’s vehicle, connect the client’s USB

device to the USB adapter.

6. Turn the ignition switch to ON (II) and turn on the

navigation unit.

7. Check if the USB device can be operated with the

navigation unit (Folders or Files UP/DOWN, etc.).

Go to step 8.

If the sound is normal, the USB device is OK

at this time. If the USB device cannot be operated,
go to USB audio device does not work.

8. Turn the ignition switch to LOCK (0).

9. Disconnect navigation unit connector E (14P).

10. Disconnect USB adapter unit connector A (14P).

11. Disconnect XM receiver connector A (14P).

12. Check for continuity between the terminal of

navigation unit connector E (14P) and body ground
according to the table.

E5

WHT

E6

RED

E13

BLK

E14

GRN

Short to body ground in the wire(s) between

the navigation unit and the USB adapter unit.
Replace the affected shielded harness.

Go to step 13.

13. Check for continuity between terminals of

navigation unit connector E (14P) according to the
table.

E4 (GRY)

E5 (WHT), E6 (RED), E13 (BLK),
E14 (GRN)

E5 (WHT)

E6 (RED), E13 (BLK), E14
(GRN)

E6 (RED)

E13 (BLK), E14 (GRN)

E13 (BLK)

E14 (GRN)

Short in the wires between the navigation

unit and the USB adapter unit. Replace the affected
shielded harness.

Go to step 14.

Wire side of female terminals

Wire side of female terminals

Do all speaker s make a sound?

Is the USB device wor king pr oper ly?

Can you oper ate the USB device, but ther e is no
sound hear d?

Is ther e continuity?

Is ther e continuity between any of the ter minals?

08/08/21 14:10:52 61SNR030_230_0238

*31

SNR9ANKJ10300000000FAAT31

Navigation

unit connector

USB adapter

unit connector

Wire color

YES

NO

YES
NO

YES
NO

YES
NO

USB input sound is low or cannot be heard
(without navigation)

23-236

23-236

Audio System

NAVIGATION UNIT CONNECTOR E (14P)

USB ADAPTER UNIT CONNECTOR A (14P)

14. Check for continuity between navigation unit

connector E (14P) and USB adapter unit connector
A (14P) according to the table.

E5

A5

WHT

E6

A6

RED

E13

A13

BLK

E14

A14

GRN

Substitute a known-good USB adapter unit

(see page 23-258), then reconnect all of the
connectors and recheck. If the symptom/indication
goes away, replace the original USB adapter unit. If
the symptom/indication is still present, replace the
navigation unit (see page 23-355).

Open in the wire(s) between the navigation

unit and the USB adapter unit. Replace affected
shielded harness.

NOTE:

• Check the vehicle battery condition first.
• Check the connectors for poor connections or loose

terminals.

1. Turn the ignition switch to ON (II).

2. Do the speaker check mode with the self-diagnostic

mode.

Go to step 3.

Go to no sound is heard from speaker(s).

3. Turn the ignition switch to LOCK (0).

4. Connect the client’s USB device to a known-good

vehicle that equipped with the USB adapter and
check the USB device operation.

Go to step 5.

USB device is faulty. Also check the USB

cable and USB adapter connector condition.

5. On the client’s vehicle, connect the client’s USB

device to the USB adapter.

6. Turn the ignition switch to ON (II), and turn on the

audio unit.

7. Check if the USB device can be operated with the

audio unit (Folders or Files UP/DOWN, etc.).

Go to step 8.

If the sound is normal, the USB device is OK

at this time. If the USB device cannot be operated,
go to USB audio device does not work.

8. Turn the ignition switch to LOCK (0).

9. Disconnect audio unit connector E (14P).

10. Disconnect USB adapter unit connector A (14P).

Wire side of female terminals

Wire side of female terminals

Is ther e continuity?

Do all speaker s make a sound?

Is the USB device wor king pr oper ly?

Can you oper ate the USB device, but ther e is no
sound hear d?

08/08/21 14:10:52 61SNR030_230_0239


Content   ..  628  629  630  631   ..