Acura CSX. Manual - part 627


  Index      Acura     Acura CSX - P/NO. 61SNR03 - service repair manual 2006-2009 year


Search            


Content   ..  625  626  627  628   ..


Acura CSX. Manual - part 627


SNR9A0DJ10300000000FAAT12

SNR9A0DJ10300000000FAAT13

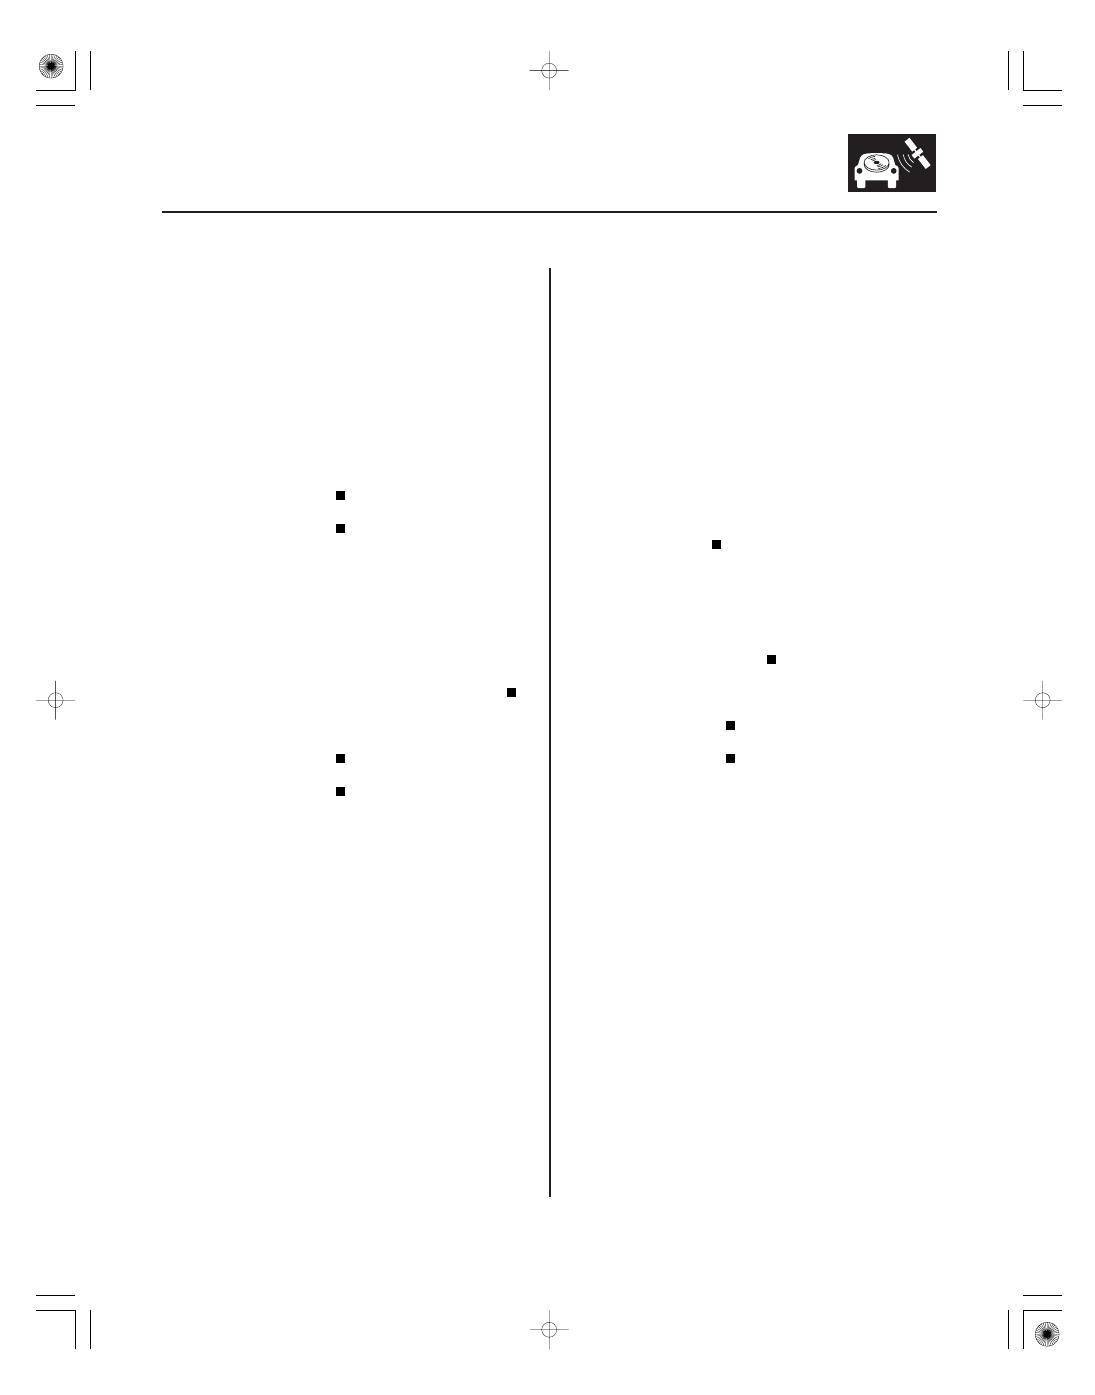
Radio preset memory is lost

Volume does not change

YES

NO

YES

NO

YES

NO

YES

NO

23-221

23-221

NOTE: If only the XM stations are lost, go to XM radio
preset memory is lost (see page 23-248).

1. Set each of the radio station preset buttons.

Go to step 2.

• With navigation: Replace the navigation unit

(see page 23-355).

• Without navigation: Replace the audio unit

(see page 23-256).

2. Turn the ignition switch to LOCK (0) for 1 minute,

then turn it back to ON (II).

3. Test the preset buttons for proper recall operation.

System is normal at this time. Check the

connections at the navigation unit or audio unit.

• With navigation: Replace the navigation unit

(see page 23-355).

• Without navigation: Replace the audio unit

(see page 23-256).

NOTE:

• Check the vehicle battery condition first.
• Check the connectors for poor connections or loose

terminals.

• Set the fader and balance positions to the center.

1. Listen for sound from the speakers.

Go to step 2.

Go to audio system sound is weak or

distorted, or no sound is heard from speaker(s)
(see page 23-206).

2. Operate the volume knob to see if the volume

changes.

Operation is normal.

• With navigation: Replace the navigation unit

(see page 23-355).

• Without navigation: Replace the audio unit

(see page 23-256).

Do each of the buttons set pr oper ly?

Do the pr eset buttons r ecall the set r adio stations?

Is the sound nor mal?

Does the volume change?

08/08/21 14:10:49 61SNR030_230_0224

*05

SNR9A0DJ10300000000FAAT14

Volume does not increase with speed (with
navigation)

YES

NO

YES

NO

YES

NO

YES

NO

23-222

Audio System

NAVIGATION UNIT CONNECTOR A (24P)

VSP (BLU)

NOTE:

• Check the vehicle battery condition first.
• Check the connectors for poor connections or loose

terminals.

1. Verify the SVC mode setting in the navigation unit

sound set-up.

Change the setting to Mid and retest

(see page 23-164).

Go to step 2.

2. Do the self-diagnostic function for the vehicle

speed pulse indication (see page 23-190).

Substitute a known-good navigation unit

(see page 23-355), and retest. If the symptom/
indication goes away, replace the original
navigation unit.

Go to step 3.

3. Test-drive the vehicle at highway speeds, and

monitor if the volume increases.

Intermittent failure, the system is OK at this

time.

Go to step 4.

4. Remove the navigation unit (see page 23-355) and

disconnect navigation unit connector A (24P).

NOTE:

• Eject all the discs before removing the navigation

unit to prevent damaging the CD player’s load
mechanism.

• Remove the PC card before removing the

navigation unit.

5. Drive the vehicle, and have an assistant measure

voltage at navigation unit connector A (24P)
terminal No. 15.

Replace the navigation unit (see page 23-355).

Repair open or shorts in the wire between

navigation unit connector A (24P) terminal No. 15
and ECM/PCM connector A (44P) terminal No. 29. If
no opens or shorts are found, Update the ECM/
PCM (see page 11-227) if it does not have the latest
software or substitute a known-good ECM/PCM
(see page 11-228).

Wire side of female terminals

Is the SV C set to of f ?

Does the self -diagnostic f unction indicate a V SP
signal?

Do the volume incr ease?

Is ther e a 0

5 V Pulse?

08/08/21 14:10:49 61SNR030_230_0225

*10

SNR9ANKJ10300000000FAAT15

Volume does not increase with speed
(without navigation)

YES

NO

YES

NO

YES

NO

YES

NO

23-223

AUDIO UNIT CONNECTOR A (17P)

VSP (BLU)

NOTE:

• Check the vehicle battery condition first.
• Check the connectors for poor connections or loose

terminals.

1. Test-drive the vehicle at highway speeds, and

monitor if the volume increases.

Intermittent failure, the system is OK at this

time.

Go to step 2.

2. Verify the SVC mode setting in the audio unit

sound set-up.

Change the setting to Mid, and retest

(see page 23-164).

Go to step 3.

3. Do the self-diagnostic function for the vehicle

speed pulse indication (see page 23-190).

Substitute a known-good audio unit

(see page 23-256), and retest. If the symptom/
indication goes away, replace the original audio
unit.

Go to step 4.

4. Remove the audio unit (see page 23-256) and

disconnect audio unit connector A (17P).

NOTE: Eject all the discs before removing the audio
unit to prevent damaging the CD player’s load
mechanism.

5. Drive the vehicle, and have an assistant measure

voltage at audio unit connector A (17P) terminal
No. 13.

Replace the audio unit (see page 23-256).

Repair open or shorts in the wire between

audio unit connector A (17P) terminal No. 13 and
ECM/PCM connector A (44P) terminal No. 29. If no
opens or shorts are found, Update the ECM/PCM
(see page 11-227) if it does not have the latest
software or substitute a known-good ECM/PCM
(see page 11-228).

Wire side of female terminals

Do the volume incr ease?

Is the SV C set to of f ?

Does the self -diagnostic f unction indicate a V SP
signal?

Is ther e a 0

5 V Pulse?

08/08/21 14:10:49 61SNR030_230_0226

SNR9A0DJ10300000000FAAT16

SNR9A0DJ10300000000FAAT17

Volume is too high or too low when driving
at freeway speeds

Radio tuner does not change stations

YES

NO

YES

NO

YES

NO

YES

NO

23-224

23-224

Audio System

NOTE:

• Check the vehicle battery condition first.
• Check the connectors for poor connections or loose

terminals.

1. Test-drive the vehicle at highway speeds, and

monitor volume level.

Go to step 2.

Intermittent failure, the system is OK at this

time.

2. Change the SVC mode setting in sound set-up to

Mid (see page 23-164).

• With navigation: Replace the navigation unit

(see page 23-355).

• Without navigation: Replace the audio unit

(see page 23-256).

Improper SVC setting for customers sound

taste.

1. Check the audio information on the display panel.

Go to step 2.

Go to power switch will not turn ON (see page

23-202).

2. Operate the tuning knob to see if the radio station

changes.

Intermittent failure: the tuning knob is OK at

this time.

• With navigation: Replace the navigation unit

(see page 23-355).

• Without navigation: Replace the audio unit

(see page 23-256).

Is the volume level too high, or too low?

Is the volume level still too high, or too low?

Does the audio inf or mation display pr oper ly?

Does the r adio station change?

08/08/21 14:10:50 61SNR030_230_0227


Content   ..  625  626  627  628   ..