Acura CSX. Manual - part 375
 

  Index      Acura     Acura CSX - P/NO. 61SNR03 - service repair manual 2006-2009 year


Search            


Content   ..  373  374  375  376   ..


Acura CSX. Manual - part 375


01

02

03

01

SNR9A00D14300014801MBAT10

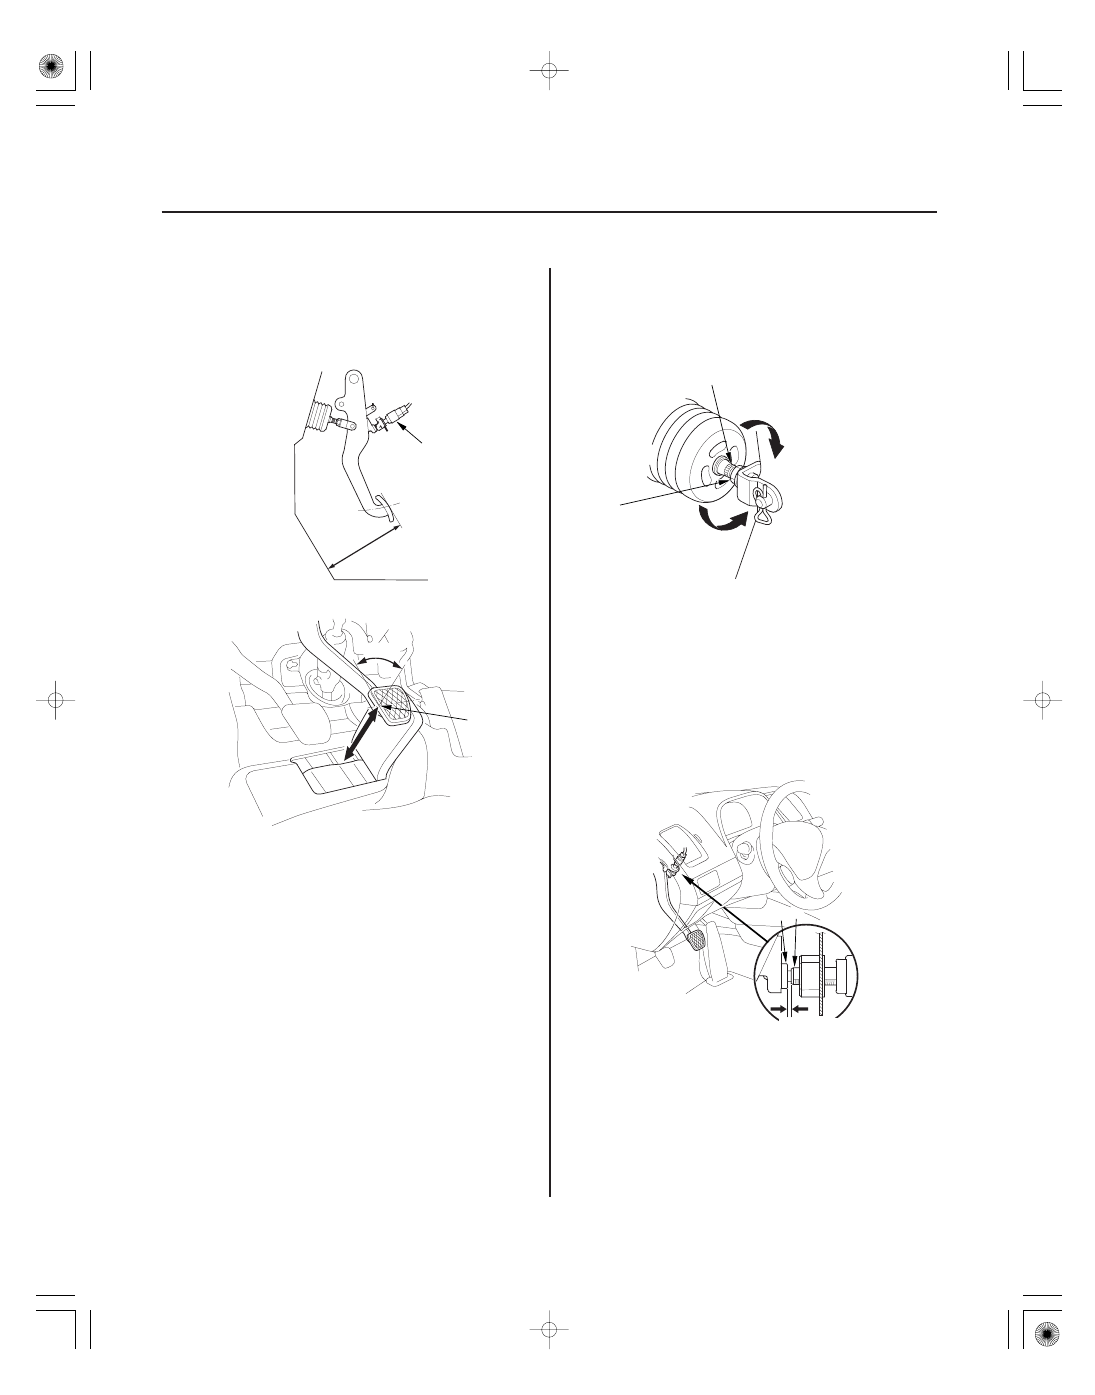
Pedal Height

Standard pedal height (with carpet removed):

M/T: 153 mm (6.02 in.)
A/T:

158 mm (6.22 in.)

Brake Pedal Position Switch Clearance

19-6

Conventional Brake Components

Brake Pedal and Brake Pedal Position Switch Adjustment

A

B

B

C

90 °

A
15 N·m
(1.5 kgf·m,
11 lbf·ft)

B

Lower
the pedal

Raise
the pedal

A

B

0.7 mm (0.028 in.)

1. Turn the brake pedal position switch (A)

counterclockwise, and pull it back until it is no
longer touching the brake pedal.

2. Pull back the carpet, and find the cutout in the

insulation. Measure the pedal height (B) at the
middle of the left side center of the pedal pad (C) to
the floor without the insulation.

3. Loosen the pushrod locknut (A), and screw the

pushrod (B) in or out with pliers until the standard
pedal height from the floor is reached. After
adjustment, tighten the locknut firmly. Do not
adjust the pedal height with the pushrod pressed.

4. Lift up on the brake pedal by hand. Push in the

brake pedal position switch until its plunger is fully
pressed (threaded end (A) touching the pad (B) on
the pedal arm). Turn the switch 45 ° clockwise to
lock it. The gap between the brake pedal position
switch and the pad is automatically adjusted to
0.7 mm (0.028 in.) by locking the switch. Make sure
the brake lights go off when the pedal is released.

5. Check the brake pedal free play.

08/08/21 15:00:50 61SNR030_190_0006

*01

01

SNR9A00D00060800000MCAT00

Pedal Free Play

Inspection

Free play: 1

5 mm (0.04

0.20 in.)

Lever locked clicks: 8 to 10

19-7

19-7

Parking Brake Inspection and
Adjustment

B

A

C

Pulled back with
196 N (20 kgf, 44 lbf)

A

1. With the ignition switch in LOCK (0), inspect the

play (A) at the pedal pad (B) by pushing the pedal
by hand. If the brake pedal free play is out of
specification, adjust the brake pedal position switch
(C). If the brake pedal free play is insufficient, it
may result in brake drag.

1. Pull the parking brake lever (A) with 196 N (20 kgf,

44 lbf) of force to fully apply the parking brake. The
parking brake lever should be locked within the
specified number of clicks.

2. If the number of lever clicks is not as specified,

adjust the parking brake.

08/08/21 15:00:50 61SNR030_190_0007

02

03

Adjustment

19-8

Conventional Brake Components

A

A

B

1. Remove the center console panel (see page 20-92).

2. Release the parking brake lever fully.

3. Loosen the parking brake adjusting nut (A).

4. Raise the rear of the vehicle, and support it with

safety stands in the proper locations (see page
1-11).

5. Remove the rear wheels.

6. Make sure the lever (A) on the rear brake caliper

contacts the stop pin (B).

NOTE: The lever will only contact the stop pin when
the parking brake adjusting nut is loosened.

7. Clean the mating surfaces between the brake disc

and the inside of the wheel, then install the rear
wheels.

8. Pull the parking brake lever 1 click.

9. Tighten the parking brake adjusting nut until the

parking brakes drag slightly when the rear wheels
are turned.

10. Release the parking brake lever fully, and check

that the parking brakes do not drag when the rear
wheels are turned. Readjust if necessary.

11. Make sure the parking brake lever is within the

specified number of clicks (8 to 10 clicks).

12. Install the center console panel (see page 20-92).

08/08/21 15:00:51 61SNR030_190_0008


Content   ..  373  374  375  376   ..