Porshe 911 (997). Manual - part 330


  Index      Hummer     Porshe 911 997 series - service repair manual 2004-2008 year


Search            


Content   ..  328  329  330  331   ..


Porshe 911 (997). Manual - part 330


Welding in front wheel housing

Note

Determine the position of the new part and secure with tensioning clamps.
When butt welding body sheet panels with a sheet thickness of > 1.5 mm, there must be a welding slit
width s = 1 x sheet thickness to guarantee the required welding quality (welding through).

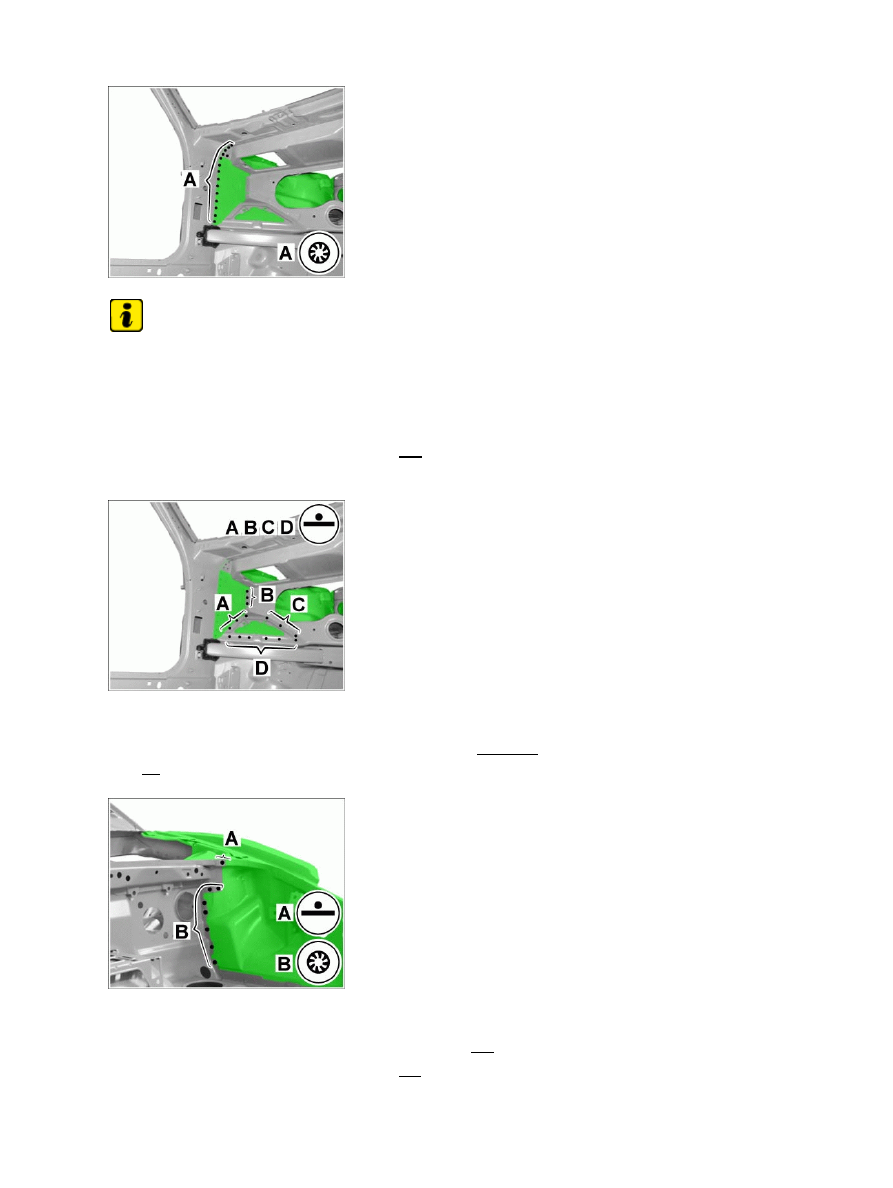
3. Weld in front wheel housing.

3.1. Plug-weld front wheel housing in area -A- using inert

gas.

Welding in front wheel housing

4. Weld in front wheel housing.

4.1. Resistance spot-weld front wheel housing in areas -A, B, C,

D-

 .

Welding in front wheel housing

5. Weld in front wheel housing.

5.1. Resistance spot-weld front wheel housing in area -A- .

5.2. Plug-weld front wheel housing in area -B- using inert

gas.

Diagnostic system: reading out fault memory and activating systems

Installing front wheel housing

1477

Welding in front wheel housing

6. Weld in front wheel housing.

6.1. Plug-weld front wheel housing in area -A- using inert

gas.

Welding in front wheel housing

7. Weld in front wheel housing.

7.1. Resistance spot-weld front wheel housing in areas -A- and -B- .

Welding in front wheel housing

8. Weld in front wheel housing.

8.1. Apply a full weld to the front wheel housing in areas -A, B, C- using inert gas.

Diagnostic system: reading out fault memory and activating systems

Installing front wheel housing

1478

Installing reinforcement for front wheel housing

Welding in reinforcement for front wheel housing

Note

Determine the position of the new part and secure with tensioning clamps.
When butt welding body sheet panels with a sheet thickness of > 1.5 mm, there must be a welding slit
width s = 1 x sheet thickness to guarantee the required welding quality (welding through).

1. Weld in reinforcement for front wheel housing.

1.1. Resistance spot-weld reinforcement for front wheel housing in areas -A, B, C, D- .

Welding in reinforcement for front wheel housing

2. Weld in reinforcement for front wheel housing.

2.1. Plug-weld reinforcement for front wheel housing in area -A- using inert gas.

3. Install front outer side member. → 507755 Replacing outer front side member - section on

"Installing"

Subsequent work

Diagnostic system: reading out fault memory and activating systems

Installing reinforcement for front wheel housing

1479

Subsequent work for body repairs

1. Removing vehicle from straightening bench

2. Cleaning spot-welded joints and sheetmetal flanges with a wire brush

3. Priming flange areas with 2K primer

4. Restore standard sealing with body sealant

→ 501000  Seam seal

5. Restore standard undersealing with underbody

sealant
→ 501000  Undersealing

6. Painting repair area and adjacent surfaces, if necessary

7. Install removed add-on parts in the repair area

8. Apply cavity preservation.

997110, 997111, 997120, 997121, 997310, 997311, 997320, 997321, 997410, 997411, 997430, 997431,
997610, 997611, 997620, 997621

WARNUNG

Gefahr des Verlusts der Text-Bild-Zuordnung beim Ausdruck.

Aus technischen Gründen kann derzeit nicht ausgeschlossen werden, dass trotz
einwandfreier Darstellung auf dem Bildschirm beim Ausdruck der
Zusammenhang von Text und zugehörigem Bild verloren geht.

• 

Wird der Fehler nicht bemerkt, besteht die Gefahr, daß Arbeiten nicht korrekt
durchgeführt werden und es dadurch zu Personen- und Sachschäden kommt.

• 

→ Vergleichen Sie deshalb nach dem Druckvorgang unbedingt die Ausdrucke mit der
Bildschirmdarstellung. Korrigieren Sie die Ausdrucke im Fehlerfall so, daß der Inhalt der
Bildschirmdarstellung zutreffend wiedergegeben wird.

WARNING

Danger of losing text-figure correspondence when printing out.

For technical reasons, it can currently not be ruled out that the correspondence
between text and associated figure can be lost when it is printed out, even though
the display on the screen is correct.

• 

If the fault is not noticed, there is the danger that work will not be performed
correctly which can cause injury and damage.

• 

→ Therefore, always compare printouts with the screen display after printing them out. Correct
the printouts if they are faulty so that the content of the screen display matches that on the
printouts.

Diagnostic system: reading out fault memory and activating systems

Subsequent work for body repairs

1480


Content   ..  328  329  330  331   ..