Snowmobile Polaris 600 IQ LXT (2015 year). Manual - part 24


  Index      Snowmobiles / ATV     Snowmobile Polaris 600 IQ LXT - service manual 2015 year


Search            


Content   ..  22  23  24  25   ..


Snowmobile Polaris 600 IQ LXT (2015 year). Manual - part 24


99

MAINTENANCE

Drive Chain Tension

Check drive chain tension weekly and 
before each long trip. To obtain correct 
chain tension: 

1. Rotate the driven clutch counter-

clockwise to move all chain slack to 
the tensioner side. Lock the brake 
lever lock, or have an assistant hold 
the brake lever firmly.

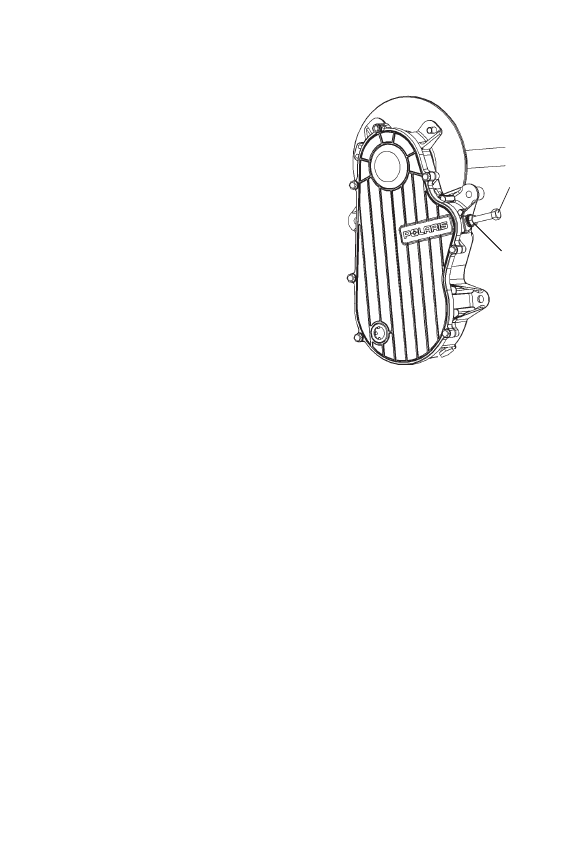
2. Loosen the adjuster bolt jam nut (1).

3. Finger tighten the adjuster bolt (2) 

until it can no longer be adjusted by 
hand, then back off 1/4 turn.

4. Tighten the jam nut while holding 

the adjuster bolt. Torque to 21 ft. 
lbs. (28 Nm).

5. Release the brake lever lock.

1

2

100

MAINTENANCE

Brakes

Hydraulic Brake Inspection

Inspect the brake lever reserve before each use of the snowmobile. See 
page 67.

Brake pads must be replaced when the brake pad material becomes 
thinner than the backing plate, approximately 1/16” (1.5 mm). A kit is 
available for replacing brake pads. See your dealer.

WARNING! Brake failure during operation can result in serious injury or death. 
Properly functioning brakes are vital to your safety. Be sure the brake pads do 
not drag on the disc and that brake lever travel is not excessive. Always replace 
brake pads when the brake pad material becomes thinner than the backing 
plate, approximately 1/16” (1.5mm).

Brake Components

1. Brake Caliper

2. Brake Disc

3. Brake Pad Material 

(Replace when thickness is 
less than 1/16”/1.5 mm).

Excessive Lever Travel

Hydraulic brakes are self-
adjusting, but if excessive 
brake pad clearance develops 
bring the snowmobile to an 
authorized POLARIS dealer for 
inspection and adjustment.

2

1

3

101

MAINTENANCE

Brakes

Brake Fluid

After opening a bottle of brake fluid, always discard any unused portion. Never 
store or use a partial bottle. Brake fluid is hygroscopic, meaning it rapidly 
absorbs moisture from the air. The moisture causes the boiling temperature of 
the brake fluid to drop, which can lead to early brake fade and the possibility of 
accident or serious injury.

Keep the master cylinder cover free of dirt and debris. The vent slits allow for 
diaphragm movement, and if they become plugged, movement of brake fluid 
below the diaphragm may be restricted, altering brake function.

NOTICE: Brake fluid will damage decals, paint and some plastics. Always wipe 

up spills immediately.

Replace brake fluid at least every two 
years with POLARIS DOT 4 high 
temperature brake fluid. See page 122 
for the part numbers of POLARIS 
products.

The brake fluid level can be seen 
through the fluid level indicator (a 
plastic sight glass) in the master 
cylinder reservoir. If the fluid is 
sufficient, the sight glass will be 
black. If the sight glass is any color 
other than black, add brake fluid.

WARNING

Sight Glass

102

MAINTENANCE

Brakes

Bleeding the Hydraulic Brake System

Air in the hydraulic brake system will cause spongy brake lever action. 
Bleed the system before operating the snowmobile.

WARNING! Operating the vehicle with a spongy brake lever can result in loss of 
brakes, which could cause an accident and lead to serious injury or death. 
Never operate the vehicle with a spongy-feeling brake lever.

During the bleeding procedure, keep the brake handle as level as 
possible. The reservoir must be in this position to minimize the 
possibility of air entering the system through the reservoir vent.

1. Remove brake master cylinder reservoir cover and gasket.

2. Fill the master cylinder reservoir to between the MIN and MAX 

marks or 1/4"-5/16" (.6-.8 cm) below the lip of the reservoir 
opening. Reinstall the gasket and cover.

3. Slip a rubber tube over the ball of the bleeder valve and direct the 

flow of fluid into an approved container.

4. Squeeze the brake lever a full stroke. Then unscrew the bleeder 

valve 3/4 of a turn to release air.

5. Close the bleeder valve and release the brake lever.

6. Repeat steps 4 and 5 until fluid flows from the bleeder valve in a 

solid stream free of air bubbles.

WARNING! Overfilling the master cylinder leaves no room for fluid expansion 
and may cause the brakes to lock, resulting in serious injury or death. Always 
add brake fluid to the fill line as recommended.

7. After bleeding is complete, refill the reservoir to the proper level. 

See page 101. 

8. Reinstall the gasket and cover.


Content   ..  22  23  24  25   ..