Nissan Frontier (2023 year). Manual in english - page 4


  Index      Manuals     Nissan Frontier (2023 year). Manual in english


Search            copyright infringement  


Content      ..     2      3      4      5     ..


Nissan Frontier (2023 year). Manual in english - page 4


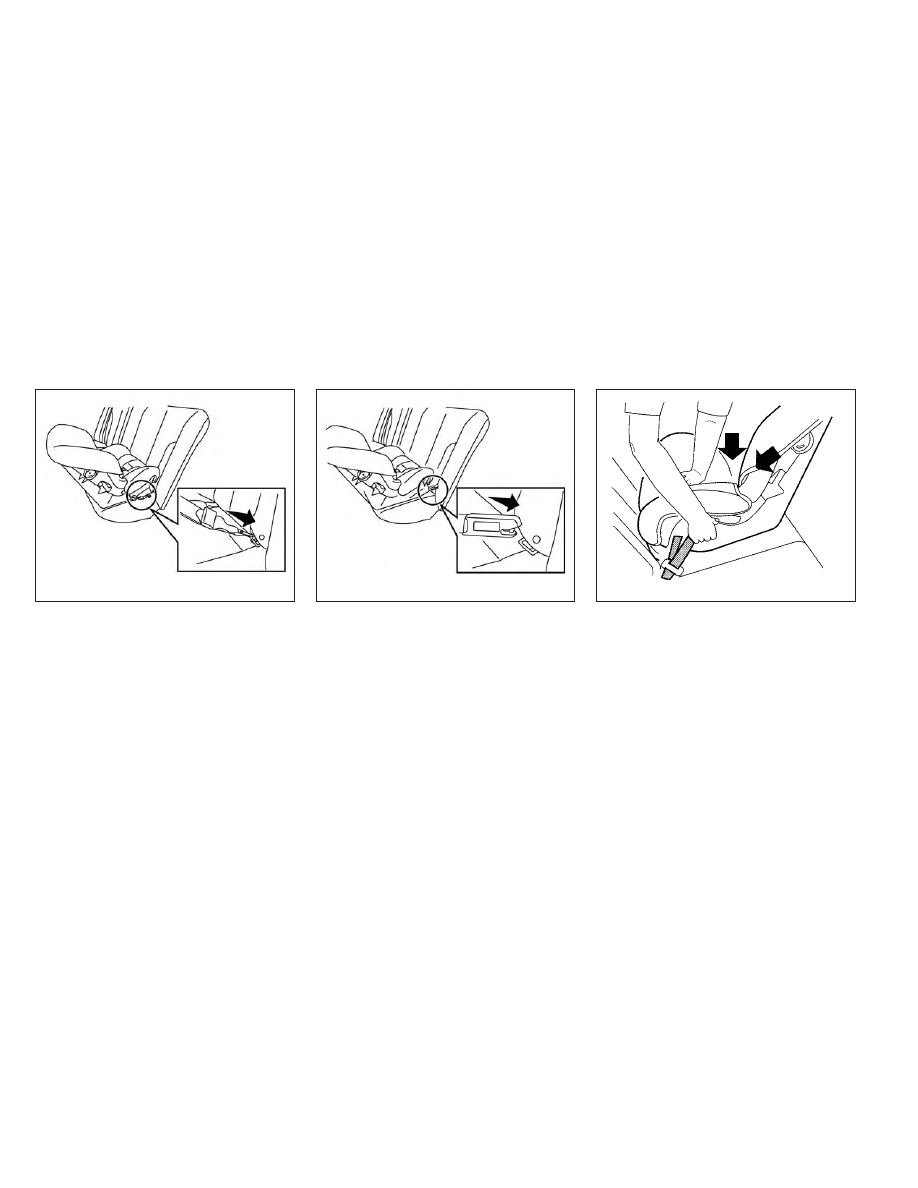
4. Secure the child restraint anchor at-

tachments to the LATCH lower anchors.
Check to make sure the LATCH attach-
ment is properly attached to the lower
anchors.

5. For child restraints that are equipped

with webbing-mounted attachments,
remove any additional slack from the
anchor attachments. Press downward
and rearward firmly in the center of the
child restraint with your hand to com-
press the vehicle seat cushion and seat-
back while tightening the webbing of
the anchor attachments.

LRS2997

Rear-facing webbing-mounted – step 4

LRS2996

Rear-facing rigid-mounted – step 4

LRS0673

Rear-facing – step 5

Safety-Seats, seat belts and supplemental restraint system

1-37

-------------------------------------------------------------------------------------------------------------------------------------------------------------

6. After attaching the child restraint, test it

before you place the child in it. Push it
from side to side while holding the child
restraint near the LATCH attachment
path. The child restraint should not
move more than 1 inch (25 mm), from
side to side. Try to tug it forward and
check to see if the LATCH attachment
holds the restraint in place. If the re-
straint is not secure, tighten the LATCH
attachment as necessary, or put the re-
straint in another seat and test it again.
You may need to try a different child
restraint or try installing by using the

vehicle seat belt (if applicable). Not all
child restraints fit in all types of vehicles.

7. Check to make sure the child restraint is

properly secured prior to each use. If the
child restraint is loose, repeat steps 1
through 6.

REAR-FACING CHILD RESTRAINT
INSTALLATION USING THE SEAT
BELTS (Crew Cab models)

WARNING

The three-point seat belt with Auto-
matic Locking Retractor (ALR) must be
used when installing a child restraint.
Failure to use the ALR mode will result
in the child restraint not being properly
secured. The restraint could tip over or
be loose and cause injury or death to a
child in a sudden stop or collision. Also,
it can change the operation of the front
passenger air bag. For additional infor-
mation, see “Front passenger air bag
and status light” (P. 1-80).

For additional information, see “Child safety”
(P. 1-23) and “Child restraints” (P. 1-26) for all
Warnings and Cautions before installing a
child restraint.

Do not use the lower anchors if the com-
bined weight of the child and the child re-
straint exceeds 65 lbs. (29.5 kg). If the com-
bined weight of the child and the child
restraint is greater than 65 lbs. (29.5 kg), use
the vehicle's seat belt (not the lower an-
chors) to install the child restraint. Be sure
to follow the child restraint manufacturer's
instructions for installation.

Follow these steps to install a rear-facing
child restraint using the vehicle seat belts in
the rear seats:

LRS0674

Rear-facing – step 6

1-38

Safety-Seats, seat belts and supplemental restraint system

-------------------------------------------------------------------------------------------------------------------------------------------------------------

1.

Child restraints for infants must be
used in the rear-facing direction and
therefore must not be used in the front
seat.

Position the child restraint on the

seat. Always follow the child restraint
manufacturer’s instructions.

2. Route the seat belt tongue through the

child restraint and insert it into the
buckle until you hear and feel the latch
engage. Be sure to follow the child re-
straint manufacturer’s instructions for
belt routing.

3. Pull the shoulder belt until the belt is fully

extended. At this time, the seat belt re-
tractor is in the ALR mode (child restraint
mode). It reverts to the ELR mode when
the seat belt is fully retracted.

WRS0256

Rear-facing – step 1

WRS0761

Rear-facing – step 2

LRS0669

Rear-facing – step 3

Safety-Seats, seat belts and supplemental restraint system

1-39

-------------------------------------------------------------------------------------------------------------------------------------------------------------

4. Allow the seat belt to retract. Pull up on

the shoulder belt to remove any slack in
the belt.

5. Remove any additional slack from the

seat belt; press downward and rearward
firmly in the center of the child restraint
to compress the vehicle seat cushion
and seatback while pulling up on the
seat belt.

6. After attaching the child restraint, test it

before you place the child in it. Push it
from side to side while holding the child
restraint near the seat belt path. The
child restraint should not move more
than 1 inch (25 mm), from side to side. Try
to tug it forward and check to see if the
belt holds the restraint in place. If the
restraint is not secure, tighten the seat
belt as necessary, or put the restraint in
another seat and test it again. You may
need to try a different child restraint.
Not all child restraints fit in all types of
vehicles.

LRS0670

Rear-facing – step 4

WRS0762

Rear-facing – step 5

WRS0763

Rear-facing – step 6

1-40

Safety-Seats, seat belts and supplemental restraint system

-------------------------------------------------------------------------------------------------------------------------------------------------------------

7. Check to make sure that the child re-

straint is properly secured prior to each
use. If the seat belt is not locked, repeat
steps 3 through 6.

After the child restraint is removed and the
seat belt fully retracted, the ALR mode
(child restraint mode) is canceled.

REAR-FACING CHILD RESTRAINT
INSTALLATION USING THE SEAT
BELTS — JUMP SEAT (King Cab®
models)

WARNING

The three-point seat belt with Auto-
matic Locking Retractor (ALR) must
be used when installing a child re-
straint. Failure to use the ALR mode
will result in the child restraint not
being properly secured. The restraint
could tip over or be loose and cause
injury to a child in a sudden stop or
collision. Also, it can change the op-
eration of the front passenger air
bag. For additional information, see
“Front passenger air bag and status
light” (P. 1-80).

A child restraint system will not be
installed properly and the child could
be seriously injured or killed in a sud-
den stop or collision.

Never install a rear-facing child re-
straint system on the driver's side
jump seat.

Do not install a child restraint sys-
tem on the passenger's side jump
seat without unfolding the seat
extender.

LRS0597

Safety-Seats, seat belts and supplemental restraint system

1-41

-------------------------------------------------------------------------------------------------------------------------------------------------------------

WARNING

To install a rear-facing child restraint
on the passenger's side jump seat, it
will be necessary to move the front
passenger's seat fully forward and
place the front seatback upright or
tilt it forward. Failure to do so may
cause the child restraint to not be in-
stalled properly and cause serious
injury or death in a sudden stop or
collision.

The front seat cannot be used
when a rear-facing child restraint
is installed on the jump seat. At-
tempting to do so could cause se-
rious injury in a sudden stop or
collision.

For additional information, see “Child safety”
(P. 1-23) and “Child restraints” (P. 1-26) for all
Warnings and Cautions before installing a
child restraint.

Do not use the lower anchors if the com-
bined weight of the child and the child re-
straint exceeds 65 lbs. (29.5 kg). If the com-
bined weight of the child and the child
restraint is greater than 65 lbs. (29.5 kg), use
the vehicle's seat belt (not the lower an-
chors) to install the child restraint. Be sure
to follow the child restraint manufacturer's
instructions for installation.

LRS0549

LRS2725

1-42

Safety-Seats, seat belts and supplemental restraint system

-------------------------------------------------------------------------------------------------------------------------------------------------------------

Follow these steps to install a child re-
straint on the passenger's side jump seat.

1. To access the jump seat extension

O

A

on

the passenger's side jump seat, pull up

O

B

on the extension to unfold it to the

open position. Then unfold the two sup-
port legs

O

C

and lower the jump seat to

the full open seating position.

2. Move the front passenger's seat into the

full forward position. Then move the
front seatback to the upright or tilted
forward position. Position the child re-
straint on the jump seat. The direction of
the child restraint depends on the type
of the child restraint and the size of the
child. Always follow the child restraint
manufacturer's instructions.

LRS2502

Full open seating position

LRS2552

Rear-facing — step 2

Safety-Seats, seat belts and supplemental restraint system

1-43

-------------------------------------------------------------------------------------------------------------------------------------------------------------

3. Route the seat belt tongue through the

child restraint and insert it into the
buckle until you hear and feel the latch
engage

O

A

.

Be sure to follow the child restraint manu-
facturer's instructions for belt routing.

4. Pull the shoulder belt until the belt is fully

extended

O

B

. At this time, the seat belt

retractor is in the ALR mode (child re-
straint mode). It reverts to the ELR mode
when the seat belt is fully retracted.

5. Allow the seat belt to retract. Pull up on

the shoulder belt

O

C

to remove any slack

in the belt.

LRS2726

Rear-facing — step 3

LRS2727

Rear-facing — step 4

LRS2728

Rear-facing — step 5

1-44

Safety-Seats, seat belts and supplemental restraint system

-------------------------------------------------------------------------------------------------------------------------------------------------------------

6. Remove any additional slack from the

seat belt; press downward and rear-
ward firmly in the center of the child re-
straint to compress the vehicle seat
cushion and seatback while pulling up
on the seat belt.

7. After attaching the child restraint, test it

before you place the child in it. Push it
from side to side while holding the seat
near the seat belt path. The child re-
straint should not move more than 1 inch
(25 mm), from side to side. Try to tug it
forward and check to see if the seat belt
holds the restraint in place. If the re-
straint is not secure, tighten the seat belt
as necessary, or put the restraint in an-
other seat and test it again. You may
need to try a different child restraint.
Not all child restraints fit in all types of
vehicles.

8. Check to make sure that the child re-

straint is properly secured prior to each
use. If the seat belt is not locked, repeat
steps 3 through 7.

After the child restraint is removed and the
seat belt fully retracted, the ALR mode
(child restraint mode) is canceled.

FORWARD-FACING CHILD
RESTRAINT INSTALLATION USING
LATCH (Crew Cab models)

For

additional

information,

see

“Child

safety” (P. 1-23) and “Child restraints” (P. 1-26)
for all Warnings and Cautions before in-
stalling a child restraint.

Do not use the lower anchors if the com-
bined weight of the child and the child re-
straint exceeds 65 lbs. (29.5 kg). If the com-
bined weight of the child and the child
restraint is greater than 65 lbs., (29.5 kg) use
the vehicle's seat belt (not the lower an-
chors) to install the child restraint. Be sure
to follow the child restraint manufacturer's
instructions for installation.

WRS0762

Rear-facing – step 6

WRS0918

Rear-facing — step 7

Safety-Seats, seat belts and supplemental restraint system

1-45

-------------------------------------------------------------------------------------------------------------------------------------------------------------

Follow these steps to install a forward-
facing child restraint in the rear seats using
the LATCH system:

1. Position the child restraint on the seat.

Always follow the child restraint manu-
facturer's instructions.

2. Secure the child restraint anchor at-

tachments to the LATCH lower anchors.
Check to make sure the LATCH attach-
ment is properly attached to the lower
anchors.

If the child restraint is equipped with a
top tether strap, route the top tether
strap and secure the tether strap to the
tether anchor point. For additional infor-
mation, see “Installing top tether strap
(rear bench seat for Crew Cab models)”

(P. 1-48, 1-58 ) or “Installing top tether
strap - jump seat (King® Cab models) (P.
1-53, 1-64 .

Do not install child restraints that require
the use of a top tether strap in seating
positions that do not have a top tether
anchor.

3. The back of the child restraint should be

secured against the vehicle seatback.

LRS2995

Forward-facing webbing-mounted –

step 2

LRS2994

Forward-facing rigid-mounted – step 2

1-46

Safety-Seats, seat belts and supplemental restraint system

-------------------------------------------------------------------------------------------------------------------------------------------------------------

If necessary, adjust or remove the head
restraint/headrest to obtain the correct
child restraint fit. If the head restraint/
headrest is removed, store it in a secure
place.

Be sure to reinstall the head

restraint/headrest when the child re-
straint is removed.

For additional infor-

mation, see “Head restraints/headrests”
(P. 1-9).

If the seating position does not have an
adjustable head restraint/headrest and
it is interfering with the proper child re-
straint fit, try another seating position or
a different child restraint.

4. For child restraints that are equipped

with webbing-mounted attachments,
remove any additional slack from the
anchor attachments. Press downward
and rearward firmly in the center of the
child restraint with your knee to com-
press the vehicle seat cushion and seat-
back while tightening the webbing of
the anchor attachments.

5. Tighten the tether strap according to

the manufacturer's instructions to re-
move any slack.

6. After attaching the child restraint, test it

before you place the child in it. Push it
from side to side while holding the child
restraint near the LATCH attachment
path. The child restraint should not
move more than 1 inch (25 mm), from
side to side. Try to tug it forward and
check to see if the LATCH attachment
holds the restraint in place. If the re-
straint is not secure, tighten the LATCH
attachment as necessary, or put the re-
straint in another seat and test it again.
You may need to try a different child
restraint. Not all child restraints fit in all
types of vehicles.

LRS0671

Forward-facing – step 4

WRS0697

Forward-facing – step 6

Safety-Seats, seat belts and supplemental restraint system

1-47

-------------------------------------------------------------------------------------------------------------------------------------------------------------

7. Check to make sure the child restraint is

properly secured prior to each use. If the
child restraint is loose, repeat steps 3
through 6.

Installing top tether strap (rear
bench seat for Crew Cab models)

To access the anchor points behind the
rear bench seat, tilt the rear seatback for-
ward by lifting up on the pull strap behind
the seatback.

Before securing the child restraint with the
LATCH lower anchors (rear outboard seat-
ing positions for Crew Cab models) follow
these steps.

1. If necessary, raise or remove the head

restraint/headrest to position the top
tether strap as shown. If the head
restraint/headrest is removed, store it in

LRS3434

Anchor point access

1. Pull strap

2. Anchor points

LRS0576

Rear bench seat (Crew Cab models)

1. Top tether strap

2. Tether strap

3. Tether anchor point

1-48

Safety-Seats, seat belts and supplemental restraint system

-------------------------------------------------------------------------------------------------------------------------------------------------------------

a secure place. Be sure to reinstall the
head restraint/headrest when the child
restraint is removed. For additional infor-
mation, see “Head restraints/headrests”
(P. 1-9).

2. Position the top tether strap as shown.

3. Secure the tether strap to the tether an-

chor point as shown.

4. Return the seatback to the locked

position.

5. Refer back to child restraint installation

steps before tightening the tether strap.

If you have any questions when install-
ing a top tether strap, it is recommended
that you visit a NISSAN dealer for this
service.

FORWARD-FACING CHILD
RESTRAINT INSTALLATION USING
LATCH — JUMP SEAT (King Cab®
models)

WARNING

If a child restraint system is not in-
stalled properly, the child could be
seriously injured or killed in a sudden
stop or collision.

Do not install a child restraint sys-
tem on the passenger's side jump
seat without unfolding the seat
extender.

For forward-facing child seats
and boosters, DO NOT install if the
child restraint base extends past
the forward edge of the driver's
side seat cushion.

LRS2360

Safety-Seats, seat belts and supplemental restraint system

1-49

-------------------------------------------------------------------------------------------------------------------------------------------------------------

For additional information, see “Child safety”
(P. 1-23) and “Child restraints” (P. 1-26) for all
Warnings and Cautions before installing a
child restraint.

Do not use the lower anchors if the com-
bined weight of the child and the child re-
straint exceeds 65 lbs. (29.5 kg). If the com-
bined weight of the child and the child
restraint is greater than 65 lbs. (29.5 kg), use
the vehicle's seat belt (not the lower an-
chors) to install the child restraint. Be sure
to follow the child restraint manufacturer's
instructions for installation.

Follow these steps to install a child re-
straint on the jump seat.

1. To access the jump seat extension (pas-

senger's side only)

O

A

on the jump seat,

pull up

O

B

on the extension to unfold it to

the open position. Then unfold the two
support legs

O

C

and lower the jump seat

to the full open seating position.

2. Position the child restraint on the seat.

Always follow the child restraint manu-
facturer's instructions.

LRS2725

LRS2502

Full open seating position

1-50

Safety-Seats, seat belts and supplemental restraint system

-------------------------------------------------------------------------------------------------------------------------------------------------------------

3. Secure the child restraint anchor at-

tachments to the LATCH lower anchors.
Check to make sure the LATCH attach-
ment is properly attached to the lower
anchors.

If the child restraint is equipped with a
top tether strap, route the top tether
strap and secure the tether strap to the
tether anchor point. For additional infor-
mation, see “Installing top tether strap -
jump seat (King Cab® models)” (P. 1-53).
Do not install child restraints that require

the use of a top tether strap in seating
positions that do not have a top tether
anchor.

4. The back of the child restraint should be

secured against the vehicle seatback.

If necessary, adjust or remove the head
restraint/headrest to obtain the correct
child restraint fit. If the head restraint/
headrest is removed, store it in a secure
place.

Be sure to reinstall the head

restraint/headrest when the child re-
straint is removed.

For additional infor-

mation, see “Head restraints/headrests”
(P. 1-9).

If the seating position does not have an
adjustable head restraint/headrest and
it is interfering with the proper child re-
straint fit, try another seating position or
a different child restraint.

LRS2995

Forward-facing webbing-mounted –

step 3

LRS2994

Forward-facing rigid-mounted – step 3

Safety-Seats, seat belts and supplemental restraint system

1-51

-------------------------------------------------------------------------------------------------------------------------------------------------------------

5. For child restraints that are equipped

with webbing-mounted attachments,
remove any additional slack from the
anchor attachments. Press downward
and rearward firmly in the center of the
child restraint with your knee to com-
press the vehicle seat cushion and seat-
back while tightening the webbing of
the anchor attachments.

6. Tighten the tether strap according to

the manufacturer's instructions to re-
move any slack.

7. After attaching the child restraint, test it

before you place the child in it. Push it
from side to side while holding the child
restraint near the LATCH attachment
path. The child restraint should not move
more than 1 inch (25 mm), from side to
side. Try to tug it forward and check to
see if the LATCH attachment holds the
restraint in place. If the restraint is not
secure, tighten the LATCH attachment
as necessary, or put the restraint in an-
other seat and test it again. You may
need to try a different child restraint.
Not all child restraints fit in all types of
vehicles.

8. Check to make sure the child restraint is

properly secured prior to each use. If the
child restraint is loose, repeat steps 1
through 7.

LRS0671

Forward-facing – step 5

WRS0697

Forward-facing – step 7

1-52

Safety-Seats, seat belts and supplemental restraint system

-------------------------------------------------------------------------------------------------------------------------------------------------------------


Content      ..     2      3      4      5     ..