Nissan Leaf (2023 year). Manual in english - page 17


  Index      Manuals     Nissan Leaf (2023 year). Manual in english


Search            copyright infringement  


Content      ..     15      16      17      18     ..


Nissan Leaf (2023 year). Manual in english - page 17


Switching procedure:

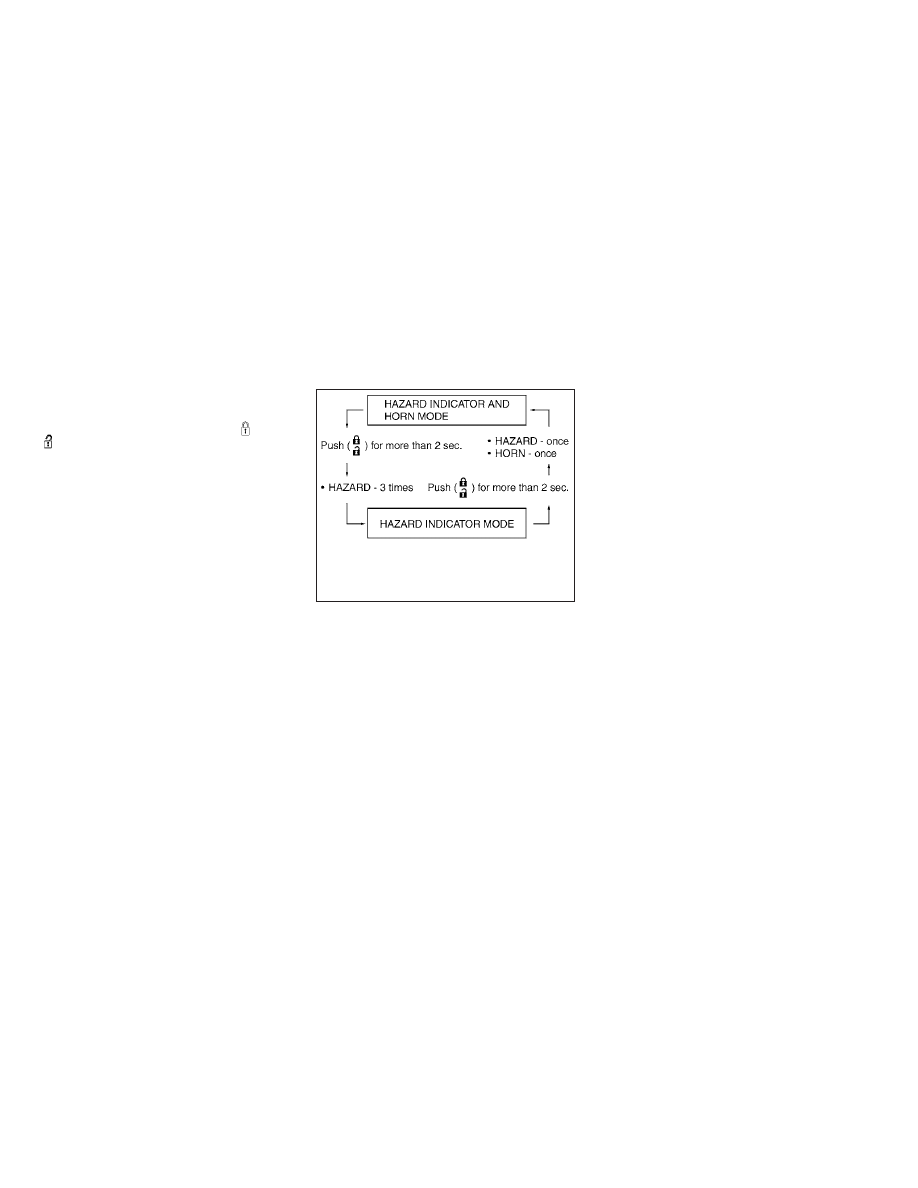
To switch the hazard indicator and horn
(chime) operation, press the

and

buttons on the Intelligent Key simulta-

neously for more than two seconds.
• When the hazard indicator mode is set,

the hazard indicator flashes three times.

• When the hazard indicator and horn

mode is set, the hazard indicator flashes
once and the horn chirps once.

12-VOLT BATTERY SAVER SYSTEM

When all the following conditions are met
for a period of time, the battery saver sys-
tem will cut off the power supply to prevent
12-volt battery discharge.
• The power switch is in the ACC or ON

position,

• All doors are closed, and
• The vehicle is in the P (Park) position.

WARNING SIGNALS

To help prevent the vehicle from moving
unexpectedly by erroneous operation of
the Intelligent Key or to help prevent the
vehicle from being stolen, a chime or
buzzer sounds from inside and outside the
vehicle and a warning is displayed in the
instrument panel.

When a chime or beep sounds or a warning
is displayed, be sure to check the vehicle
and the Intelligent Key.

For additional information, see “Trouble-
shooting guide” (P. 3-16) and “Vehicle infor-
mation display warnings and indicator”
(P. 2-36 ).

TROUBLESHOOTING GUIDE

Verify the location of all Intelligent Keys that
are programmed for the vehicle. If another
Intelligent Key is in range or inside the ve-
hicle, the vehicle system may respond dif-
ferently than expected.

NOS1695

3-16

Pre-driving checks and adjustments

-------------------------------------------------------------------------------------------------------------------------------------------------------------

Symptom

Possible cause

Action to take

When opening the driver’s door
to get out of the vehicle

The inside warning chime sounds continu-
ously.

The power switch is pushed to the OFF
position while the driver's door is open.

Close the driver's door.

The power switch is in the ACC posi-
tion.

Push the power switch to the OFF posi-
tion then close the driver's door.

When closing the door after
getting out of the vehicle

The No Key Detected warning appears on
the display, the outside chime sounds
three times and the inside warning chime
sounds for a few seconds.

The power switch is in the ACC or ON
position.

Push the power switch to the OFF posi-
tion.

The Rear Door Alert warning message ap-
pears on the display, the horn sounds three
times twice, or a Check Rear Seat for All Ar-
ticles warning appears on the display.

The Rear Door Alert is activated.

Check the back seat for all articles, press
the OK button to clear the Rear Door Alert
warning message.

The outside chime sounds continuously.

The power switch is in the ACC or OFF
position, the electric shift control sys-
tem has malfunctioned and the ve-
hicle cannot be placed in the P (Park)
position when the parking brake is not
applied.

Make sure the parking brake is applied.

When closing the door with the
inside lock knob turned to
LOCK

The outside chime sounds for a few sec-
onds and all the doors unlock.

The Intelligent Key is inside the vehicle
or cargo area.

Carry the Intelligent Key with you.

When pushing the request
switch or the

button on

the Intelligent Key to lock the
door

The outside chime sounds for a few sec-
onds.

The Intelligent Key is inside the vehicle
or a cargo area.

Carry the Intelligent Key with you.

When pushing the power
switch in the READY to drive
position

The EV system operation for discharged
Intelligent Key system indicator appears on
the display.

The Intelligent Key battery charge is
low.

For additional information, see “NISSAN
Intelligent Key® battery discharge” (P. 8-19).

The No Key Detected warning appears on
the display and the inside warning chime
sounds for a few seconds.

The Intelligent Key is not in the vehicle.

Carry the Intelligent Key with you.

When pushing the power
switch

The Key System Error indicator appears on
the display.

It warns of a malfunction with the In-
telligent Key system.

It is recommended that you visit a NISSAN
certified LEAF dealer.

Pre-driving checks and adjustments

3-17

-------------------------------------------------------------------------------------------------------------------------------------------------------------

1. Securely close the charge port lid.

2. Pull the hood lock release handle

O

1

lo-

cated below the driver’s side instrument
panel until the hood springs up slightly.

3. Locate the lever

O

2

between the hood

and the charge port lid, and push the
lever upward with your fingertips.

4. Raise the hood

O

3

.

5. Remove the support rod

O

4

from under

the hood and insert it into the slot

O

5

.

Hold the coated parts when removing or
resetting the support rod

O

A

. Avoid di-

rect contact with the metal parts, as they
may be hot immediately after the motor
has been stopped.

When closing the hood, return the support
rod to its original position, lower the hood
to approximately 8 in (20 cm) above the
latch and release it. This allows proper en-
gagement of the hood latch.

WARNING

Make sure the hood is completely
closed and latched before driving.
Failure to do so could cause the hood
to fly open and result in an accident.

If you see steam or smoke coming
from the motor compartment, to
avoid injury do not open the hood.

LPD2691

HOOD

3-18

Pre-driving checks and adjustments

-------------------------------------------------------------------------------------------------------------------------------------------------------------

To open the rear hatch, unlock it and push
the rear hatch opener switch

O

A

. Pull up the

rear hatch to open.

The rear hatch can be unlocked by:
• Pushing the power door lock switch to

the unlock position.

• Pushing the rear hatch request switch.
• Pressing the

button on the Intelli-

gent Key.

For additional information, see “NISSAN In-
telligent Key® system” (P. 3-6).

WARNING

Always make sure that the rear hatch
has been closed securely to prevent
it from opening while driving.

Do not drive with the rear hatch open.

Make sure that all passengers have
their hands, etc. inside the vehicle
before closing the rear hatch.

SECONDARY REAR HATCH
RELEASE

Follow the following steps to unlock the
rear hatch when the battery is discharged.

NOTE:

It is recommended that you visit a
NISSAN certified LEAF dealer as soon as
possible for inspection.

Unlocking the rear hatch:

LPD2692

LPD2782

REAR HATCH

Pre-driving checks and adjustments

3-19

-------------------------------------------------------------------------------------------------------------------------------------------------------------

1. Move the cover

O

A

by using a screwdriver

or a similar tool available on hand.

2. Then move the inside lever

O

B

by using a

screwdriver or similar tool available on
hand. The rear hatch will open.

OPENING CHARGE PORT LID

When opening the charge port lid perform
one of the following:
• Push the charge port lid switch located

on the instrument panel, or

• Press and hold the

button on the

Intelligent Key for more than one second.

LPD2783

LPD2784

LPD2694

Instrument panel switch

CHARGE PORT LID

3-20

Pre-driving checks and adjustments

-------------------------------------------------------------------------------------------------------------------------------------------------------------

When opening the charge port lid:

1. The charging status indicator lights flash

and a chime sounds three times and the
charge port lid will then spring up slightly.

2. Put your hand into the underside of the

lid and open until it is in the fully open
position.

When closing the charge port lid:

1. Slowly move the lid down.

2. Lock it securely into place.

If the charge port lid cannot be unlocked

1. Open the hood.

2. Move the lever behind the charge port

lid in the direction of the arrow using a
flat head screwdriver or suitable tool,
and the port is unlocked.

CAUTION

Make sure that the charge port lid is
completely closed and latched before
driving. Failure to do so could cause the
lid to open suddenly during driving.

LPD2151

Intelligent Key button

LPD2706

LPD2705

Pre-driving checks and adjustments

3-21

-------------------------------------------------------------------------------------------------------------------------------------------------------------

CHARGE PORT CAP

When opening the charge port cap, press
the tab inward and the cap will spring open.

When the charge port cap is closed to its
previous position, it will lock automatically.

CAUTION

When charging is finished, be sure to
close the charge port cap. If water or
dust gets inside the charge port, this
may cause a malfunction.

Pay particular attention when using
the normal charge port as the charge
port lid can be closed even when the
normal charge port cap is open.

Close the quick charge port cap be-
fore closing the charging lid. The
quick charge port cap can be dam-
aged if it is open when closing the
charge port lid.

WARNING

Do not adjust the steering wheel
while driving. You could lose control
of

your

vehicle

and

cause

an

accident.

Do not adjust the steering wheel any
closer to you than is necessary for
proper steering operation and com-
fort. The driver's air bag inflates with
great force. If you are unrestrained,
leaning forward, sitting sideways or
out of position in any way, you are at
greater risk of injury or death in a
crash. You may also receive serious
or fatal injuries from the air bag if you
are up against it when it inflates. Al-
ways sit back against the seatback
and as far away as practical from the
steering wheel. Always use the seat
belts.

LPD3317

STEERING WHEEL

3-22

Pre-driving checks and adjustments

-------------------------------------------------------------------------------------------------------------------------------------------------------------

TILT AND TELESCOPIC OPERATION

Push the lock lever

O

1

down:

• Adjust the steering wheel up or down in

direction

O

2

to the desired position.

• Adjust the steering wheel forward or

backward in direction

O

3

to the desired

position.

Pull the lock lever

O

1

up firmly to lock the

steering wheel in place.

1. To block glare from the front, swing

down

O

1

the main sun visor.

2. To block glare from the side, remove the

main sun visor from the center mount
and swing the visor to the side

O

2

.

3. To extend

O

3

the sun visor, slide in or out

as needed.

CAUTION

Do not store the sun visor before re-
turning the extension to its original
position.

Do not pull the extension sun visor
forcedly downward.

LPD3112

WPD0344

SUN VISORS

Pre-driving checks and adjustments

3-23

-------------------------------------------------------------------------------------------------------------------------------------------------------------

VANITY MIRRORS

To access the vanity mirror, pull the sun
visor down and flip open the mirror cover.
The vanity mirror will illuminate when the
mirror cover is open.

MANUAL ANTI-GLARE REARVIEW
MIRROR (if so equipped)

Use the night position

O

1

to reduce glare

from the headlights of vehicles behind you
at night.

Use the day position

O

2

when driving in

daylight hours.

WARNING

Use the night position only when nec-
essary, because it reduces rear view
clarity.

AUTOMATIC ANTI-GLARE
REARVIEW MIRROR

The inside mirror is designed so that it au-
tomatically dims during night time condi-
tions and according to the intensity of the
headlights of the vehicle following you. The
automatic anti-glare feature will always be
ON.

The indicator light

O

2

will illuminate when

the

automatic

anti-glare

feature

is

operating.

LPD2595

WPD0126

LPD3278

MIRRORS

3-24

Pre-driving checks and adjustments

-------------------------------------------------------------------------------------------------------------------------------------------------------------

NOTE:

Do not hang any objects over the sen-
sors

O

1

or apply glass cleaner to the sen-

sors. Doing so will reduce the sensitivity
of the sensors, resulting in improper
operation.

OUTSIDE MIRRORS

The outside mirror remote control will op-
erate only when the power switch is in the
ACC or ON position.

Turn the switch

O

1

to select the left or right

mirror then adjust each mirror to the de-
sired position using the control switch

O

2

.

Return the small switch

O

1

to the center

(neutral) position to prevent accidentally
moving the mirror.

WARNING

Objects viewed in the outside mirror
on the passenger side are closer than
they appear. Be careful when moving
to the right. Using only this mirror
could cause an accident. Use the in-
side mirror or glance over your
shoulder to properly judge distances
to other objects.

Do not adjust the mirrors while driv-
ing. You could lose control of your ve-
hicle and cause an accident.

JVC0061X

Pre-driving checks and adjustments

3-25

-------------------------------------------------------------------------------------------------------------------------------------------------------------

Foldable outside mirrors

Pull the outside mirror toward the door to
fold it.

Heated mirrors (if so equipped)

Some outside mirrors can be heated to
defrost, defog, or de-ice for improved vis-
ibility. For additional information, see “Rear
window

and

outside

mirror

defroster

switch” (P. 2-49).

LPD2216

3-26

Pre-driving checks and adjustments

-------------------------------------------------------------------------------------------------------------------------------------------------------------

4 Monitor, climate, audio, phone and
voice recognition systems

NissanConnect® Manual . . . . . . . . . . . . . . . . . . . . . . . . 4-2
RearView Monitor (if so equipped) . . . . . . . . . . . . . . . 4-3

RearView Monitor system operation . . . . . . . . . . 4-4
How to read the displayed lines . . . . . . . . . . . . . . 4-5
Difference between predicted and
actual distances . . . . . . . . . . . . . . . . . . . . . . . . . . . . . 4-5
How to park with predicted course
lines . . . . . . . . . . . . . . . . . . . . . . . . . . . . . . . . . . . . . . . . . . 4-7
Adjusting the screen . . . . . . . . . . . . . . . . . . . . . . . . . 4-8
How to turn on and off predicted
course lines . . . . . . . . . . . . . . . . . . . . . . . . . . . . . . . . . . 4-9
RearView Monitor system limitations . . . . . . . . . 4-9
System maintenance . . . . . . . . . . . . . . . . . . . . . . . 4-10

Intelligent Around View® Monitor
(if so equipped) . . . . . . . . . . . . . . . . . . . . . . . . . . . . . . . . . .4-11

Intelligent Around View® Monitor
system operation . . . . . . . . . . . . . . . . . . . . . . . . . . . 4-12
Difference between predicted and
actual distances . . . . . . . . . . . . . . . . . . . . . . . . . . . . 4-16
How to park with predicted course
lines . . . . . . . . . . . . . . . . . . . . . . . . . . . . . . . . . . . . . . . . . 4-17
How to switch the display . . . . . . . . . . . . . . . . . . . 4-18
Adjusting the screen . . . . . . . . . . . . . . . . . . . . . . . . 4-19
Intelligent Around View® Monitor
system limitations . . . . . . . . . . . . . . . . . . . . . . . . . . 4-20

System maintenance . . . . . . . . . . . . . . . . . . . . . . . 4-22

Moving Object Detection (MOD)
(if so equipped) . . . . . . . . . . . . . . . . . . . . . . . . . . . . . . . . . 4-23

MOD system operation . . . . . . . . . . . . . . . . . . . . . . 4-24
Turning MOD ON and OFF . . . . . . . . . . . . . . . . . . . 4-26
MOD system limitations . . . . . . . . . . . . . . . . . . . . . 4-26
System maintenance . . . . . . . . . . . . . . . . . . . . . . . 4-27

Vents . . . . . . . . . . . . . . . . . . . . . . . . . . . . . . . . . . . . . . . . . . 4-28
Heater and air conditioner (automatic) . . . . . . . . . 4-29

Displaying climate control system
status screen (models with navigation
system) . . . . . . . . . . . . . . . . . . . . . . . . . . . . . . . . . . . . . 4-30
Operating tips . . . . . . . . . . . . . . . . . . . . . . . . . . . . . . . 4-30
In-cabin microfilter . . . . . . . . . . . . . . . . . . . . . . . . . . 4-31
Automatic climate control
(models without Navigation System) . . . . . . . . 4-32
Automatic climate control
(models with Navigation System) . . . . . . . . . . . . 4-35
Climate ctrl. timer . . . . . . . . . . . . . . . . . . . . . . . . . . . 4-38

Antenna . . . . . . . . . . . . . . . . . . . . . . . . . . . . . . . . . . . . . . . . 4-43
Car phone or CB radio . . . . . . . . . . . . . . . . . . . . . . . . . . 4-43
iPod®/iPhone® . . . . . . . . . . . . . . . . . . . . . . . . . . . . . . . . . 4-44

-------------------------------------------------------------------------------------------------------------------------------------------------------------

Refer

to

the

digital

NissanConnect®

manual using the QR code on this page, or
your printed NissanConnect® manual (if so
equipped). This manual includes the fol-
lowing information:
• EV-Specific functions
• Audio
• Hands-Free Phone
• NissanConnect® EV & Services (if so

equipped)

• Apple CarPlay®
• Android Auto™

• Navigation (if so equipped)
• Voice recognition
• Information and settings viewable on the

system

LHA5680

NISSANCONNECT® MANUAL

4-2

Monitor, climate, audio, phone and voice recognition systems

-------------------------------------------------------------------------------------------------------------------------------------------------------------

LHA5348

1. CAMERA button

2. MENU button

REARVIEW MONITOR (if so
equipped)

Monitor, climate, audio, phone and voice recognition systems

4-3

-------------------------------------------------------------------------------------------------------------------------------------------------------------

WARNING

Failure to follow the warnings and in-
structions for proper use of the Rear-
View Monitor system could result in se-
rious injury or death.

RearView Monitor is a convenience
feature and is not a substitute for
proper backing. Always turn and look
out the windows and check mirrors
to be sure that it is safe to move be-
fore operating the vehicle. Always
back up slowly.

The system is designed as an aid to
the driver in showing large station-
ary objects directly behind the ve-
hicle, to help avoid damaging the
vehicle.

The distance guide line and the ve-
hicle width line should be used as a
reference only when the vehicle is on
a level paved surface. The distance
viewed on the monitor is for refer-
ence only and may be different than
the actual distance between the ve-
hicle and displayed objects.

CAUTION

Do not scratch the camera lens when
cleaning dirt or snow from the front of
the camera.

The RearView Monitor system automati-
cally shows a rear view of the vehicle when
the shift lever is shifted into the R (Reverse)
position. The radio can still be heard while
the RearView Monitor is active.

To display the rear view, the RearView Moni-
tor system uses a camera located just
above the vehicle’s license plate

1

.

REARVIEW MONITOR SYSTEM
OPERATION

With the EV (electric vehicle) system on and
in “READY to drive”, move the shift lever to
the R (Reverse) position to operate the
RearView Monitor.

LHA4522

4-4

Monitor, climate, audio, phone and voice recognition systems

-------------------------------------------------------------------------------------------------------------------------------------------------------------

HOW TO READ THE DISPLAYED
LINES

Guiding lines which indicate the vehicle
width and distances to objects with refer-
ence to the vehicle body line

O

A

are dis-

played on the monitor.

Distance guide lines

Indicate distances from the vehicle body.
• Red line

O

1

: approx. 1.5 ft (0.5 m)

• Yellow line

O

2

: approx. 3 ft (1 m )

• Green line

O

3

: approx. 7 ft (2 m)

Vehicle width guide lines

O

4

Indicate the vehicle width when backing
up.

The width of the vehicle width guide line is
wider than the actual width.

Predicted course lines

O

5

Indicate the predicted course when back-
ing up. The predicted course lines will be
displayed on the monitor when the shift
lever is in the R (Reverse) position and the
steering wheel is turned. The predicted
course lines will move depending on how
much the steering wheel is turned and will
not be displayed while the steering wheel is
in the straight-ahead position.

The vehicle width guide lines and the width
of the predicted course lines are wider than
the actual width and course.

DIFFERENCE BETWEEN PREDICTED
AND ACTUAL DISTANCES

The displayed guidelines and their loca-
tions on the ground are for approximate
reference only. Objects on uphill or downhill
surfaces or projecting objects will be actu-
ally located at distances different from
those displayed in the monitor relative to
the guidelines (refer to illustrations). When
in doubt, turn around and view the objects
as you are backing up, or park and exit the
vehicle to view the positioning of objects
behind the vehicle.

LHA4805

Monitor, climate, audio, phone and voice recognition systems

4-5

-------------------------------------------------------------------------------------------------------------------------------------------------------------


Content      ..     15      16      17      18     ..