Nissan Leaf (2023 year). Manual in english - page 9


  Index      Manuals     Nissan Leaf (2023 year). Manual in english


Search            copyright infringement  


Content      ..     7      8      9      10     ..


Nissan Leaf (2023 year). Manual in english - page 9


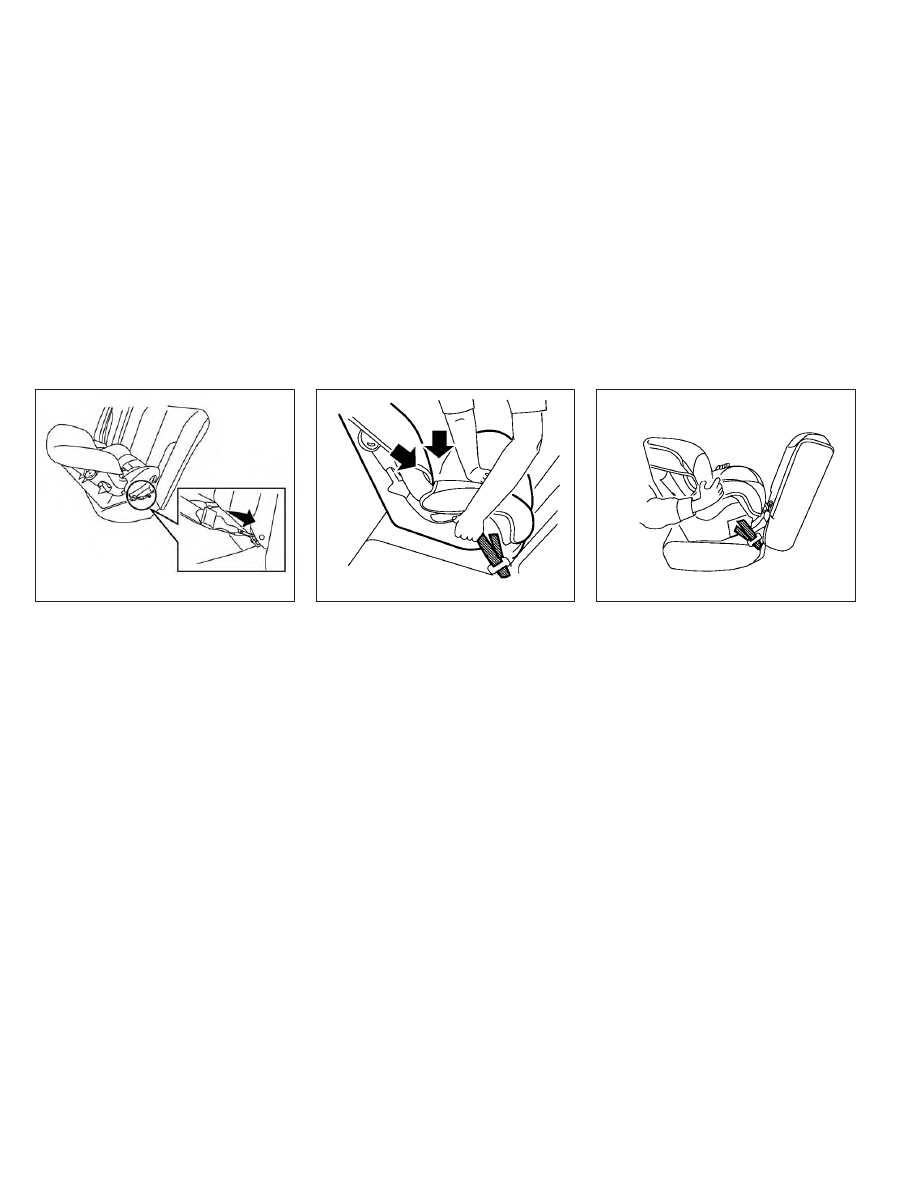
3. For child restraints that are equipped

with webbing-mounted attachments,
remove any additional slack from the
anchor attachments. Press downward
and rearward firmly in the center of the
child restraint with your hand to com-
press the vehicle seat cushion and seat-
back while tightening the webbing of
the anchor attachments.

4. After attaching the child restraint, test it

before you place the child in it. Push it
from side to side while holding the seat
near the LATCH attachment path. The
child restraint should not move more
than 1 inch (25 mm), from side to side. Try
to tug it forward and check to see if the
LATCH attachment holds the restraint in
place. If the restraint is not secure,
tighten the LATCH attachment as nec-
essary, or put the restraint in another
seat and test it again. You may need to

LRS2997

Rear-facing rigid-mounted — step 2

SSS0639

Rear-facing — step 3

SSS0650

Rear-facing — step 4

Safety–Seats, seat belts and supplemental restraint system

1-29

-------------------------------------------------------------------------------------------------------------------------------------------------------------

try a different child restraint or try install-
ing by using the vehicle seat belt (if ap-
plicable). Not all child restraints fit in all
types of vehicles.

5. Check to make sure that the child re-

straint is properly secured prior to each
use. If the child restraint is loose, repeat
steps 2 through 4.

REAR-FACING CHILD RESTRAINT
INSTALLATION USING THE SEAT
BELTS

WARNING

The three-point seat belt with Auto-
matic Locking Retractor (ALR) must be
used when installing a child restraint.
Failure to use the ALR mode will result
in the child restraint not being properly
secured. The restraint could tip over or
be loose and cause injury to a child in a
sudden stop or collision. Also, it can
change the operation of the front pas-
senger air bag. For additional informa-
tion, see “Front passenger air bag and
status light” (P. 1-55).

For additional information, see all Warnings
and Cautions in “Child safety” (P. 1-19) and
“Child restraints” (P. 1-22) before installing a
child restraint. Do not use the lower an-
chors if the combined weight of the child
and child restraint exceeds 65 lbs. (29.5 kg).
If the combined weight of the child and
child restraint is greater than 65 lbs. (29.5
kg), use the vehicle’s seat belt (not the lower
anchors) to install the child restraint. Be
sure to follow the child restraint manufac-
turer’s instructions for installation.

Follow these steps to install a rear-facing
child restraint using the vehicle seat belt in
the rear seats:

1.

Child restraints for infants must be
used in the rear-facing direction and
therefore must not be used in the front
seat.

Position the child restraint on the

seat. Always follow the child restraint
manufacturer’s instructions.

SSS0100

Rear-facing — step 1

1-30

Safety–Seats, seat belts and supplemental restraint system

-------------------------------------------------------------------------------------------------------------------------------------------------------------

2. Route the seat belt tongue through the

child restraint and insert it into the
buckle until you hear and feel the latch
engage. Be sure to follow the child re-
straint manufacturer’s instructions for
belt routing.

3. Pull the shoulder belt until the belt is fully

extended. At this time, the seat belt re-
tractor is in the ALR mode (child restraint
mode). It reverts to the ELR mode when
the seat belt is fully retracted.

4. Allow the seat belt to retract. Pull up on

the shoulder belt to remove any slack in
the belt.

SSS0654

Rear-facing — step 2

SSS0655

Rear-facing — step 3

SSS0656

Rear-facing — step 4

Safety–Seats, seat belts and supplemental restraint system

1-31

-------------------------------------------------------------------------------------------------------------------------------------------------------------

5. Remove any additional slack from the

child restraint. Press downward and
rearward firmly in the center of the child
restraint with your hand to compress
the vehicle seat cushion and seatback
while pulling up on the seat belt.

6. After attaching the child restraint, test it

before you place the child in it. Push it
from side to side while holding the child
restraint near the seat belt path. The
child restraint should not move more
than 1 inch (25 mm), from side to side. Try
to tug it forward and check to see if the
belt holds the restraint in place. If the
restraint is not secure, tighten the seat
belt as necessary, or put the restraint in
another seat and test it again. You may
need to try a different child restraint. Not
all child restraints fit in all types of
vehicles.

7. Check to make sure that the child re-

straint is properly secured prior to each
use. If the seat belt is not locked, repeat
steps 1 through 6.

After the child restraint is removed and the
seat belt fully retracted, the ALR mode
(child restraint mode) is canceled.

FORWARD-FACING CHILD
RESTRAINT INSTALLATION USING
LATCH

For additional information, see all Warnings
and Cautions in “Child safety” (P. 1-19) and
“Child restraints” (P. 1-22) before installing a
child restraint.

Do not use the lower anchors if the com-
bined weight of the child and the child re-
straint exceeds 65 lbs. (29.5 kg). If the com-
bined weight of the child and the child
restraint is greater than 65 lbs. (29.5 kg), use
the vehicle's seat belt (not the lower an-
chors) to install the child restraint. Be sure
to follow the child restraint manufacturer's
instructions for installation.

Follow these steps to install a forward-facing
child restraint using the LATCH system:

1. Position the child restraint on the seat.

Always follow the child restraint manu-
facturer’s instructions.

SSS0657

Rear-facing — step 5

SSS0658

Rear-facing — step 6

1-32

Safety–Seats, seat belts and supplemental restraint system

-------------------------------------------------------------------------------------------------------------------------------------------------------------

2. Secure the child restraint anchor at-

tachments to the LATCH lower anchors.
Check to make sure that the LATCH at-
tachment is properly attached to the
lower anchors.

If the child restraint is equipped with a
top tether strap, route the top tether
strap and secure the tether strap to the
tether anchor point. For additional infor-
mation, see “Installing top tether strap”
(P. 1-35).

Do not install child restraints that require
the use of a top tether strap in seating
positions that do not have a top tether
anchor.

3. The back of the child restraint should be

secured against the vehicle seatback.

If necessary, remove the head restraint/
headrest to obtain the correct child re-
straint fit. If the head restraint/headrest
is removed, store it in a secure place.

Be

sure to reinstall the head restraint/
headrest when the child restraint is
removed

. For additional information,

see “Head restraints/headrests” (P. 1-7).

LRS2995

Forward-facing webbing-mounted —

step 2

LRS2994

Forward-facing rigid-mounted — step 2

Safety–Seats, seat belts and supplemental restraint system

1-33

-------------------------------------------------------------------------------------------------------------------------------------------------------------

If the seating position does not have an
adjustable head restraint/headrest and
it is interfering with the proper child re-
straint fit, try another seating position or
a different child restraint.

4. For child restraints that are equipped

with webbing-mounted attachments,
remove any additional slack from the
anchor attachments. Press downward
and rearward firmly in the center of the
child restraint with your knee to com-
press the vehicle seat cushion and seat-
back while tightening the webbing of
the anchor attachments.

5. Tighten the tether strap according to

the manufacturer’s instructions to re-
move any slack.

6. After attaching the child restraint, test it

before you place the child in it. Push it
from side to side while holding the child
restraint near the LATCH attachment
path. The child restraint should not
move more than 1 inch (25 mm), from
side to side. Try to tug it forward and
check to see if the LATCH attachment
holds the restraint in place. If the re-
straint is not secure, tighten the LATCH
attachment as necessary, or put the re-
straint in another seat and test it again.
You may need to try a different child
restraint. Not all child restraints fit in all
types of vehicles.

SSS0647

Forward-facing — step 4

SSS0638

Forward-facing — step 6

1-34

Safety–Seats, seat belts and supplemental restraint system

-------------------------------------------------------------------------------------------------------------------------------------------------------------

7. Check to make sure the child restraint is

properly secured prior to each use. If the
child restraint is loose, repeat steps 1
through 6.

Installing top tether strap

The child restraint top tether strap must be
used when installing the child restraint with
the LATCH lower anchor attachments.

First, secure the child restraint with the
LATCH lower anchors (rear bench out-
board seating positions only).

Rear bench seat

OUTBOARD SEATING POSITIONS

1. Remove the head restraint/headrest

and store it in a secure place. Be sure to
reinstall the head restraint/headrest
when the child restraint is removed. For
additional

information,

see

“Head

restraints/headrests” (P. 1-7).

2. Position the top tether strap

O

1

as

shown.

3. Secure the tether strap to the tether an-

chor point

O

2

as shown.

4. Refer to the appropriate child restraint

installation procedure steps in this sec-
tion before tightening the tether strap.

CENTER SEATING POSITION

1. Remove the head restraint/headrest

and store it in a secure place. Be sure to
reinstall the head restraint/headrest
when the child restraint is removed. For
additional

information,

see

“Head

restraints/headrests” (P. 1-7).

2. Position the top tether strap

O

1

as

shown.

3. Secure the tether strap to the tether an-

chor point

O

2

as shown.

LRS2638

1

Top tether strap

2

Tether anchor point

Safety–Seats, seat belts and supplemental restraint system

1-35

-------------------------------------------------------------------------------------------------------------------------------------------------------------

4. Refer to the appropriate child restraint

installation procedure steps in this sec-
tion before tightening the tether strap.

If you have any questions when install-
ing a top tether strap, it is recommended
that you visit a NISSAN certified LEAF
dealer for details.

WARNING

Child restraint anchorages are de-
signed to withstand only those loads
imposed by correctly fitted child re-
straints. Under no circumstances are
they to be used to attach adult seat
belts, or other items or equipment to
the vehicle. Doing so could damage the
child restraint anchorages. The child
restraint will not be properly installed
using the damaged anchorage, and a
child could be seriously injured or killed
in a collision.

FORWARD-FACING CHILD
RESTRAINT INSTALLATION USING
THE SEAT BELTS

WARNING

The three-point seat belt with Auto-
matic Locking Retractor (ALR) must be
used when installing a child restraint.
Failure to use the ALR mode will result
in the child restraint not being properly
secured. The restraint could tip over or
be loose and cause injury to a child in a
sudden stop or collision. Also, it can
change the operation of the front pas-
senger air bag. For additional informa-
tion, see “Front passenger air bag and
status light” (P. 1-35).

For additional information, see all Warnings
and Cautions in “Child safety” (P. 1-19) and
“Child restraints” (P. 1-22) before installing a
child restraint.

Do not use the lower anchors if the com-
bined weight of the child and the child re-
straint exceeds 65 lbs. (29.5 kg). If the com-
bined weight of the child and the child
restraint is greater than 65 lbs. (29.5 kg), use
the vehicle's seat belt (not the lower an-
chors) to install the child restraint. Be sure
to follow the child restraint manufacturer's
instructions for installation.

SSS0640

Forward-facing (front passenger seat)

— step 1

1-36

Safety–Seats, seat belts and supplemental restraint system

-------------------------------------------------------------------------------------------------------------------------------------------------------------

Follow these steps to install a forward-
facing child restraint using the vehicle seat
belt in the rear seat or in the front passen-
ger seat:

1.

If you must install a child restraint in the
front seat, it should be placed in the
forward-facing direction only. Move the
seat to the rearmost position. Child re-
straints for infants must be used in the
rear-facing

direction

and

therefore

must not be used in the front seat.

2. Position the child restraint on the seat.

Always follow the child restraint manu-
facturer’s instructions.

The back of the child restraint should be
secured against the seatback.

If necessary, adjust the head restraint/
headrest to obtain the correct child re-
straint fit. If the head restraint/headrest
is removed, store it in a secure place.

Be

sure to reinstall the head restraint/
headrest when the child restraint is
removed.

For additional information,

see “Head restraints/headrests” (P. 1-7).

If the seating position does not have an
adjustable head restraint/headrest and
it is interfering with the proper child re-
straint fit, try another seating position or
a different child restraint.

3. Route the seat belt tongue through the

child restraint and insert it into the
buckle until you hear and feel the latch
engage. Be sure to follow the child re-
straint manufacturer’s instructions for
belt routing.

If the child restraint is equipped with a
top tether strap, route the top tether
strap and secure the tether strap to the
tether anchor point (rear seat installa-
tion only). For additional information, see
“Installing top tether strap” (P. 1-40).

Do not install child restraints that require
the use of a top tether strap in seating
positions that do not have a top tether
anchor.

SSS0360B

Forward-facing — step 3

Safety–Seats, seat belts and supplemental restraint system

1-37

-------------------------------------------------------------------------------------------------------------------------------------------------------------

4. Pull the shoulder belt until the belt is fully

extended. At this time, the seat belt re-
tractor is in the ALR mode (child restraint
mode). It reverts to the ELR mode when
the seat belt is fully retracted.

5. Allow the seat belt to retract. Pull up on

the shoulder belt to remove any slack in
the belt.

6. Remove any additional slack from the

seat belt. Press downward and rearward
firmly in the center of the child restraint
with your knee to compress the vehicle
seat cushion and seatback while pulling
up on the seat belt.

7. Tighten the tether strap according to the

manufacturer’s instructions to remove
any slack.

SSS0651

Forward-facing — step 4

SSS0652

Forward-facing — step 5

SSS0653

Forward-facing — step 6

1-38

Safety–Seats, seat belts and supplemental restraint system

-------------------------------------------------------------------------------------------------------------------------------------------------------------

8. After attaching the child restraint, test it

before you place the child in it. Push it
from side to side while holding the child
restraint near the seat belt path. The
child restraint should not move more
than 1 inch (25 mm), from side to side. Try
to tug it forward and check to see if the
belt holds the restraint in place. If the
restraint is not secure, tighten the seat
belt as necessary, or put the restraint in
another seat and test it again. You may
need to try a different child restraint. Not
all child restraints fit in all types of
vehicles.

9. Check to make sure the child restraint is

properly secured prior to each use. If the
seat belt is not locked, repeat steps 2
through 8.

10. If the child restraint is installed on the

front passenger seat, push the power
switch to the ON position. The front
passenger air bag status light
should illuminate. If this light does not
illuminate, see “Front passenger air bag
and status light” (P. 1-55).

Move the child

restraint to another seating position

.

Have the system checked. It is recom-
mended that you visit a NISSAN certi-
fied LEAF dealer for this service.

After the child restraint is removed and the
seat belt is fully retracted, the ALR mode
(child restraint mode) is canceled.

SSS0641

Forward-facing — step 8

LRS2980

Safety–Seats, seat belts and supplemental restraint system

1-39

-------------------------------------------------------------------------------------------------------------------------------------------------------------

Installing top tether strap

The child restraint top tether strap must be
used when installing the child restraint with
the seat belts.

First, secure the child restraint with the seat
belt.

Rear bench seat

1. Remove the head restraint/headrest

and store it in a secure place. Be sure to
reinstall the head restraint/headrest
when the child restraint is removed. For

additional

information,

see

“Head

restraints/headrests” (P. 1-7).

2. Position the top tether strap

O

1

as

shown.

3. Secure the tether strap to the tether an-

chor point

O

2

as shown.

4. Refer to the appropriate child restraint

installation procedure steps in this sec-
tion before tightening the tether strap.

If you have any questions when install-
ing a top tether strap, it is recommended
that you visit a NISSAN certified LEAF
dealer for this service.

WARNING

Child restraint anchorages are de-
signed to withstand only those loads
imposed by correctly fitted child re-
straints. Under no circumstances are
they to be used for adult seat belts, har-
nesses or for attaching other items or
equipment to the vehicle. Doing so
could damage the child restraint an-
chorages. The child restraint will not be
properly installed using the damaged
anchorage, and a child could be seri-
ously injured or killed in a collision.

BOOSTER SEATS

For additional information on installing a
booster seat in your vehicle, follow the in-
structions outlined in this section.

Precautions on booster seats

WARNING

If a booster seat and seat belt are not
used properly, the risk of a child being
injured or killed in a sudden stop or col-
lision greatly increases:

Make sure the shoulder portion of
the belt is away from the child’s face
and neck and the lap portion of the
belt does not cross the stomach.

Make sure the shoulder belt is not
behind the child or under the child’s
arm.

A booster seat must only be installed
in a seating position that has a lap/
shoulder belt.

LRS2638

1

Top tether strap

2

Tether anchor point

1-40

Safety–Seats, seat belts and supplemental restraint system

-------------------------------------------------------------------------------------------------------------------------------------------------------------

Booster seats of various sizes are offered
by several manufacturers. When selecting
any booster seat, keep the following points
in mind:
• Choose only a booster seat with a label

certifying that it complies with Federal
Motor Vehicle Safety Standard 213 or Ca-
nadian Motor Vehicle Safety Standard 213.

• Check the booster seat in your vehicle to

be sure it is compatible with the vehicle’s
seat and seat belt system.

• Make sure the child’s head will be properly

supported by the booster seat or vehicle
seat. The seatback must be at or above
the center of the child’s ears. For example,
if a low back booster seat

O

1

is chosen,

the vehicle seatback must be at or above
the center of the child’s ears. If the seat-
back is lower than the center of the child’s
ears, a high back booster seat

O

2

should

be used.

• If the booster seat is compatible with

your vehicle, place your child in the
booster seat and check the various ad-
justments to be sure the booster seat is
compatible with your child. Always follow
all recommended procedures.

All U.S. states and Canadian provinces or
territories require that infants and small
children be restrained in an approved
child restraint at all times while the ve-
hicle is being operated.

The instructions in this section apply to
booster seat installation in the rear seats
or the front passenger seat.

LRS0455

LRS0453

LRS0464

Safety–Seats, seat belts and supplemental restraint system

1-41

-------------------------------------------------------------------------------------------------------------------------------------------------------------

Booster seat installation

WARNING

To avoid injury to child, do not use the
lap/shoulder belt in the Automatic
Locking Retractor (ALR) mode when us-
ing a booster seat with the seat belts.

For additional information, see all Warnings
and Cautions in “Child safety” (P. 1-19),“Child
restraints” (P. 1-22) and “Booster seats”
(P. 1-40) before installing a child restraint.

Follow these steps to install a booster seat
in the rear seats or in the front passenger
seat:

1.

If you must install a booster seat in the
front seat, move the seat to the rear-
most position.

2. Position the booster seat on the seat.

Only place it in a front-facing direction.
Always follow the booster seat manu-
facturer’s instructions.

WRS0699

LRS0454

Front passenger position

1-42

Safety–Seats, seat belts and supplemental restraint system

-------------------------------------------------------------------------------------------------------------------------------------------------------------

3. The booster seat should be positioned

on the vehicle seat so that it is stable.

If necessary, adjust or remove the head
restraint/headrest to obtain the correct
booster seat fit. If the head restraint/
headrest is removed, store it in a secure
place.

Be sure to reinstall the head

restraint/headrest when the booster
seat is removed.

For additional infor-

mation, see “Head restraints/headrests”
(P. 1-7).

If the seating position does not have an
adjustable head restraint/headrest and
it is interfering with the proper booster
seat fit, try another seating position or a
different booster seat.

4. Position the lap portion of the seat belt

low and snug on the child’s hips. Be sure
to follow the booster seat manufactur-
er’s instructions for adjusting the seat
belt routing.

5. Pull the shoulder belt portion of the seat

belt toward the retractor to take up ex-
tra slack. Be sure the shoulder belt is
positioned across the top, middle por-
tion of the child’s shoulder. Be sure to
follow the booster seat manufacturer’s
instructions for adjusting the seat belt
routing.

6. Follow the warnings, cautions and in-

structions for properly fastening a seat
belt shown in “Three-point type seat belt
with retractor” (P. 1-15).

LRS0451

Rear center position

LRS0452

Rear outboard position

Safety–Seats, seat belts and supplemental restraint system

1-43

-------------------------------------------------------------------------------------------------------------------------------------------------------------

7. If the booster seat is installed in the front

passenger seat, place the power switch
in the ON position. The front passenger
air bag status light

may or may not

illuminate, depending on the size of the
child and the type of booster seat being
used. For additional information, see
“Front passenger air bag and status
light” (P. 1-55).

PRECAUTIONS ON SRS

This SRS section contains important infor-
mation concerning the following systems.
• Driver and front passenger supplemental

front-impact air bag (NISSAN Advanced
Air Bag System)

• Front seat-mounted side-impact supple-

mental air bag

• Rear

outboard

seat-mounted

side-

impact supplemental air bag

• Roof-mounted curtain side-impact and

rollover supplemental air bag

• Driver and front passenger supplemental

knee air bag

• Seat belt with pretensioner(s) (front seat

and rear outboard seats)

Supplemental

front-impact

air

bag

system

The NISSAN Advanced Air Bag System can
help cushion the impact force to the head
and chest of the driver and front passenger
in certain frontal collisions.

Front

seat-mounted

side-impact

supplemental air bag system

This system can help cushion the impact
force to the chest and pelvic area of the
driver and front passenger in certain side
impact collisions. The side air bags are de-
signed to inflate on the side where the ve-
hicle is impacted.

Rear

outboard

seat-mounted

side-

impact supplemental air bag system

This system can help cushion the impact
force to the chest area of the rear outboard
seat passengers in certain side impact col-
lisions. The side air bags are designed to
inflate on the side where the vehicle is
impacted.

Roof-mounted curtain side-impact and
rollover supplemental air bag system

This system can help cushion the impact
force to the head of occupants in front and
rear outboard seating positions in certain
side impact collisions. In a side impact, the
curtain air bags are designed to inflate on
the side where the vehicle is impacted. In a
rollover, the curtain air bags are designed
to inflate and remain inflated for a short
time.

LRS0865

SUPPLEMENTAL RESTRAINT SYSTEM
(SRS)

1-44

Safety–Seats, seat belts and supplemental restraint system

-------------------------------------------------------------------------------------------------------------------------------------------------------------


Content      ..     7      8      9      10     ..