Nissan Leaf (2023 year). Manual in english - page 6


  Index      Manuals     Nissan Leaf (2023 year). Manual in english


Search            copyright infringement  


Content      ..     4      5      6      7     ..


Nissan Leaf (2023 year). Manual in english - page 6


To start charging/discharging:

1. Push the P (Park) position switch to place

the vehicle in the P (Park) position and
apply the parking brake.

2. When charging/discharging the Li-ion

battery, place the power switch in the
OFF position. When the power switch is
in the ON position, the Li-ion battery will
not start charging/discharging.

3. Open the charge port lid and charge

port cap. For additional information, see
“Charge port lid” (P. 3-20) and “Charge
port cap” (P. 3-22).
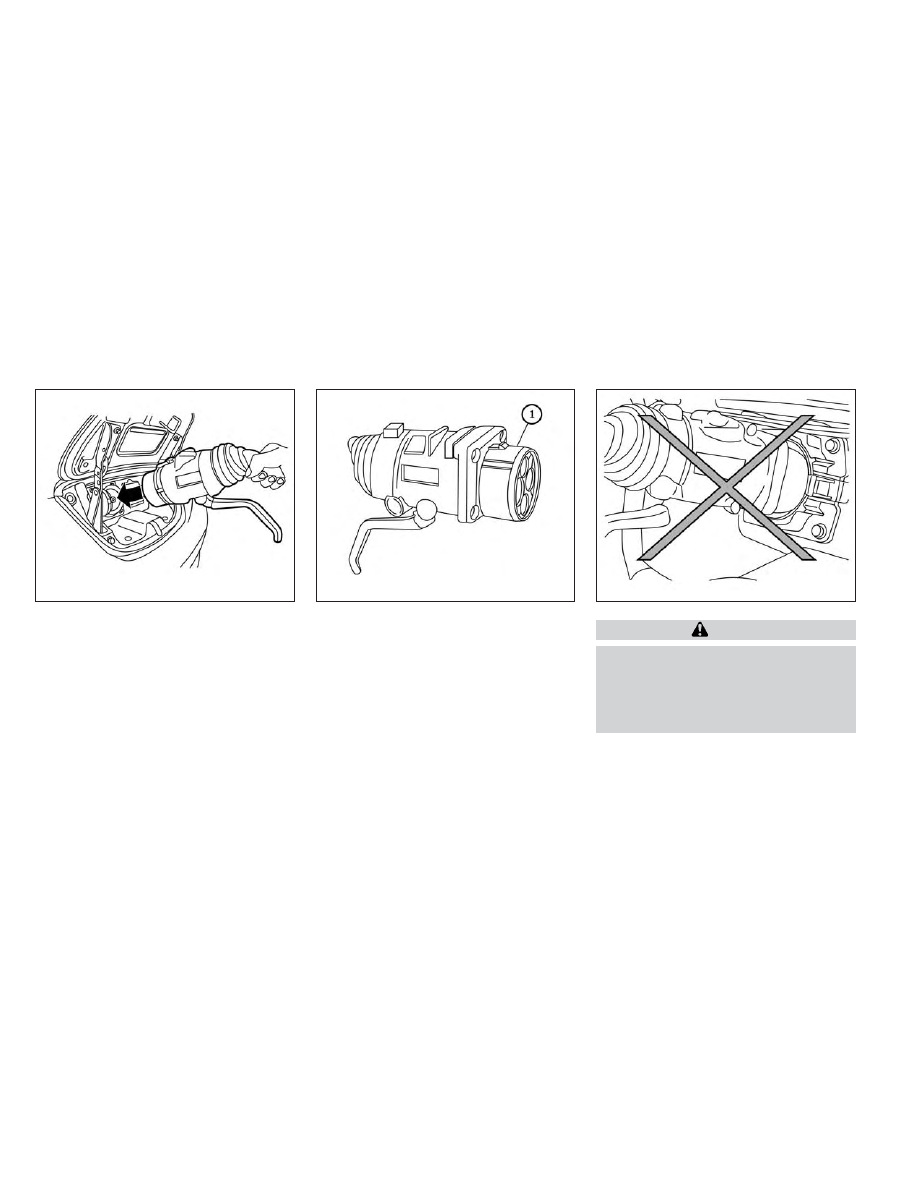
4. Align

O

1

with the groove of the charge

port and insert the charge connector.

CAUTION

Be sure to insert the charge connector
straight into the quick charge port right
up to the base. Failure to do so may re-
sult in the Li-ion battery not charging/
discharging or could cause damage to
the charging equipment.

LCH2115

LCH2116

LCH2117

Charging

CH-39

-------------------------------------------------------------------------------------------------------------------------------------------------------------

5. Grasp the lock lever and lock the charge

connector.

6. Follow the instructions on the quick

charge equipment, or the V2X device, to
start charging. When the equipment or
V2X is properly installed and ready to
charge/discharge, a beep sounds twice
and the charging status indicator light
will change. For additional information,
see “Charging status indicator lights”
(P. CH-49).

Charging/discharging ends in the follow-
ing situations:
• When charging is complete
• When the possible charge time set for the

quick charger is exceeded

NOTE:
• Charging/discharging may automati-

cally stop even if it is not completed.

• If charging stops mid-charge, you can

restart charging by pressing the start
button on the quick charger again.

• The charge connector is locked to the

charge

port

during

charging/

discharging and cannot be discon-
nected. Follow the instructions on the
quick charge equipment or the V2X de-
vice

to

stop

charging/discharging.

Confirm

charging/discharging

is

stopped by looking at the indicators on
the instrument panel. The charge con-
nector can be disconnected from the
vehicle when charging is stopped.

• When V2X charging, the Li-ion battery

charging rate is slower as the percent-
age

of

available

battery

charge

increases.

To finish charging/discharging:

1. Confirm

charging/discharging

is

stopped by looking at the indicators on
the instrument panel. The charge con-
nector can be disconnected from the
vehicle when charging/discharging is
stopped.

2. Unlock the charge connector, remove

from the vehicle and properly store it.

3. Close the quick charge port cap.

4. Shut the charge port lid.

LCH2118

LCH2119

CH-40

Charging

-------------------------------------------------------------------------------------------------------------------------------------------------------------

CHARGE CONNECTOR LOCK
SYSTEM

The normal or trickle charge connector
can be locked to the normal charge port.

Perform the following steps and the
charge connector lock mode can be se-
lected:

1. Press the

button to select “EV

settings” and then press the OK button.

2. Press the

button until “Chg.

Connector Lock” is selected and then
press the OK button.

3. Press the

button until the pre-

ferred mode of AUTO, LOCK or UNLOCK,
is selected and then press the OK
button.

NOTE:

The charge connector lock can be acti-
vated when the shift lever is in the P
(Park) position and the charge connector
is connected. The charge connector lock
will not be activated if the charge con-
nector is not properly connected.

AUTO mode

To select AUTO mode, push the up and
down switch until "AUTO" is selected and
then press the OK button. The indicator
light for "AUTO" will illuminate.

When AUTO mode is selected, the charge
connector is locked while charging is in
process. The charge connector will be un-
locked automatically when charging is
complete.

LOCK mode

To select the LOCK mode, push the up and
down switch until "LOCK" is selected and
then press the OK button. The indicator
light for "LOCK" will illuminate.

When LOCK mode is selected, the charge
connector will remain locked. The charge
connector will be unlocked when UNLOCK
mode is selected or temporary unlock op-
eration is performed.

UNLOCK mode

To select UNLOCK mode, push the up and
down switch until "UNLOCK" is selected
and then press the OK button. The indica-
tor light for "UNLOCK" will illuminate.

When UNLOCK mode is selected, the
charge connector will remain unlocked.

Temporary unlock mode

When the charge connector lock system is
in the AUTO or LOCK mode, the charge
connector lock can be unlocked temporar-
ily by using the NISSAN Intelligent Key® or
the charge port lid switch.

LHA5081

Charging

CH-41

-------------------------------------------------------------------------------------------------------------------------------------------------------------

Unlock operation using Intelligent
Key

1. Press the charge port lid opener button

on the Intelligent Key for more than 1
second.

2. The charging status indicator light

flashes three times and a beep sounds
three times. The charge connector lock
is unlocked for 30 seconds.

3. After 30 seconds, the charge connector

lock is locked.

The charge connector lock can also be un-
locked for 30 seconds when unlocking a
door or the rear hatch (in this case, the
charging status indicator light does not
operate). If the lock is operated again within
30 seconds after unlocking the door/rear
hatch, the charge connector lock is locked
again.

Unlock operation using charge
port lid switch

1. Push the charge port lid switch.

2. The charging status indicator light

flashes three times and a beep sounds
three times. The charge connector lock
is unlocked for 30 seconds.

3. After 30 seconds, the charge connector

lock is locked.

LCH2009

LIC3808

CH-42

Charging

-------------------------------------------------------------------------------------------------------------------------------------------------------------

NOTE:
• Depending on the charging station, the

lock mechanism established by local
standards may not be compatible with
your vehicle. It may not be possible for
the charge connector to lock to your
vehicle.

• When the power source is cut off while

charging in AUTO mode, the connector
will be continuously locked for 5 min-
utes, then it will be released.

• When timer charging is set with AUTO

mode, the connector will not lock until
charging is started.

• When the following system(s) are oper-

ated individually or the 12-volt battery
is being charged, the charging connec-
tor lock will not lock:

– Climate Ctrl. Timer
– Remote

climate

control

(if

so

equipped)

– Li-ion

battery

warmer

(if

so

equipped)

If the charge connector cannot be
unlocked

1. Place power switch in the OFF position.

2. Open the hood.

3. Insert a flat head screwdriver or suitable

tool into the screw that is located on the
front of the hood lock.

4. Turn it clockwise to release the charge

connector lock.

5. Remove the charge connector.

CHARGING TIMER

Use charging timer to schedule when the
Li-ion battery charges. The vehicle auto-
matically begins charging at the scheduled
times when the charge connector is con-
nected to the vehicle. The timers do not
need to be reset each time the Li-ion bat-
tery needs charging.

The charging timer can save two timer set-
tings that include the charging start time
and end time. The charging timer can be
applied to the timer settings for each day
of the week (models with Navigation
System).

The vehicle automatically begins charging
at the scheduled times when the charge
connector is connected to the vehicle. The
timers do not need to be reset each time
the Li-ion battery needs to be charged.

LCH2143

CHARGING METHODS

Charging

CH-43

-------------------------------------------------------------------------------------------------------------------------------------------------------------

1. Press the

button to select “EV

settings” and then press the OK button.

2. Press the

button to select

“Charge Timer1” or “Charge Timer2” and
then press the OK button.

3. Press the

button to select

“Timer” and then press the OK button.
The indicator light will turn on when the
timer setting is turned on.

4. Press the

button until to select

“Start time” and then press the OK
button.

5. Press the

button to set “Hour”

and then press the OK button.

6. Press the

button to set “Min-

ute” and then press the OK button.

7. Press the

button to select “End

time” and then press the OK button.

8. Press the

button to set “Hour”

and then press the OK button.

9. Press the

button to set “Min-

ute” and then press the OK button.

10. Models with Navigation System: Press

the

button to select the days

of the week you wish to activate the
charging timer and then press the OK
button. Press the Back button to return
to the previous display.

11. After the setting is complete, place the

power switch in the OFF position, and
then connect the charge connector to
the vehicle.

NOTE:
• Always place the power switch in the

OFF position after setting the charging
timers. When the power switch in the
ON position, the Li-ion battery will not
start charging.

• Charging stations that are used to per-

form

normal

charging

may

be

equipped with timer functions. If the
charging timer function and the ve-
hicle timer are both set, and the two
timers are not set to operate at the
same time, it is possible that the char-
ger will not start or the battery will not
be charged to the level expected.

• The Li-ion battery may not charge to

the expected level using the charging
timer while the Li-ion battery warmer
(if so equipped) operates.

• Charging timer is performed according

to the current time setting of the clock
on the vehicle information display.
When setting the charging timer func-
tion, be sure to check that the current
time displayed is correct.

• To turn off the charging timer function,

select "Timer" on the charge timer dis-
play (vehicle information display) us-
ing the

button and press the

OK button to turn off the indicator
light. The start and end time settings
are not deleted, even if the charging
timer function is turned off.

LCH2144

CH-44

Charging

-------------------------------------------------------------------------------------------------------------------------------------------------------------

• If the day of the week is not selected on

the timer charge setting screen, the
charging timer will not operate on that
day. The system will wait until the next
set charging time to perform charging
(models with Navigation System).

Timer Charge setting screen

Chg. Timer Only at HOME (models
with Navigation System)

If you register your home in the navigation
system and turn on “Chg. Timer Only at
HOME,” the timer charging is applied only
when the normal or trickle charge is per-
formed at home. For additional informa-
tion, refer to the NissanConnect® Manual
for the registration. When the charging is
performed at a place other than home, the
charging automatically starts when a nor-
mal or trickle charge connector is con-
nected to the vehicle.

Full charge has priority

If “Full charge has priority” is turned on, the
charge start timer will be advanced if the
fully charged condition of the Li-ion battery
cannot be achieved during the start time
to end time interval. If the fully charged
battery condition cannot be achieved, the
charge continues until the battery is fully
charged.

LCH2144

LHA5085

Charging

CH-45

-------------------------------------------------------------------------------------------------------------------------------------------------------------

NOTE:

If “Full charge has priority” is turned on, it
is possible that the battery is not
charged fully by the charge end time due
to the operating condition of Climate
Ctrl. Timer and the tolerance of charging
time, etc. In that case, the charging con-
tinues until the Li-ion battery is fully
charged.

TIMER DISPLAY

The timer display appears for approxi-
mately 30 seconds when the power switch
is placed in the OFF position.

O

1

Charging time

The estimated time of charging the Li-ion
battery (start time and end time) is dis-
played.
• When the charging timer is set, the charg-

ing system calculates the estimated time
to charge the Li-ion battery based on the
electrical power supplied in the last
charging using the timer, and the start
time and end time are displayed.

• The estimated time may be recalculated

depending on the actual electrical power
after the charge cable is connected. Al-
though the estimated time may be differ-
ent from the time that was displayed
when the power switch was placed in the
OFF position, this is not a malfunction.

• When the charging timer is set to OFF, the

estimated end time to charge the Li-ion
battery to a full level in the case of per-
forming the immediate charge. The end
time is calculated based on the electrical
power selected in the “Charge Time
Screen”.

• When the Li-ion battery was fully charged,

the charging time will be displayed as
“--:--”.

O

2

Charging timer setting status

When the charging timer is set, the start
time and end time of the charging using
the timer are displayed

O

3

Climate Ctrl. timer setting status

When the Climate Ctrl. timer is set, the de-
parture time (end time) set for the Climate
Ctrl. Timer is displayed.

O

4

Charge connector lock setting status

The current mode of the charge connector
lock (AUTO, LOCK or UNLOCK) is displayed.

LHA5086

LCH2210

CH-46

Charging

-------------------------------------------------------------------------------------------------------------------------------------------------------------

For additional information, see “Charge
connector lock system” (P. CH-41).

When the OK button on the steering wheel
is pressed, the display will be switched to
the “EV Settings” menu. In the EV Settings,
the setting of the charging timer, Climate
Ctrl. timer and charge connector lock
mode can be changed. For additional infor-
mation, see “Vehicle information display”
(P. 2-26).

When the

button on the steering

wheel is pressed while the timer display is
shown, the display is switched to the ECO
Drive Report (if the vehicle was driven).

Either display will continue to be displayed
for another 30 seconds when the button is
operated. If the doors are locked after the
power switch was placed in the OFF posi-
tion, the display will turn off before the pre-
set time.

For models with Navigation System, the
day of the week is displayed with the time
(hour and minute) in each information

O

1

O

3

.

In addition to the above, note the following
conditions for the charging time

O

1

infor-

mation:

• The charging time is displayed by the 10

minutes. If the estimated charging time is
longer than 24 hours, “Over 24h” is
displayed.

• When the charging is set to start imme-

diately after connecting the charge con-
nector to the vehicle, the start time is
displayed as “Charge Now”.

• While being charged, the time when the

charging has actually started is displayed
as the start time. The end time is dis-
played

according

to

the

estimated

charging time that was calculated based
on the electrical power being supplied.

• For models with Li-ion battery warmer,

the charging system calculates the elec-
trical power used by the battery warmer
when the Li-ion battery temperature is
low, and longer charging time will be
displayed.

• When “Chg. Timer Only at HOME” is set to

ON (models with Navigation System) in
the EV Settings, the start time is displayed
only when the power switch is placed in
the OFF position at home. If the power
switch is placed in the OFF position other
than at home, the immediate charge
mode is selected and “Charge Now” will
appear as the start time.

• When “Full charge has priority” is set to ON

in the EV Settings and the Li-ion battery
cannot be charged to a full level within
the hours between the scheduled start
time and end time of the charging timer,
the charging time shows the time that
exceeds the scheduled hours in the
charging timer.

• If you need to confirm the estimated

charging time depending on the avail-
able electrical power (supplied to the
charger), see the Estimated Charge Time
display. For additional information, see
“Meters and gauges” (P. 2-5).

NOTE:
• The displayed end time of charging is

an estimation. The Li-ion battery may
not be charged to a full level by the
estimated end time.

• If the charging timer and the Climate

Ctrl. timer are set to operate at the
same time, longer charging time will be
displayed or the Li-ion battery may not
be charged to a full level at the sched-
uled end time.

Charging

CH-47

-------------------------------------------------------------------------------------------------------------------------------------------------------------

IMMEDIATE CHARGE

When a charging timer is not turned on,
charging automatically starts when a nor-
mal or trickle charge connector is con-
nected to the vehicle.

Use the immediate charge mode anytime
you want to start charging when a charg-
ing timer is turned on by performing the
following:

1. Place the power switch in the OFF

position.

2. Push the immediate charge switch.

3. Connect the normal or trickle charge

cable when the charging status indica-
tor light changes to display immediate
charge mode. For additional informa-
tion, see “Charging status indicator
lights” (P. CH-49).

NOTE:
• You have 15 minutes to connect a nor-

mal or trickle charge connector to the
vehicle after the immediate charge
switch is pushed. If a charge connector
is not connected to the vehicle within
15 minutes, the vehicle automatically
returns to the previous setting.

• To cancel immediate charge mode push

the immediate charge switch again.

• If the charge cable is disconnected, the

Li-ion battery automatically switches
to charging timer. To perform an im-
mediate charge again, push the imme-
diate charge switch and connect the
charge cable.

• If the charge cable is already con-

nected, push the immediate charge
switch to start performing an immedi-
ate charge.

CHARGING RELATED REMOTE
FUNCTION (models with
Navigation System)

This vehicle incorporates a communica-
tion device that is called a TCU (Telematics
Communication Unit). The communication
connection between this unit and NISSAN
Data Center allows for various remote
function services.

LCH2125

CH-48

Charging

-------------------------------------------------------------------------------------------------------------------------------------------------------------

Remote battery status check:

The charging status of the Li-ion battery
can

be

checked

using

the

“NissanConnect®

EV

&

Services”,

or

“NissanConnect®”, or Owners Portal even
if you are not in the vehicle.

Remote start charge:

The function of starting the Li-ion battery
charge or starting the heater and air con-
ditioner is available using your personal
computer or internet enabled smart
phone.

Plug-in reminder:

A notification e-mail will be sent to your
personal computer or internet enabled
smart phone if the plug is not connected
at the specific time you selected, after
turning off the power switch.

NOTE:
• Establishing the NissanConnect® EV &

Services, or NissanConnect® is neces-
sary before using this service. For addi-
tional

information,

refer

to

the

NissanConnect® Manual.

• To check the Li-ion battery charging

status using an internet enabled smart
phone or personal computer, the fol-
lowing conditions must be met:

– The vehicle must be located in a cel-

lular phone coverage area.

– The cellular phone must be located

in

an

area

with

cellular

phone

coverage.

– If using a computer, the computer

must be connected to the internet.

– Some cellular phones are not com-

patible and cannot be used to check
the Li-ion battery charging status.
Please confirm beforehand.

• Certain remote functions require a

compatible smart phone, which is not
included with the vehicle.

• NissanConnect®

EV

&

Services,

or

NissanConnect® information system
features are included through a sub-
scription service which requires owner
consent to activate. The subscription
must be active to use these features.

• NissanConnect®

EV

&

Services,

or

NissanConnect® communications may
be received at a verified e-mail address
or by SMS/text messaging-enabled
mobile phone.

• Standard text rates and/or data usage

may apply depending on your carrier.

CHARGING STATUS INDICATOR
LIGHTS

The charging status indicator lights (1) to (3)
display the charging status, and are visible
from both inside and outside the vehicle.

LCH2146

CHARGING RELATED INDICATOR
LIGHTS

Charging

CH-49

-------------------------------------------------------------------------------------------------------------------------------------------------------------

When the normal charge connector lock
is unlocked

All of the indicator lights, (1) to (3), will flash
and a beep will sound three times when
the normal charge connector lock switch
on the Intelligent Key or the charge port lid
switch is pushed.

When the normal charge connector is
connected incorrectly

All of the indicator lights, (1) to (3), will flash
and a beep will sound three times within 30
seconds when the charge connector is
connected

incorrectly

to

the

normal

charge port.

Ready for charging timer

If the charging timer is set, the indicator
lights illuminate in order from (1) to (3). The
indicator lights turn off after approximately
5 minutes.

Ready for immediate charge

When the power switch is off and if the
immediate charge switch is pushed while
the charge cable is not connected, the in-
dicator light (2) illuminates.

This indicator light (2) illuminates when the
vehicle is ready for immediate charge. You
have 15 minutes to connect the charge
connector to the vehicle. If the charge con-
nector is not connected within 15 minutes,
the indicator light (2) turns off and you
must start the immediate charge mode
again to charge the Li-ion battery.

LCH2147

LCH2148

LCH2149

CH-50

Charging

-------------------------------------------------------------------------------------------------------------------------------------------------------------

When charging

When the Li-ion battery is being charged,
the charging status indicator lights will
change depending on the amount the Li-
ion battery is charged.

* : This value is also displayed by the battery
available charge gauge on the vehicle in-
formation display.

When fully charged

All of the indicator lights (1) to (3) illuminate
when the Li-ion battery is fully charged to
the selected charging mode level.

The indicator lights turn off after approxi-
mately 5 minutes or when the charge con-
nector is removed.

When the indicator light (3) flashes

The indicator light (3) flashes when the 12-
volt battery is being charged. For additional
information, see “Charging the 12-volt bat-
tery” (P. EV-5).

The indicator light will also flash for up to 5
minutes if the electrical power from the
EVSE or charging device is interrupted dur-
ing charging. Charging will restart auto-
matically when the electrical power from
the EVSE or charging device is restored if
the normal charge connector is con-
nected. The charge start beep will not
sound when charging restarts.

LCH2150

LCH2151

LCH2152

Charging

CH-51

-------------------------------------------------------------------------------------------------------------------------------------------------------------

The indicator will also flash when the fol-
lowing systems are operating:
• Climate Ctrl. Timer
• Remote climate control (if so equipped)
• Li-ion battery warmer (if so equipped)

When not charging

None of the lights are illuminated when the
Li-ion battery and 12-volt battery are not
charging.

EVSE (Electric Vehicle Supply
Equipment) CONTROL BOX
INDICATOR LIGHT

When a charge is being performed, the
charging status is shown by the indicator
light that is on the EVSE control box.

An indicator light also indicates if there is
an EVSE malfunction.

LCH2153

LCH2203

CH-52

Charging

-------------------------------------------------------------------------------------------------------------------------------------------------------------

Meaning

Light ON

Blinking

Light OFF

Symbol

LCH2204

Charging

CH-53

-------------------------------------------------------------------------------------------------------------------------------------------------------------

READY

POWER

FAULT

Status and action to be taken

All LED lamps will light for a 1/2 second check when EVSE is first connected to an
outlet.

After initial processing is completed, when the EVSE is not connected to the ve-
hicle, or the EVSE is connected to the vehicle but charging is not being performed.
For additional information, see “Charging troubleshooting guide” (P. CH-56).

While the Li-ion battery is being charged

If the EVSE control box indicator light does not illuminate after connecting the
plug to the outlet, check the GFCI and circuit breaker for the outlet. If either the
GFCI or breaker has tripped, the circuit may not be suitable for use with EVSE. You
should have a qualified electrician inspect and repair the electrical circuit. If the
GFCI breaker is not tripped, stop using the EVSE. It is recommended that you visit
a NISSAN certified LEAF dealer.

The EVSE could not detect sufficient grounding at outlet for reliable EV charging.
Consult a qualified electrician to have the outlet checked.

When the temperature of the electrical plug is too hot or the EVSE is unable to de-
tect the temperature of the electrical plug.
The EVSE is restricting the charging current for safety according to the tempera-
ture of the electrical plug.
POWER Lamp status:

= No charging current restricted.

= Charge current restricted

= Charge stopped

This problem may be caused by a failure in the outlet.
Stop using the outlet and consult a qualified electrician.
If the same indication continues after checking an outlet, it is recommended that
you visit a NISSAN certified LEAF dealer.

CH-54

Charging

-------------------------------------------------------------------------------------------------------------------------------------------------------------


Content      ..     4      5      6      7     ..