Nissan Titan (2023 year). Manual in english - page 14


  Index      Manuals     Nissan Titan (2023 year). Manual in english


Search            copyright infringement  


Content      ..     12      13      14      15     ..


Nissan Titan (2023 year). Manual in english - page 14


• To prevent the Intelligent Key from being

left inside the vehicle, make sure you
carry the Intelligent Key with you and then
lock the doors.

• Do not pull the door handle before push-

ing the door handle request switch (if so
equipped). The door will be unlocked but
will not open. Release the door handle
once and pull it again to open the door.

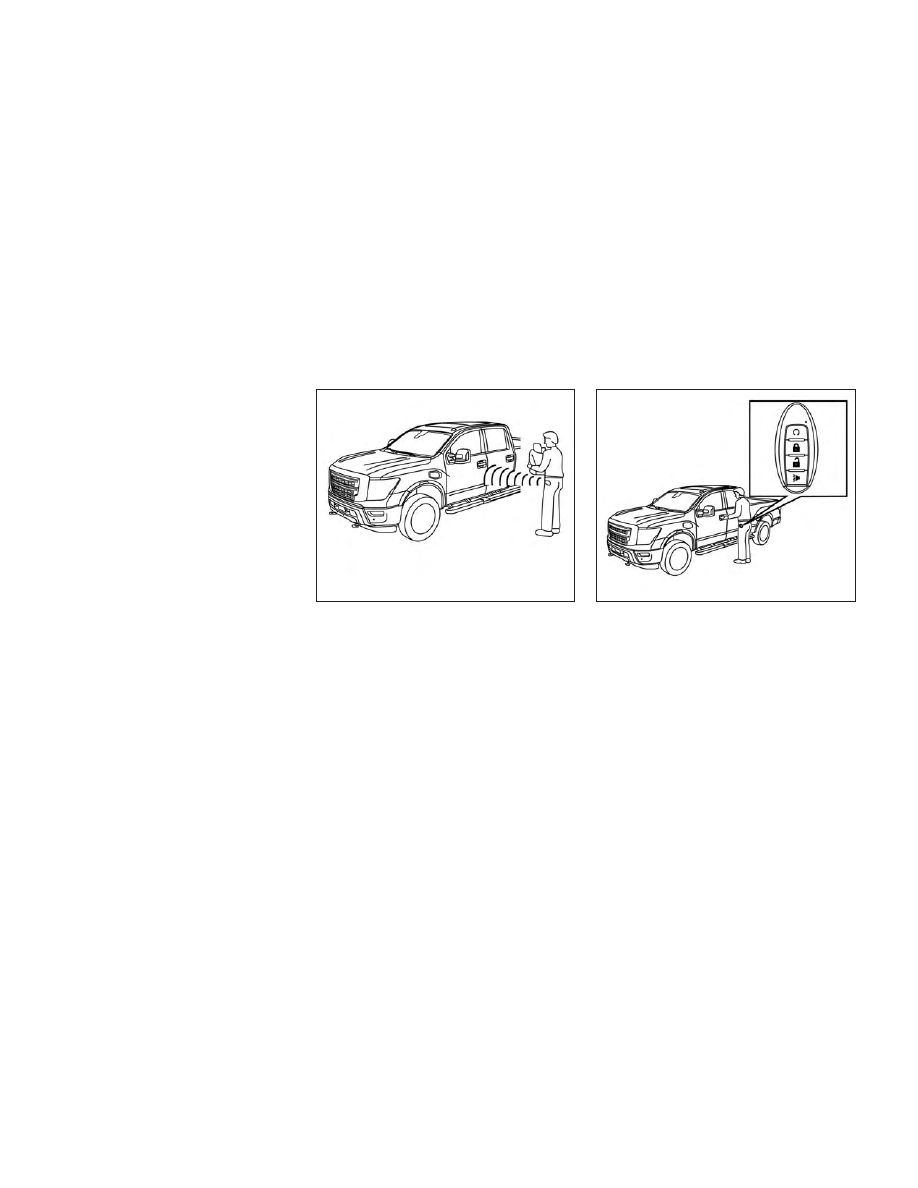
NISSAN INTELLIGENT KEY®
OPERATION

You can lock or unlock the doors without
taking the Intelligent Key out of your pocket
or bag.

When you carry the Intelligent Key with you,
you can lock or unlock all doors by pushing
the door handle request switch (if so
equipped) within the range of operation.

Locking doors

LPD3097

LPD3098

3-12

Pre-driving checks and adjustments

-------------------------------------------------------------------------------------------------------------------------------------------------------------

1. Move the shift lever to the P (Park) posi-

tion, place the ignition switch in the LOCK
position and make sure you carry the
Intelligent Key with you.

2. Close the driver’s door and push the

driver’s door request switch (if so
equipped)

O

1

OR close all doors and

push any door request switch (if so
equipped) while carrying the Intelligent
Key with you.

3. Push the door handle request switch (if

so equipped) while carrying the Intelli-
gent Key with you.

4. All doors and the electronic locking tail-

gate (if so equipped) will lock.

5. The hazard indicator lights flash twice,

the outside chirp sounds twice, and the
front and tail lights may turn on for 10
seconds.

NOTE:

• Request switches (if so equipped) for

all doors can be deactivated when the
“I-Key Door Lock (if so equipped)” set-
ting is switched to OFF in the Vehicle
Settings of the vehicle information dis-
play. For additional information, see
“Vehicle information display” (P. 2-24).

• Doors and the electronic locking tail-

gate (if so equipped) will lock with the
door handle request switch (if so
equipped) while the ignition switch is
not in the LOCK position.

• Doors do not lock by pushing the door

handle request switch (if so equipped)
while the driver’s door is open. How-
ever, doors lock with the mechanical
key even if any door is open.

• Doors and the electronic locking tail-

gate (if so equipped) do not lock with
the door handle request switch (if so
equipped) if the Intelligent Key is inside
the vehicle. A beep will sound to warn
you. However, when an Intelligent Key
is inside the vehicle, doors can be
locked with another Intelligent Key.

WARNING

After locking the doors using the re-
quest switch (if so equipped), make
sure that the doors have been securely
locked by operating the door handles.
Failure to follow these instructions may
result in inadvertently unlocking the
doors, which may decrease the safety
and security of your vehicle.

LPD3099

Pre-driving checks and adjustments

3-13

-------------------------------------------------------------------------------------------------------------------------------------------------------------

CAUTION

When locking the doors using the re-
quest switch (if so equipped), make
sure to have the Intelligent Key in
your possession before operating
the request switch (if so equipped) to
prevent the Intelligent Key from be-
ing left in the vehicle.

The request switch (if so equipped) is
operational only when the Intelligent
Key has been detected by the Intelli-
gent Key system.

Lockout protection

To prevent the Intelligent Key from being
accidentally locked in the vehicle, lockout
protection is equipped with the Intelligent
Key system.

When any door is open, the doors are
locked, and then the Intelligent Key is put
inside the vehicle and all the doors are
closed; a chime will sound and the lock will
automatically unlock.

NOTE:

The doors may not lock when the Intelli-
gent Key is in the same hand that is op-
erating

the

request

switch

(if

so

equipped) to lock the door. Put the Intel-
ligent Key in a purse, pocket or your
other hand.

CAUTION

The lockout protection may not func-
tion under the following conditions:

When the Intelligent Key is placed on
top of the instrument panel.

When the Intelligent Key is placed in-
side the glove box or a storage bin.

When the Intelligent Key is placed in-
side the door pockets.

When the Intelligent Key is placed in-
side or near metallic materials.

Unlocking doors

1. Carry the Intelligent Key.

2. Push the door handle request switch (if

so equipped)

O

1

.

3. The door will unlock and the hazard in-

dicator lights flash once, the outside
chirp sounds once, and the front and tail
lights may turn on for 30 seconds.

4. Push the door handle request switch (if

so equipped) again within one minute.

LPD3098

3-14

Pre-driving checks and adjustments

-------------------------------------------------------------------------------------------------------------------------------------------------------------

5. The outside chirp will sound once and

the remaining doors and electronic
locking tailgate (if so equipped) will
unlock.

NOTE:

• If “Selective Unlock” is turned OFF in

the Vehicle Settings, all doors and elec-
tronic locking tailgate (if so equipped)
will unlock upon the first request
switch (if so equipped) press.

• The request switch (if so equipped) can

be deactivated when the “I-Key Door
Lock (if so equipped)” is switched to
OFF in the Vehicle Settings of the ve-
hicle information display. For addi-
tional information, see “Vehicle infor-
mation display” (P. 2-24).

If a door handle is pulled while unlocking
the doors, that door may not be unlocked.
Returning the door handle to its original
position will unlock the door. If the door
does not unlock after returning the door
handle, push the door handle request (if so
equipped) switch to unlock the door.

All doors will be locked automatically un-
less one of the following operations is per-
formed within one minute after pushing
the request switch (if so equipped).
• Opening any door.
• Pushing the ignition switch.

Using the interior lights

The interior lights illuminate for a period of
time when a door is unlocked and the
room light switch is in the DOOR position.

The lights can be turned off without waiting
by

performing

one

of

the

following

operations:
• Placing the ignition switch in the ON

position.

• Locking the doors with the Intelligent Key.
• Switching the room light switch to the

“OFF” position.

For additional information, see “Interior
lights” (P. 2-90).

LPD3099

Pre-driving checks and adjustments

3-15

-------------------------------------------------------------------------------------------------------------------------------------------------------------

HOW TO USE THE REMOTE
KEYLESS ENTRY FUNCTION

The remote keyless entry function can op-
erate all door locks using the remote key-
less function of the Intelligent Key. The re-
mote keyless function can operate at a
distance of 33 ft (10 m) away from the ve-
hicle. The operating distance depends
upon the conditions around the vehicle.

The remote keyless entry function will not
function under the following conditions:
• When the Intelligent Key is not within the

operational range.

• When

the

Intelligent

Key

battery

is

discharged.

• When the doors are open or not closed

securely.

CAUTION

When locking the doors using the Intel-
ligent Key, be sure not to leave the key
in the vehicle.

Type A (if so equipped)

1.

(lock) button

2.

(unlock) button

3.

(panic) button

Type B (if so equipped)

1.

(remote engine start) button

2.

(lock) button

3.

(unlock) button

4.

(panic) button

Locking doors

1. Place the ignition switch in the LOCK

position.

2. Close all doors.

3. Press the

button on the Intelli-

gent Key.

LPD3600

LPD3602

3-16

Pre-driving checks and adjustments

-------------------------------------------------------------------------------------------------------------------------------------------------------------

4. The hazard warning lights flash twice

and the horn beeps once.

5. All doors and the electronic locking tail-

gate (if so equipped) will be locked.

WARNING

After locking the doors using the Intel-
ligent Key, be sure that the doors have
been securely locked by operating the
door handles. Failure to follow these in-
structions may result in inadvertently
unlocking the doors, which may de-
crease the safety and security of your
vehicle.

Unlocking doors

1. Press the

button on the Intelligent

Key to unlock the driver’s door.

2. The hazard warning lights flash once.

3. Press the

button again within 1

minute to unlock all doors and elec-
tronic locking tailgate (if so equipped).

All doors and electronic locking tailgate (if
so equipped) will be locked automatically
unless one of the following operations is
performed within 1 minute after pressing
the

button:

• Opening any doors.

• Pushing the ignition switch.

Using the interior lights

The interior lights illuminate for a period of
time when a door is unlocked and the
room light switch is in the DOOR position.

The lights can be turned off without waiting
by

performing

one

of

the

following

operations:
• Placing the ignition switch in the ON

position.

• Locking the doors with the Intelligent Key.
• Switching the room light switch to the

“OFF” position.

For additional information, see “Interior
lights” (P. 2-90).

Opening windows

The Intelligent Key allows you to simultane-
ously open windows equipped with auto-
matic operation.

To open the windows, press the

but-

ton on the Intelligent Key for

longer than 3

seconds

after all doors are unlocked

The door windows will open while pressing
the

button on the Intelligent Key.

The door windows cannot be closed by
using the Intelligent Key.

Using the panic alarm

If you are near your vehicle and feel threat-
ened, you may activate the panic alarm to
call attention by pressing and holding the

button on the Intelligent Key for

lon-

ger than 0.5 seconds.

The panic alarm and headlights will stay on
for a period of time.

The panic alarm stops when:
• It has run for a period of time.
• Any button is pressed on the Intelligent

Key.

• The request switch (if so equipped) on the

driver or passenger door is pushed and
the Intelligent Key is in range of the door
handle.

Trailer light check (if so equipped)

This functionality allows the customer to
confirm trailer light operation, without the
need of a second person to press the brake
pedal or activate each turn signal light. The
trailer light check can be performed by the
Intelligent Key or through the Vehicle Set-
tings in the vehicle information display. For
additional information, see “Vehicle infor-
mation display” (P. 2-24).

Pre-driving checks and adjustments

3-17

-------------------------------------------------------------------------------------------------------------------------------------------------------------

To activate the trailer light check function
with your Intelligent Key, perform the
following:

1. Aim the Intelligent Key at the vehicle.

2. Press and release the

LOCK

button.

3. Within 2 seconds, press and hold the

LOCK button again for at least 2

seconds, until the horn beeps once and
the park lights turn on.

The following events will occur:
• The left turn signal light on the vehicle

and the trailer will flash for 5 seconds.

• The right turn signal light on the vehicle

and the trailer will flash for 5 seconds.

• The brake lights on the vehicle and the

trailer will turn ON for 5 seconds.

NOTE:
If the ignition switch is in the OFF po-
sition, the park lights will turn off after
the events above occur. If ignition
switch is in the ON position, lights will
stay on for 45 seconds after trailer
light check. If the trailer lights do not
work properly, check the connections
and bulbs. If the vehicle lights do not
turn on, check the bulbs. If the trailer
light check routine fails to start, en-
sure the following vehicle conditions:

• The vehicle is NOT moving, 0 mph (0

km/h)

• Brake switch is NOT depressed
• Left or right flasher is OFF
• Trailer light check configuration is NOT

disabled and available in the meter
towing settings

• The hazard switch is NOT turned ON
• The shift position is fully in P (Park)

position

• Vehicle is within Remote Keyless Entry

range

Answer back horn feature

If desired, the horn beep feature can be
deactivated using the Intelligent Key.

To deactivate:

Press and hold the

and

buttons

for at least 2 seconds.

The hazard warning lights will flash three
times to confirm that the horn beep fea-
ture has been deactivated.

To activate:

Press and hold the

and

buttons

for at least 2 seconds once

more.

The hazard warning lights will flash once
and the horn will sound once to confirm
that the horn beep feature has been
reactivated.

Deactivating the horn beep feature does
not silence the horn if the alarm is
triggered.

3-18

Pre-driving checks and adjustments

-------------------------------------------------------------------------------------------------------------------------------------------------------------

Intelligent Key button operation
light

The light blinks only when you press any
button on the Intelligent Key. The light illu-
mination only signifies that the key fob has
transmitted a signal. You may look and/or
listen to verify that the vehicle has per-
formed the intended operation. If the light
does not blink, your battery may be too
weak to communicate to the vehicle. If this
occurs, the battery may need to be re-
placed. For additional information regard-
ing the replacement of a battery, see “Bat-
tery replacement” (P. 8-28).

WARNING SIGNALS

To help prevent the vehicle from moving
unexpectedly by erroneous operation of
the Intelligent Key or to help prevent the
vehicle from being stolen, a chime or chirp
sounds from inside and outside the vehicle
and a warning is displayed in the instru-
ment panel.

When a chime or beep sounds or a warning
is displayed, be sure to check the vehicle
and the Intelligent Key.

For additional information, see “Trouble-
shooting guide” (P. 3-20) and “Vehicle infor-
mation display” (P. 2-24).

LPD2836

Pre-driving checks and adjustments

3-19

-------------------------------------------------------------------------------------------------------------------------------------------------------------

TROUBLESHOOTING GUIDE

Verify the location of all Intelligent Keys that are programmed for the vehicle. If another Intelligent Key is in range or inside the vehicle, the
vehicle system may respond differently than expected.

Symptom

Possible Cause

Remedy

When pushing the ignition switch to
stop the engine

The “Shift to Park” warning appears on
the vehicle information display and the
inside warning chime sounds continu-
ously.

The shift lever is not in the P (Park) po-
sition.

Move the shift lever to the P (Park) po-
sition.

When opening the driver's door to get
out of the vehicle

The Door Open warning appears on
the display and the inside warning
chime sounds continuously.

The ignition switch is in the ACC posi-
tion.

Place the ignition switch in the ON po-
sition or close the driver’s door.

When closing the door after getting
out of the vehicle

The “No Key Detected” warning ap-
pears on the vehicle information dis-
play, the outside chime sounds three
times and the inside warning chime
sounds for approximately three sec-
onds.

The Intelligent Key is not detected in-
side of the vehicle.

Place the ignition switch in the OFF
position.

The Rear Door Alert warning message
appears on the display, the horn
sounds three times twice, or a Check
Back Seat For All Articles warning ap-
pears on the display.

The Rear Door Alert is activated.

Check the back seat for all articles,
press the ENTER button to clear the
Rear Door Alert warning message.

When closing the door with the inside
lock knob turned to LOCK

The outside chime sounds for approxi-
mately three seconds and all the doors
unlock.

The Intelligent Key is inside the vehicle.

Carry the Intelligent Key with you.

3-20

Pre-driving checks and adjustments

-------------------------------------------------------------------------------------------------------------------------------------------------------------

Symptom

Possible Cause

Remedy

When pushing the door handle re-
quest switch (if so equipped) or the

button on the Intelligent Key to

lock the door

The outside chime sounds for approxi-
mately three seconds.

The Intelligent Key is inside the vehicle.

Carry the Intelligent Key with you.

When pushing the ignition switch to
start the engine

The Intelligent Key battery indicator
appears on the display.

The battery charge is low.

Replace the battery with a new one.
For additional information, see “Battery
replacement” (P. 8-28).

The “Key ID Incorrect” warning appears
on the vehicle information display .

The Intelligent Key is not detected in-
side of the vehicle.

Carry the registered Intelligent Key
with you.

Pre-driving checks and adjustments

3-21

-------------------------------------------------------------------------------------------------------------------------------------------------------------

The

button will be on the NISSAN

Intelligent Key® if the vehicle has Remote
Engine Start. This feature allows the engine
to start from outside the vehicle.

Vehicles with an automatic climate control
system (if so equipped) may default to ei-
ther a heating or cooling mode depending
on outside and cabin temperatures. For
additional information, see “Remote Engine
Start

with

Intelligent

Climate

Control”

(P. 4-39).

Vehicles with a manual climate control sys-
tem (if so equipped) will default to the last
used heating or cooling mode.

Laws in some local communities may re-
strict or prohibit the use of Remote Engine
Start, or the amount of time a parked ve-
hicle engine may idle. For example, some
laws require a person using Remote Engine
Start to have the vehicle in view or may
restrict idling time except in freezing tem-
peratures. Check local regulations for any
requirements.

Other conditions may affect the function of
the Remote Engine Start feature. For addi-
tional information, see “Conditions the Re-
mote Engine Start will not work” (P. 3-24).

Other conditions can affect the perfor-
mance of the Intelligent Key transmitter.
For additional information, see “NISSAN In-
telligent Key® system” (P. 3-9).

REMOTE ENGINE START
OPERATING RANGE

WARNING

To help avoid risk of injury or death
through unintended operation of the
vehicle and/or its systems, including
entrapment in windows or inadver-
tent door lock activation, do not
leave children, people who require
the assistance of others or pets unat-
tended in your vehicle. Additionally,
the temperature inside a closed ve-
hicle on a warm day can quickly be-
come high enough to cause a signifi-
cant risk of injury or death to people
and pets.

Do not use Remote Engine Start in
closed spaces such as a garage. Do
not breathe exhaust gases; they con-
tain colorless and odorless carbon
monoxide. Carbon monoxide is dan-
gerous. It can cause unconscious-
ness or death.

LPD2995

REMOTE ENGINE START (if so
equipped)

3-22

Pre-driving checks and adjustments

-------------------------------------------------------------------------------------------------------------------------------------------------------------

CAUTION

When the Intelligent Key battery is dis-
charged or other strong radio wave
sources are present near the operating
location, the Intelligent Key operating
range becomes narrower, and the Intel-
ligent Key may not function properly.

The Remote Engine Start function can only
be used when the Intelligent Key is within
the specified operating range from the
vehicle.

The Remote Engine Start operating range
is approximately 197 ft (60 m) from the
vehicle.

REMOTE STARTING THE VEHICLE

To use the Remote Engine Start feature to
start the engine perform the following:

1. Aim the Intelligent Key at the vehicle.

2. Press the

button to lock all doors.

3. Within 5 seconds press and hold the

button until the turn signal lights

flash and the tail lamps turn on. If the
vehicle is not within view press and hold
the

button for at least 2 seconds.

The following events will occur when the
engine starts:
• The parking lights will turn on and remain

on as long as the engine is running.

• The doors will be locked and the climate

control system may come on.

• The engine will continue to run for 10 min-

utes. Repeat the steps to extend the time
for an additional 10 minutes. For addi-
tional information, see “Extending engine
run time” (P. 3-23).

Press and hold the brake then push the
push-button ignition switch to the ON po-
sition before driving. For additional infor-
mation, see “Driving the vehicle” (P. 5-18)).

EXTENDING ENGINE RUN TIME

The Remote Engine Start feature can be
extended one time by performing the
steps listed in “Remote starting the vehicle”
in this section. Run time will be calculated
as follows:
• The first 10 minute run time will start

when the Remote Engine Start function is
performed.

• The second 10 minutes will start immedi-

ately when the Remote Engine Start
function is performed again. For example,
if the engine has been running for 5 min-
utes, and 10 minutes are added, the en-
gine will run for a total of 15 minutes.

• Extending engine run time will count to-

wards the two Remote Engine Start limit.

A maximum of two Remote Engine Starts,
or a single Remote Engine Start with an
extension, are allowed between ignition
cycles. The ignition switch must be cycled
to the ON position and then back to the
OFF position before the Remote Engine
Start procedure can be used again.

CANCELING A REMOTE ENGINE
START

To cancel a Remote Engine Start, perform
one of the following:
• Aim the Intelligent Key at the vehicle and

press

until the parking lights turn off.

• Turn on the hazard warning flashers.
• Cycle the ignition switch on and then off.
• The extended engine run time has

expired.

• The first 10 minute timer has expired.
• The engine hood has been opened.
• The shift lever is moved out of park.

Pre-driving checks and adjustments

3-23

-------------------------------------------------------------------------------------------------------------------------------------------------------------

• The alarm sounds due to illegal entry into

the vehicle.

• The ignition switch is pushed without an

Intelligent Key in the vehicle.

• The ignition switch is pushed with an In-

telligent Key in the vehicle but the brake
pedal is not depressed.

CONDITIONS THE REMOTE ENGINE
START WILL NOT WORK

The Remote Engine Start will not operate if
any of the following conditions are present:
• The ignition switch is placed in the ON

position.

• The hood is not securely closed.
• The hazard warning lights are on.
• The engine is still running. The engine

must be completely stopped. Wait at
least 6 seconds if the engine goes from
running to off. This is not applicable when
extending engine run time.

• The

button is not pressed and held

for at least 2 seconds.

• The

button is not pressed and held

within 5 seconds of pressing the lock
button.

• The brake is pressed.
• The doors are not closed and locked.

• The Key System Error Light remains solid

in the vehicle information display.

• The alarm sounds due to illegal entry into

the vehicle.

• Two Remote Engine Starts, or a single

Remote Engine Start with an extension,
have already been used.

• The vehicle is not in P (Park).
• There is a detected registered key already

inside of the vehicle.

The Remote Engine Start Mode (if so
equipped) may display a warning or indica-
tor in the vehicle information display. For
additional information, see “Vehicle infor-
mation display” (P. 2-24).

3-24

Pre-driving checks and adjustments

-------------------------------------------------------------------------------------------------------------------------------------------------------------

1. Pull the hood lock release handle

O

1

lo-

cated below the driver side instrument
panel. The hood will spring up slightly.

2. Push the lever at the front of the hood to

the side

O

2

as illustrated with your fin-

gertips and raise the hood.

When closing the hood, lower it slowly and
make sure it locks into place.

WARNING

Make sure the hood is completely
closed and latched before driving.
Failure to do so could cause the hood
to fly open and result in an accident.

If you see steam or smoke coming
from the engine compartment, to
avoid injury do not open the hood.

LPD3094

LPD2593

King Cab® models only

HOOD

FUEL-FILLER DOOR

Pre-driving checks and adjustments

3-25

-------------------------------------------------------------------------------------------------------------------------------------------------------------

CAUTION

Be careful when opening and exiting
the driver’s side rear door if the fuel-
filler door is open. This may cause dam-
age to the driver’s side rear door or
fuel-filler door if you open fully and
they make contact.

GASOLINE FUEL ENGINES

WARNING

Gasoline is extremely flammable and
highly explosive under certain condi-
tions. You could be burned or seri-
ously injured if it is misused or mis-
handled. Always stop the engine and
do not smoke or allow open flames or
sparks

near

the

vehicle

when

refueling.

Do not attempt to top off the fuel
tank after the fuel pump nozzle
shuts off automatically. Continued
refueling may cause fuel overflow,
resulting in fuel spray and possibly a
fire.

Use only an original equipment type
fuel-filler cap as a replacement. It has
a built-in safety valve needed for
proper operation of the fuel system
and emission control system. An in-
correct cap can result in a serious
malfunction and possible injury. It
could also cause the

Malfunc-

tion Indicator Light (MIL) to come on.

Never pour fuel into the throttle body
to attempt to start your vehicle.

Do not fill a portable fuel container
on a truck bed liner, rubber truck bed
mat or other insulating material.
Static electricity can cause an explo-
sion of flammable liquid, vapor or
gas in any vehicle or trailer. To reduce
the risk of serious injury or death
when filling portable fuel containers:

Always place the container on the

ground when filling.

Do not use electronic devices

when filling.

LPD2594

King Cab® models only

LPD3100

3-26

Pre-driving checks and adjustments

-------------------------------------------------------------------------------------------------------------------------------------------------------------

Keep the pump nozzle in contact

with the container while you are
filling it.

Use only approved portable fuel

containers for flammable liquid.

CAUTION

Do not use E-15 or E-85 fuel in your
vehicle. For additional information,
see “Fuel recommendation” (P. 10-4).

The Loose Fuel Cap warning mes-
sage will appear if the fuel-filler cap
is not properly tightened. It may take
a few driving trips for the message to
be displayed. Failure to tighten the
fuel-filler cap properly after the
Loose Fuel Cap warning message ap-
pears may cause the

Malfunc-

tion

Indicator

Light

(MIL)

to

illuminate.

Failure to tighten the fuel-filler cap
properly may cause the

Mal-

function Indicator Light (MIL) to illu-
minate. If the

light illuminates

because the fuel-filler cap is loose or
missing, tighten or install the cap and
continue to drive the vehicle. The

light should turn off after a few

driving trips. If the

light does not

turn off after a few driving trips, have
the vehicle inspected. It is recom-
mended that you visit a NISSAN
dealer for this service.

For additional information, see “Mal-
function

Indicator

Light

(MIL)”

(P. 2-17).

If fuel is spilled on the vehicle body,
flush it away with water to avoid
paint damage.

To remove the fuel-filler cap:

1. Turn the fuel-filler cap counterclockwise

to remove.

2. Loop the tether strap around the hook

while refueling.

To install the fuel-filler cap:

1. Insert the fuel-filler cap straight into the

fuel-filler tube.

2. Turn the fuel-filler cap clockwise until a

single click is heard.

LPD3101

Pre-driving checks and adjustments

3-27

-------------------------------------------------------------------------------------------------------------------------------------------------------------


Content      ..     12      13      14      15     ..