Nissan Z (2023 year). Manual in english - page 6


  Index      Manuals     Nissan Z (2023 year). Manual in english


Search            copyright infringement  


Content      ..     4      5      6      7     ..


Nissan Z (2023 year). Manual in english - page 6


Tire Pressure Unit:

The unit for tire pressure that is shown in

the vehicle information display can be

changed to:

.

psi

.

kPa

.

bar

.

kgf/cm

2

Use the scroll dial

to select and change

the unit.
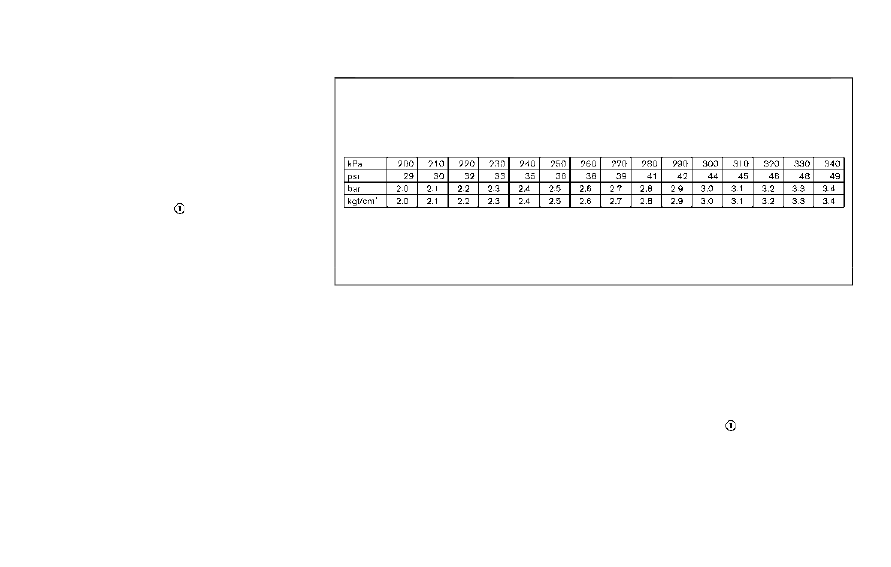
If necessary, refer to the following table to

convert between units.

JVI0938X

Clock

Allows user to adjust the clock settings

and time within the vehicle information

display.

.

Display (if so equipped)

.

Clock Mode (if so equipped)

.

Clock Format

.

Daylight Saving (if so equipped)

.

Time Zone (if so equipped)

.

Set Clock Manually

The clock may also be set in the center

display. For additional information, refer

to the separate NissanConnect® Owner’s

Manual.

Vehicle Settings

The vehicle settings allows user to

change settings for the following menus.

.

Lighting

.

Turn Indicator

.

Locking

.

Wipers

The vehicle settings can be changed

using the scroll dial

.

Lighting:

The “Lighting” menu has the following

options:

.

Welcome Headlight
The welcome lighting can be set to be

Instruments and controls

2-25

-------------------------------------------------------------------------------------------------------------------------------------------------------------

2-26

Instruments and controls

ON or OFF. Use the scroll dial

to turn

this feature ON or OFF.

.

Auto Room Lamp
When this item is turned to ON, the

interior lights will illuminate if any door

is unlocked. Use the scroll dial

to

turn this feature ON or OFF.

.

Auto Headlight
The sensitivity of the Auto Headlight

can be adjusted. Use the scroll dial

to select the required sensitivity. The

following options are available:
— Turn on earliest
— Turn on earlier
— Turn on standard
— Turn on later

.

Light Off Delay
The duration of the automatic head-

lights off timer can be changed from 0

to 180 seconds. Use the scroll dial

to

change the duration.

Turn Indicator:

The “3 flashes” overtaking feature can be

changed from:

.

3 flashes

.

Continuous

Use the scroll dial

to toggle choices.

Locking:

The “Locking” menu has the following

options:

.

Ext. Door Switch (if so equipped)
When this item is turned on, the

request switch on the door is acti-

vated. Use the scroll dial

to activate

or deactivate this function.

.

Selective Unlock (if so equipped)
When this item is turned to ON, only

the driver’s door is unlocked first after

the door unlock operation. When the

door handle request switch on the

driver’s or passenger’s side door is

pushed to be unlocked, only the

corresponding door is unlocked first.

All the doors can be unlocked if the

door unlock operation is performed

again within 60 seconds. When this

item is turned to OFF, all the doors will

be unlocked after the door unlock

operation is performed once.

.

Auto Door Unlock (if so equipped)
The “Auto Door Unlock” feature allows

user to customize the auto door

unlock options. Use the scroll dial

to change the mode.
— Shift to P (if so equipped)
— IGN OFF
— OFF

.

Horn beeps on lock (if so equipped)
When this item is turned on, the horn

will chirp and the hazard indicators

will flash twice when locking the

vehicle with the Intelligent Key. Use

the scroll dial

to activate or deacti-

vate this function.

Wipers:

The “Wipers” menu has the following

options:

.

Speed Dependent
The “Speed Dependent” feature can be

activated or deactivated. Use the

scroll dial

to turn this feature ON

or OFF.

.

Drip Wipe
The “Drip Wipe” feature can be set to

be ON or OFF. Use the scroll dial

to

turn this feature ON or OFF.

Maintenance

The maintenance mode allows user to

check the distance to oil change or set

alerts for the reminding of maintenance

intervals. To change an item:
Select “Maintenance” using the scroll dial

and push it.

.

Oil Control System

.

Oil and Filter

-------------------------------------------------------------------------------------------------------------------------------------------------------------

.

Tire

.

Other

Oil Control System:

The Oil Control System informs the dis-

tance to oil change. Never exceed one

year or the following distance between oil

change intervals:

.

10,000 miles (16,000 km) for the

VR30DDTT engine

Display

when

ignition

is ON

Display timing

Action Required

Engine

Oil Ser-

vice due

in xxx

miles

Remaining oil

life is less than

940 miles (1,500

km).

Plan to have

your vehicle ser-

viced.

Engine

Oil Ser-

vice due

Remaining oil

life is 0 miles (0

km).

Have your vehi-

cle serviced

within two

weeks or less

than 500 miles

(800 km).

The oil change interval cannot be ad-

justed manually.
The distance to oil change interval is

calculated depending on the driving con-

ditions and set automatically by the oil

control system. A reminder will be dis-

played when approaching the end of the

service interval.
When the Factory Reset option is selected

in the vehicle information display, the oil

control system will also be reset to initial

value. Please change the engine oil when

Factory Reset is selected.

CAUTION

If the oil replacement indicator is

displayed, change the engine oil

within two weeks or less than 500

miles (800 km).
Operating the vehicle with deterio-

rated oil can damage the engine.

To reset oil control system:
1. Place the ignition switch in the ON

position.

2. Push the

and

buttons on the

steering wheel until “Settings” appears

in the vehicle information display. Use

the scroll dial to select “Maintenance”.

Then, push the scroll dial.

3. Select the “Oil Control System” and

push the scroll dial.

4. Push the scroll dial according to the

reset instructions displayed at the

bottom of the “Oil Control System”

maintenance screen.

When the user sets an alert for chan-

ging the engine oil in the “Oil and Filter”

menu, reset both “Oil Control System”

and “Oil and Filter” after changing the

engine oil.
Oil and Filter:

This indicator appears when user set

distance comes for changing the engine

oil and filter. You can set or reset the

distance for checking or replacing these

items. For scheduled maintenance items

and intervals, refer to the “9. Maintenance

and schedules” section.

When the user sets an alert for chan-

ging the engine oil in the “Oil and Filter”

menu, reset both “Oil Control System”

and “Oil and Filter” after changing the

engine oil.
Tire:

This indicator appears when the user set

distance comes for replacing tires. You

can set or reset the distance for replacing

tires.

WARNING

The tire replacement indicator is not

a substitute for regular tire checks,

including tire pressure checks. (See

“Changing wheels and tires” (P.8-

Instruments and controls

2-27

-------------------------------------------------------------------------------------------------------------------------------------------------------------

2-28

Instruments and controls

34).) Many factors including tire in-

flation, alignment, driving habits and

road conditions affect tire wear and

when tires should be replaced.

Setting the tire replacement indica-

tor for a certain driving distance

does not mean your tires will last

that long. Use the tire replacement

indicator as a guide only and always

perform regular tire checks. Failure

to perform regular tire checks, in-

cluding tire pressure checks could

result in tire failure. Serious vehicle

damage could occur and may lead to

a collision, which could result in

serious personal injury or death.

Other:

This indicator appears when the user set

distance comes for checking or replacing

maintenance items other than the engine

oil, oil filter and tires. Other maintenance

items can include such things as air filter

or tire rotation. You can set or reset the

distance for checking or replacing the

items.

Customize Display

The display settings allows user to

choose from the various meter selections.
The display settings can be changed

using the scroll dial

.

Main Menu Selection:

Displays available screens that can be

shown in the vehicle information display.

Route Guidance (if so equipped):

To change the setting, use the scroll dial

to select and push it.

.

Alerts

The “Alerts” allows user to turn the

Navigation Settings alerts on or off.

Welcome Effect:

The “Welcome Effect” displays the avail-

able welcome effect settings.

.

Animation

Unit/Language

The units that are shown in the vehicle

information display can be changed:

.

Mileage/Fuel

.

Tire Pressure

.

Temperature

.

Language

Use the scroll dial

to select and change

the units of the vehicle information dis-

play.

Mileage/Fuel:

The unit for the mileage that is shown in

the vehicle information display can be

changed.

.

miles, MPG

.

km, km/l

.

km, l/100km

Use the scroll dial

to select and change

the unit.

Tire Pressure:

The unit for tire pressures that is shown

in the vehicle information display can be

changed to:

.

psi

.

kPa

.

bar

.

kgf/cm

2

(See “TPMS Setting” (P.2-24).)

-------------------------------------------------------------------------------------------------------------------------------------------------------------

Temperature:

The temperature that is shown in the

vehicle information display can be chan-

ged from:

.

°C

.

°F

Use the scroll dial

to toggle choices.

Language:

The language of the vehicle information

display can be changed.
Use the scroll dial

to select and change

the language of the vehicle information

display.

Factory Reset

The settings in the vehicle information

display can be reset back to the factory

default. To reset the vehicle information

display:
1. Select “Factory Reset” using the scroll

dial

and push it.

2. Select “Yes” to return all settings back

to default by pushing the scroll dial .

Instruments and controls

2-29

-------------------------------------------------------------------------------------------------------------------------------------------------------------

2-30

Instruments and controls

WAC0905X

-------------------------------------------------------------------------------------------------------------------------------------------------------------

WAC0906X

Instruments and controls

2-31

-------------------------------------------------------------------------------------------------------------------------------------------------------------

2-32

Instruments and controls

VEHICLE INFORMATION DISPLAY

WARNINGS AND INDICATORS

The displayed images may differ depend-

ing on the model.

1. Engine start operation indicator

(Automatic transmission models)

This indicator appears when the shift

position is in the P (Park) position.
This indicator means that the engine will

start by pushing the ignition switch with

the brake pedal depressed. You can start

the engine directly in any position of the

ignition switch.

2. Engine start operation indicator

(Manual Transmission models)

This indicator means that the engine will

start by pushing the ignition switch with

the clutch pedal depressed.

3. No Key Detected warning

The warning appears when the door is

closed with the Intelligent Key left outside

the vehicle and the ignition switch in the

ACC or ON position. Make sure that the

Intelligent Key is inside the vehicle.
See “Intelligent Key system” (P.3-6) for

more details.

4. Intelligent Key battery discharge

indicator

This indicator appears when the Intelli-

gent Key battery is running out of power.
If this indicator appears, replace the

battery with a new one. (See “Intelligent

Key battery replacement” (P.8-21).)

5. Engine start operation for Intelli-

gent Key system indicator

This indicator appears when the Intelli-

gent Key battery is running out of power

and when the Intelligent Key system and

vehicle are not communicating normally.
If this indicator appears, touch the igni-

tion switch with the Intelligent Key while

depressing the brake pedal. (See “Intelli-

gent Key battery discharge” (P.5-13).)

6. Key System Error: See Owner’s

Manual warning

This warning appears if there is a mal-

function in the Intelligent Key system.
If this warning appears while the engine is

stopped, the engine cannot be started. If

this warning appears while the engine is

running, the vehicle can be driven. How-

ever, it is recommended that you visit a

NISSAN dealer for repair as soon as

possible.

7. Parking brake release warning

This warning appears when the vehicle

speed is above 4 MPH (7 km/h) and the

parking brake is applied.

8. Low Fuel warning

This warning appears when the fuel level

in the fuel tank is getting low. Refuel as

soon as it is convenient, preferably before

the fuel gauge reaches 0 (Empty). There

will be a small reserve of fuel in the tank

when the fuel gauge needle reaches 0

(Empty).

9. Loose Fuel Cap warning

This warning appears when the fuel-filler

cap is not tightened correctly after the

vehicle has been refueled. (See “Fuel-filler

cap” (P.3-19).)

10. Low Washer Fluid warning

This warning appears when the window

washer fluid is at a low level. Add window

washer fluid as necessary. For additional

information, refer to “Window washer

fluid” (P.8-11).

-------------------------------------------------------------------------------------------------------------------------------------------------------------

11. Door/rear hatch open warning

This warning appears if any of the doors

and/or the rear hatch are open or not

closed securely. The vehicle icon indicates

which door or the rear hatch is open on

the display.

12. Tire Pressure Low — Add Air

warning

This warning appears when the low tire

pressure warning light in the meter

illuminates and low tire pressure is de-

tected. The warning appears each time

the ignition switch is placed in the ON

position as long as the low tire pressure

warning light remains illuminated. If this

warning appears, stop the vehicle and

adjust the pressure to the recommended

COLD tire pressure shown on the Tire and

Loading Information label. (See “Low tire

pressure warning light” (P.2-18) and “Tire

Pressure Monitoring System (TPMS)” (P.5-

5).)

13. Shift to P range warning (Auto-

matic transmission models)

This warning appears when the driver’s

door is opened while the shift lever is in

any position other than P (Park).
If this warning appears, push the park

button to engage the P (Park) position.
An inside warning chime will also sound.

(See “Intelligent Key system” (P.3-6).)

14. AT Malfunction Service now

warning (Automatic transmission

models)

This warning appears when there is a

malfunction with the AT system. If this

warning appears, have the system

checked. It is recommended that you visit

a NISSAN dealer for this service.

15. AT hot Power reduced warning

(Automatic transmission models)

The AT has a high fluid temperature

protection mode. If the fluid temperature

becomes too high (for example, climbing

steep grades in high temperatures with

heavy loads), engine power and, under

some conditions, vehicle speed will be

decreased automatically to reduce the

chance of transmission damage. Vehicle

speed can be controlled with the accel-

erator pedal, but the engine and vehicle

speed may be reduced.

16. AT Malfunction Stop safely

warning (Automatic transmission

models)

This warning appears when there is a

malfunction with the AT system. If this

warning appears, stop the vehicle in a

safe place. Have the system checked. It is

recommended you visit a NISSAN dealer

for this service.

17. Stop the vehicle warning (Auto-

matic transmission models)

This warning appears when the AT sys-

tem judges the vehicle is reversed on an

uphill road with the shift position in D

(Drive), or moved forward on a downhill

road with the shift position in R (Reverse).

The engine may stall, so stop the vehicle

movement by depressing the brake ped-

al.

18. Service AT Power reduced

warning (Automatic transmission

models)

This warning appears when the AT power

is reduced. If this warning appears, have

the system checked. It is recommended

that you visit a NISSAN dealer for this

service.

19. Check position of shift lever

warning (if so equipped)

This warning appears if the system can-

not detect the shift position. Make sure

the vehicle is placed in a position properly.

Have the system checked. It is recom-

mended you contact a NISSAN dealer for

this service.

Instruments and controls

2-33

-------------------------------------------------------------------------------------------------------------------------------------------------------------

2-34

Instruments and controls

20. When parked apply parking

brake warning (Automatic trans-

mission models)

This warning appears if a malfunction

occurs in the electric shift control system.

Contact a NISSAN dealer as soon as

possible. When parking the vehicle, make

sure that the parking brake is applied. If

the parking brake is not applied, the

ignition switch may not be turned off.

21. Automatic Transmission (AT)

position indicator (Automatic

transmission models)

This indicator shows the AT shift position.
In the manual shift mode, when the

transmission does not shift to the se-

lected gear due to a transmission protec-

tion mode, the AT position indicator will

blink and a chime will sound.
See “Automatic transmission” (P.5-15) for

further details.

22. Shipping Mode On Push Storage

Fuse warning (if so equipped)

This warning may appear if the extended

storage switch is not pushed in. When this

warning appears, push in the extended

storage switch to turn off the warning.

(See “Extended storage fuse switch” (P.8-

20).)

23. Power will turn off to save the

battery warning

Under the specific conditions, this warn-

ing may appear after the ignition switch is

in the ON position for a certain period of

time.

24. Power turned off to save the

battery warning

Under the specific conditions, this warn-

ing may appear after the ignition switch is

automatically turned OFF to save the

battery.

25. Reminder Turn OFF Headlights

warning

This warning appears when the driver

side door is opened with the headlight

switch is left ON and the ignition switch is

placed in the OFF position. Place the

headlight switch in OFF (if so equipped)

or AUTO position. For additional informa-

tion, (See “Headlight and turn signal

switch” (P.2-46).)

26. Headlight System Error: See

Owner’s Manual warning

This warning appears if the LED head-

lights are malfunctioning. Have the sys-

tem checked. It is recommended that you

visit a NISSAN dealer for this service.

27. Time for a break? indicator

This indicator appears when the set

Timer Alert activates. You can set the

time for up to 6 hours.

28. Lane Departure Warning (LDW)

indicator

This indicator appears when the Lane

Departure Warning (LDW) system is en-

gaged.
(See “Lane Departure Warning (LDW)” (P.5-

29).)

29. Blind Spot Warning (BSW) indi-

cator

This indicator appears when the Blind

Spot Warning (BSW) system is engaged.
(See “Blind Spot Warning (BSW)” (P.5-34).)

30. Vehicle ahead detection indi-

cator

This indicator shows the status of the

following systems:

.

Automatic Emergency Braking (AEB)

with Pedestrian Detection

.

Intelligent Forward Collision Warning

(I-FCW)

(See “Automatic Emergency Braking (AEB)

with Pedestrian Detection system” (P.5-

63) or “Intelligent Forward Collision Warn-

ing (I-FCW)” (P.5-81).)

-------------------------------------------------------------------------------------------------------------------------------------------------------------

31. Cruise indicator

This indicator shows the conventional

(fixed speed) cruise control mode status.

The status is shown by the color.
(See “Conventional (fixed speed) cruise

control mode” (P.5-59).)

32. Speed control status/set dis-

tance indicator

This indicator shows the status of the

Intelligent Cruise Control (ICC) system.

The status is shown by the color and

shape. (See “Intelligent Cruise Control

(ICC)” (P.5-43).)

33. Malfunction See Owner’s Man-

ual warning

This warning appears when the following

systems malfunction.

.

Lane Departure Warning (LDW)

.

Blind Spot Warning (BSW)

.

Intelligent Cruise Control (ICC)

.

Automatic Emergency Braking (AEB)

with Pedestrian Detection

.

Rear Cross Traffic Alert (RCTA)

.

Intelligent Forward Collision Warning

(I-FCW)

.

Intelligent Driver Alertness (I-DA)

(See “Lane Departure Warning (LDW)” (P.5-

29), “Blind Spot Warning (BSW)” (P.5-34),

“Intelligent Cruise Control (ICC)” (P.5-43),

“Automatic Emergency Braking (AEB) with

Pedestrian Detection system” (P.5-63),

“Rear Cross Traffic Alert (RCTA)” (P.5-74),

“Intelligent Forward Collision Warning (I-

FCW)” (P.5-81) or “Intelligent Driver Alert-

ness (I-DA)” (P.5-90).)

34. Unavailable Camera Tempera-

ture High warning

This warning appears if the interior tem-

perature of the vehicle has reached such

a high temperature that the sensor for

the following system can no longer func-

tion reliably.

.

Lane Departure Warning (LDW)

Once the interior temperature has

reached normal levels, the warning

should disappear.
If the warning continues to display, have

the system checked. It is recommended

that you visit a NISSAN dealer for this

service.
For additional information, refer to “Lane

Departure Warning (LDW)” (P.5-29).

35. Launch Control indicator (if so

equipped)

This indicator appears when the Launch

Control system is engaged.
(See “Launch Control” (P.5-26).)

36. Currently Unavailable warning

This warning appears when the Intelli-

gent Cruise Control (ICC) system be-

comes unavailable in the following

conditions:

.

The Vehicle Dynamic Control (VDC)

system is turned off

For additional information, refer to “In-

telligent Cruise Control (ICC)” (P.5-43).

37. Forward Driving Aids tempora-

rily disabled Front Sensor blocked

warning

If the front radar sensor area on the front

of the vehicle is covered with dirt or

obstructed, making it impossible to de-

tect a vehicle ahead, the following system

is automatically turned off.

.

Intelligent Cruise Control (ICC)

.

Automatic Emergency Braking (AEB)

with Pedestrian Detection

.

Intelligent Forward Collision Warning

(I-FCW)

If the warning message appears, park the

Instruments and controls

2-35

-------------------------------------------------------------------------------------------------------------------------------------------------------------

2-36

Instruments and controls

vehicle in a safe location and turn the

engine off.
Check to see if the sensor area is blocked.

If the sensor area is blocked, remove the

blocking material. Restart the engine. If

the warning message continues to ap-

pear, have the system checked. It is

recommended that you visit a NISSAN

dealer for this service.
For more details, see “Intelligent Cruise

Control (ICC)” (P.5-43), “Automatic Emer-

gency Braking (AEB) with Pedestrian De-

tection system” (P.5-63) or “Intelligent

Forward Collision Warning (I-FCW)” (P.5-

81).

38. Unavailable Side Radar Ob-

struction warning

This warning appears when the following

systems become unavailable because a

radar blockage is detected.

.

Blind Spot Warning (BSW)

.

Rear Cross Traffic Alert (RCTA)

(See “Blind Spot Warning (BSW)” (P.5-34) or

“Rear Cross Traffic Alert (RCTA)” (P.5-74).)

39. Unavailable Slippery Road

warning

This warning appears when the following

system become unavailable because the

road is slippery.

.

Intelligent Cruise Control (ICC)

(See “Intelligent Cruise Control (ICC)” (P.5-

43).)

40. Automatic Emergency Braking

(AEB) emergency warning indicator

This warning indicator appears along

with an audible warning, when the Auto-

matic Emergency Braking (AEB) with Pe-

destrian Detection system detects the

possibility of a forward collision.
See “Automatic Emergency Braking (AEB)

with Pedestrian Detection system” (P.5-

63).

41. Sonar system indicator

This indicator appears to indicate the

status of the sonar system.
See “Front and rear sonar system” (P.5-

93).

42. Parking Sensor Error warning

This warning appears when there is a

malfunction with the sonar system. (See

“Front and rear sonar system” (P.5-93).)

43. Take a Break? indicator

This indicator appears when the Intelli-

gent Driver Alertness (I-DA) system detect

that the driver attention is decreasing.

(See “Intelligent Driver Alertness (I-DA)”

(P.5-90).)

44. Neutral Hold Mode guidance

indicator (Automatic transmission

models)

This indicator appears when the ignition

switch is placed in the OFF position while

the shift position is in the N (Neutral)

position (Neutral hold mode is available).

(See “Neutral hold mode function” (P.5-

18).)

45. Neutral Hold Mode activated

indicator (Automatic transmission

models)

This indicator appears when the Neutral

hold mode is activated. To exit the Neutral

hold mode, place the vehicle in other than

N (Neutral) position. (See “Neutral hold

mode function” (P.5-18).)

-------------------------------------------------------------------------------------------------------------------------------------------------------------

46. Neutral Hold Mode was not

activated indicator (Automatic

transmission models)

This indicator appears when the Neutral

hold mode is unavailable. To activate the

Neutral hold mode, wait for a while with-

out shifting and then perform the opera-

tions again. (See “Neutral hold mode

function” (P.5-18).)

47. Engine Oil Service due in – – –

miles

This distance to oil change is displayed if

the distance to oil change is less than 62

miles (100 km).

48. Drive Mode Selector indicator

(Automatic transmission models)

When a driving mode is selected using the

Drive Mode Selector, the selected mode

indicator is displayed.

.

SPORT

.

STANDARD

(See “Drive Mode Selector” (P.5-21).)

Instruments and controls

2-37

-------------------------------------------------------------------------------------------------------------------------------------------------------------

2-38

Instruments and controls

WAC0907X

-------------------------------------------------------------------------------------------------------------------------------------------------------------

WAC0908X

TRIP COMPUTER

Switches for the trip computer are lo-

cated on the left side of the steering

wheel.

Scroll dial - navigate through the items

and change or select an item in vehicle

information display
this scroll dial allows up/down navigation

and push to select

- go back to the previous menu

- change from one display screen

to the next (i.e. trip, Fuel economy)

The displayed images may differ depend-

ing on the model.

1. Home (if so equipped)

The Home mode shows the following

information.

.

Vehicle speed

.

Navigation

.

Audio

2. Drive Computer

Average fuel consumption:

The average fuel consumption shows the

average fuel consumption since the last

reset.

Average speed:

The average speed shows the average

vehicle speed since the last reset.

Trip odometer:

The trip odometer shows the total dis-

tance the vehicle has been driven since

the last reset.

Elapsed time:

The elapsed time shows the time since

the last reset.
The Drive Computer mode have three

modes of operation. You can switch

between Manual Reset1, Manual Reset2

or Auto Refuel by pushing the scroll dial

.

Manual Reset1 and Manual Reset2 can be

reset manually by using the scroll dial

.

Auto Refuel will be reset automatically

each time when refueling.

3. Fuel Economy display

Current fuel consumption:

The Fuel economy display mode shows

the current fuel consumption.

Average fuel consumption:

The Fuel economy display mode shows

the average fuel consumption since the

last reset.
The Fuel economy display mode have

three modes of operation. You can switch

between Manual Reset1, Manual Reset2 or

Auto Refuel by pushing the scroll dial

.

Manual Reset1 and Manual Reset2 can be

reset manually by using the scroll dial

.

Auto Refuel will be reset automatically

each time when refueling.

4. Tire Pressures

The tire pressure mode shows the pres-

sure of all four tires while the vehicle is

driven.
When the Tire Pressure Low — Add Air

warning appears, the display can be

switched to the tire pressure mode by

pushing the scroll dial

to reveal addi-

tional details on the displayed warning.

Instruments and controls

2-39

-------------------------------------------------------------------------------------------------------------------------------------------------------------

2-40

Instruments and controls

5. Compass (if so equipped)

This display indicates the heading direc-

tion of the vehicle.

6. Navigation (if so equipped)

When the route guidance is set in the

navigation system, this item shows the

navigation route information.

7. Audio

The audio mode shows the status of

audio information.

8. Driver Assistance

The Driver Assistance mode shows the

operating condition for the following

systems.

.

Forward:
— Automatic Emergency Braking

(AEB) with Pedestrian Detection

system

— Intelligent Forward Collision Warn-

ing (I-FCW)

.

Lane:
— Lane Departure Warning (LDW)

.

Blind Spot:
— Blind Spot Warning (BSW)

For more details, see “Lane Departure

Warning (LDW)” (P.5-29), “Blind Spot Warn-

ing (BSW)” (P.5-34), “Automatic Emergency

Braking (AEB) with Pedestrian Detection

system” (P.5-63) or “Intelligent Forward

Collision Warning (I-FCW)” (P.5-81).

9. Intelligent Cruise Control (ICC)

system

This mode shows the operating condition

for the Intelligent Cruise Control (ICC)

system. (See “Intelligent Cruise Control

(ICC)” (P.5-43).)

WAC0521X

CLOCK AND OUTSIDE AIR TEM-

PERATURE

The clock

and outside air temperature

are displayed on the upper side of the

vehicle information display.

Clock

For clock adjustment, see “Clock” (P.2-25)

or the separate NissanConnect® Owner’s

Manual.

-------------------------------------------------------------------------------------------------------------------------------------------------------------


Content      ..     4      5      6      7     ..