Nissan Altima (2022 year). Manual in english - page 13


  Index      Manuals     Nissan Altima (2022 year). Manual in english


Search            copyright infringement  


Content      ..     11      12      13      14     ..


Nissan Altima (2022 year). Manual in english - page 13


The Loose Fuel Cap warning mes-
sage will be displayed/warning will
appear if the fuel-filler cap is not
properly tightened. It may take a few
driving trips for the message to be
displayed. Failure to tighten the fuel-
filler cap properly after the Loose
Fuel

Cap

warning

message

is

displayed/warning

appears

may

cause the

Malfunction Indicator

Light (MIL) to illuminate.

Failure to tighten the fuel-filler cap
properly may cause the

Mal-

function Indicator Light (MIL) to illu-
minate. If the

light illuminates

because the fuel-filler cap is loose or
missing, tighten or install the cap and
continue to drive the vehicle. The

light should turn off after a few

driving trips. If the

light does not

turn off after a few driving trips, have
the vehicle inspected. It is recom-
mended that you visit a NISSAN
dealer for this service.

For additional information, see “Mal-
function

Indicator

Light

(MIL)”

(P. 2-15).

If fuel is spilled on the vehicle body,
flush it away with water to avoid
paint damage.

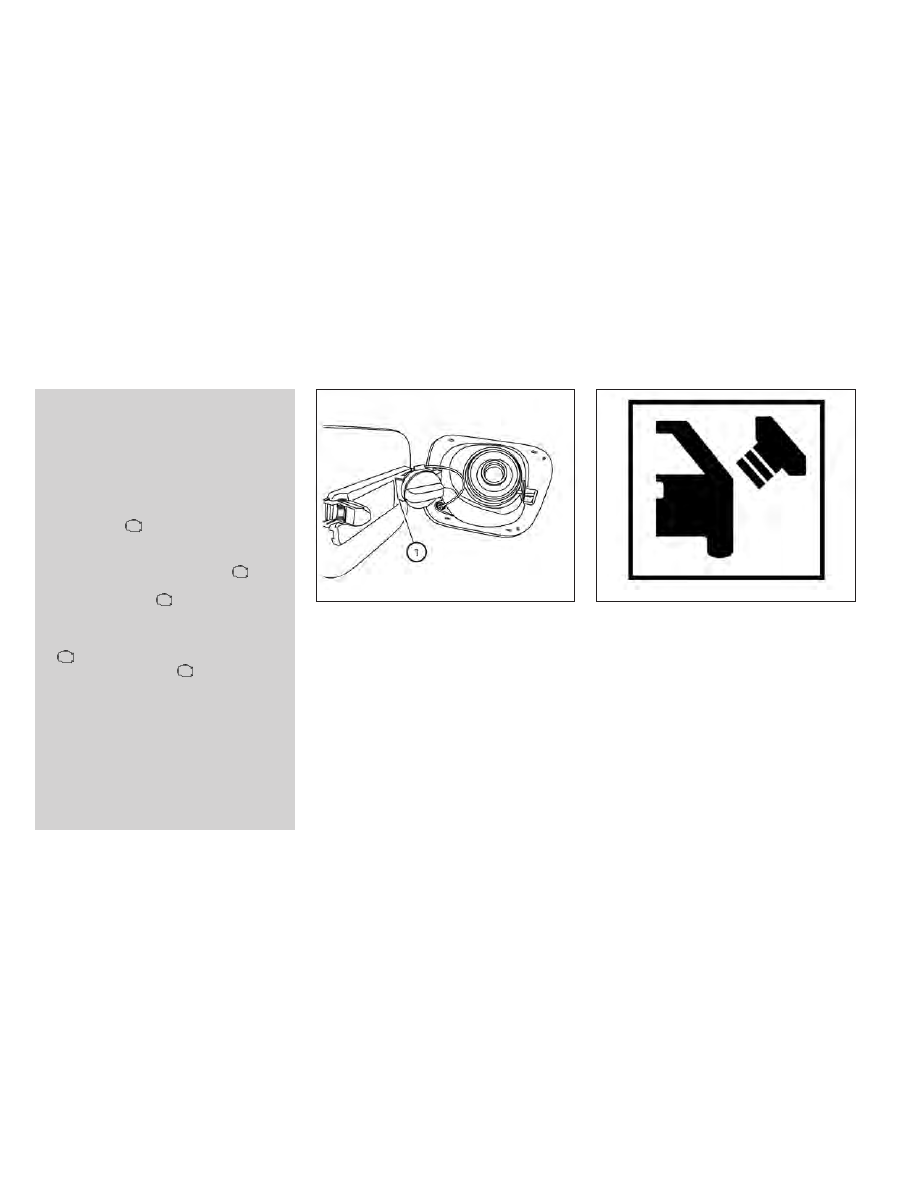
To remove the fuel-filler cap:

1. Turn the fuel-filler cap counterclockwise

to remove.

2. Put the fuel-filler cap on the cap holder

O

1

while refueling.

To install the fuel-filler cap:

1. Insert the fuel-filler cap straight into the

fuel-filler tube.

2. Turn the fuel-filler cap clockwise until a

single click is heard.

Loose Fuel Cap warning

The Loose Fuel Cap warning message will
be displayed in the vehicle information dis-
play when the fuel-filler cap is not tight-
ened correctly after the vehicle has been
refueled. It may take a few driving trips for
the message to be displayed. To turn off
the warning, perform the following:

1. Remove and install the fuel-filler cap as

soon as possible. For additional informa-
tion, see “Fuel-filler cap” (P. 3-25)

2. Tighten the fuel-filler cap until it clicks.

LPD2870

LPD3029

3-26

Pre-driving checks and adjustments

-------------------------------------------------------------------------------------------------------------------------------------------------------------

3. Press the OK button on the steering

wheel for about 1 second to turn off the
Loose Fuel Cap warning after tightening
the fuel-filler cap.

WARNING

Do not adjust the steering wheel
while driving. You could lose control
of

your

vehicle

and

cause

an

accident.

Do not adjust the steering wheel any
closer to you than is necessary for
proper steering operation and com-
fort. The driver's air bag inflates with
great force. If you are unrestrained,
leaning forward, sitting sideways or
out of position in any way, you are at
greater risk of injury or death in a
crash. You may also receive serious
or fatal injuries from the air bag if you
are up against it when it inflates. Al-
ways sit back against the seatback
and as far away as practical from the
steering wheel. Always use the seat
belts.

TILT OPERATION

Pull the lock lever down and hold on until
the end of the stroke

O

1

and adjust the

steering wheel up or down

O

2

to the de-

sired position.

Push the lock lever up

O

1

firmly and hold on

until end of stroke to lock the steering
wheel in place.

TELESCOPIC OPERATION

Pull the lock lever down

O

1

and adjust the

steering wheel forward or backward

O

3

to

the desired position.

LPD2871

STEERING WHEEL

Pre-driving checks and adjustments

3-27

-------------------------------------------------------------------------------------------------------------------------------------------------------------

Push the lock lever up

O

1

firmly and hold on

until end of stroke to lock the steering
wheel in place.

1. To block glare from the front, swing

down the main sun visor

O

1

.

2. To block glare from the side, remove the

main sun visor

O

2

from the center

mount and swing the visor to the side.

3. To extend the sun visor, slide in or out as

needed

O

3

.

CAUTION

Do not store the sun visor before re-
turning the extension to its original
position.

Do not pull the extension sun visor
forcedly downward.

WPD0344

SUN VISORS

3-28

Pre-driving checks and adjustments

-------------------------------------------------------------------------------------------------------------------------------------------------------------

VANITY MIRRORS

To access the vanity mirror, pull the sun
visor down and flip open the mirror cover.
Some vanity mirrors are illuminated and
turn on when the mirror cover is open.

MANUAL ANTI-GLARE REARVIEW
MIRROR (if so equipped)

Use the night position

O

1

to reduce glare

from the headlights of vehicles behind you
at night.

Use the day position

O

2

when driving in

daylight hours.

WARNING

Use the night position only when nec-
essary, because it reduces rear view
clarity.

AUTOMATIC ANTI-GLARE
REARVIEW MIRROR (if so equipped)

The inside mirror is designed so that it au-
tomatically dims during night time condi-
tions and according to the intensity of the
headlights of the vehicle following you. The
automatic anti-glare feature is activated
when the ignition switch is in the ON
position.

LPD2589

WPD0126

LPD0469

MIRRORS

Pre-driving checks and adjustments

3-29

-------------------------------------------------------------------------------------------------------------------------------------------------------------

NOTE:

Do not hang any objects over the sen-
sors

O

1

or apply glass cleaner to the sen-

sors. Doing so will reduce the sensitivity
of the sensors, resulting in improper
operation.

The indicator light

O

2

will illuminate when

the

automatic

anti-glare

feature

is

operating.
• To turn off the anti-glare feature, press

the O button. The indicator light will
turn off.

• To turn on the anti-glare feature, press

the | button. The indicator light will turn
on.

For information on HomeLink® Universal
Transceiver operation, see the “HomeLink®
Universal Transceiver” (P. 2-81).

OUTSIDE MIRRORS

The outside mirror remote control only op-
erates when the ignition switch is placed in
the ON position.

Move the small switch

O

1

to select the right

or left mirror. Adjust each mirror to the de-
sired position using the large switch

O

2

.

Move the small switch

O

1

to the center

(neutral) position to prevent accidentally
moving the mirror.

WARNING

Do not adjust the mirrors while driv-
ing. You could lose control of your ve-
hicle and cause an accident.

Objects viewed in the outside mirror
on the passenger side are closer than
they appear. Be careful when moving
to the right. Using only this mirror
could cause an accident. Use the in-
side mirror or glance over your
shoulder to properly judge distances
to other objects.

LPD2452

3-30

Pre-driving checks and adjustments

-------------------------------------------------------------------------------------------------------------------------------------------------------------

Manual folding outside mirrors

Pull the outside mirror toward the door to
fold it.

Heated mirrors (if so equipped)

Some outside mirrors can be heated to
defog, defrost or de-ice for improved visibil-
ity. For additional information, see “Rear
window and outside mirror (if so equipped)
defroster switch” (P. 2-56).

The memory seat system has three
features:
• Memory storage function (Key-link)
• Memory storage function (Switch)
• Entry/exit function

Key-link, when enabled, automatically re-
tains the driver’s last seat and outside mir-
ror (if so equipped) position for that specific
key when the ignition is turned from ON to
OFF.

Each memory switch button (1 or 2) on the
driver’s door can also store one additional
position which is independent of the key-
linked position.

MEMORY STORAGE FUNCTION

Use the following process to setup key-link:

1. Unlock the vehicle with the desired Intel-

ligent Key while the ignition is OFF.

2. Place the ignition in the ON position.

3. Within the “Settings” menu of the vehicle

information display, select “Key-Linked
Settings” and press the OK button on the
steering switch.

4. While in the menu, press the OK button

on the steering switch to turn the sys-
tem ON/OFF.

LPD2084

LPD3281

MEMORY SEAT (if so equipped)

Pre-driving checks and adjustments

3-31

-------------------------------------------------------------------------------------------------------------------------------------------------------------

Once step 4 is completed, every time the
ignition is switched from ON to OFF, the
memory positions of the driver’s seat and
outside mirror (if so equipped) are linked to
the Intelligent Key.

Follow the same procedure if you want
to link the 2nd, 3rd or 4th Intelligent Key.

NOTE:

If new memory positions are set prior to
turning the ignition from ON to OFF, the
previously linked memory positions for
the respective key will be overwritten by
new positions.

Recalling Intelligent Key memory
positions

If the “Key-Linked Settings” are enabled in
the vehicle information display for that par-
ticular key, every time you enter the vehicle
the driver’s seat and outside mirrors (if so
equipped) will automatically move to the
driver’s last position of the respective Intel-
ligent Key.

NOTE:

The key-linked memory positions can be
different from the positions stored in the
memory switch (1 or 2).

MEMORY STORAGE FUNCTION
(switch)

Use the following process to manually
store the two memory positions in the
switch:

1. The vehicle should be stopped while set-

ting the memory.

2. Adjust the driver's seat and outside mir-

ror (if so equipped) to the desired posi-
tions by manually operating each ad-
justing

switch.

For

additional

information, see “Front power seat ad-
justment” (P. 1-4) and “Outside mirrors”
(P. 3-30).

3. Push the SET switch and, within 5 sec-

onds, push the memory switch (1 or 2).

The indicator light for the pushed memory
switch will come on and stay on for ap-
proximately 5 seconds. The chime will
sound when the memory is stored.

NOTE:

If a new memory position is stored in the
same memory switch, the previous
memory position will be overwritten by
the new stored position.

Recalling switch memory
positions

To recall the manually stored positions,
press the memory switch (1 or 2). The driv-
er’s seat and outside mirror (if so equipped)
will move to the positions stored to those
buttons.

LPD2872

3-32

Pre-driving checks and adjustments

-------------------------------------------------------------------------------------------------------------------------------------------------------------

ENTRY/EXIT FUNCTION

This system is designed so that the driver's
seat will automatically move when the shift
lever is in the P (Park) position. This allows
the driver to easily get in and out of the
driver’s seat.

The driver’s seat will slide backward:
• When the driver's door is opened and the

ignition switch is in the OFF position.

• When the ignition switch is turned from

ACC to OFF with the driver’s door open.

The driver’s seat will return to the previous
position:
• When the ignition switch is turned to ACC

or ON while the shift lever is in the P (Park)
position.

The entry/exit function can be adjusted or
canceled through the “Vehicle Settings” in
the vehicle information display by perform-
ing the following:
• Switch the Exit Seat Slide from ON to OFF.

SYSTEM OPERATION

The memory seat system will not work or
will stop operating under the following
conditions:
• When the vehicle speed is above 4 mph (7

km/h).

• When any of the memory switches are

pushed

while

the

memory

seat

is

operating.

• When the switch for the driver’s seat and

steering column is pushed while the
memory seat is operating.

• When the seat has already been moved

to the memorized position.

• When no seat position is stored in the

memory switch.

• When the shift lever is moved from P

(Park) to any other position.

The memory seat system can be adjusted
and canceled. It is recommended you visit
a NISSAN dealer for this service.

Pre-driving checks and adjustments

3-33

-------------------------------------------------------------------------------------------------------------------------------------------------------------

4 Monitor, climate, audio, phone and
voice recognition systems

NissanConnect® Owner’s Manual . . . . . . . . . . . . . . . 4-2
Control panel buttons . . . . . . . . . . . . . . . . . . . . . . . . . . . 4-3

How to use the touch-screen . . . . . . . . . . . . . . . . 4-4
How to use the

MENU button . . . . . . . . . . . 4-5

(brightness control) button . . . . . . . . . . . . . 4-7

How to use the VOL (volume) knob /
PUSH

(power) button . . . . . . . . . . . . . . . . . . . . 4-7

Selecting menu from launch bar . . . . . . . . . . . . . 4-7

RearView Monitor (if so equipped) . . . . . . . . . . . . . . . 4-8

RearView Monitor system operation . . . . . . . . . . 4-9
How to read the displayed lines . . . . . . . . . . . . . . 4-9
Difference between predicted and
actual distances . . . . . . . . . . . . . . . . . . . . . . . . . . . . 4-10
How to park with predicted course
lines . . . . . . . . . . . . . . . . . . . . . . . . . . . . . . . . . . . . . . . . . .4-11
Adjusting the screen . . . . . . . . . . . . . . . . . . . . . . . . 4-13
How to turn on and off predicted
course lines . . . . . . . . . . . . . . . . . . . . . . . . . . . . . . . . . 4-13
RearView Monitor system limitations . . . . . . . . 4-13
System maintenance . . . . . . . . . . . . . . . . . . . . . . . 4-15

Intelligent Around View Monitor
(if so equipped) . . . . . . . . . . . . . . . . . . . . . . . . . . . . . . . . . 4-16

Intelligent Around View Monitor system
operation . . . . . . . . . . . . . . . . . . . . . . . . . . . . . . . . . . . 4-17
Difference between predicted and
actual distances . . . . . . . . . . . . . . . . . . . . . . . . . . . . 4-20

How to park with predicted course
lines . . . . . . . . . . . . . . . . . . . . . . . . . . . . . . . . . . . . . . . . . 4-22
How to switch the display . . . . . . . . . . . . . . . . . . . 4-23
Adjusting the screen . . . . . . . . . . . . . . . . . . . . . . . . 4-24
Intelligent Around View Monitor system
limitations . . . . . . . . . . . . . . . . . . . . . . . . . . . . . . . . . . 4-24
System maintenance . . . . . . . . . . . . . . . . . . . . . . . 4-26

Moving Object Detection (MOD)
(if so equipped) . . . . . . . . . . . . . . . . . . . . . . . . . . . . . . . . . 4-27

MOD system operation . . . . . . . . . . . . . . . . . . . . . . 4-28
Turning MOD on and off (if so equipped) . . . . . 4-30
MOD system limitations . . . . . . . . . . . . . . . . . . . . . 4-30
System maintenance . . . . . . . . . . . . . . . . . . . . . . . 4-31

Vents . . . . . . . . . . . . . . . . . . . . . . . . . . . . . . . . . . . . . . . . . . 4-31
Heater and air conditioner (manual)
(if so equipped) . . . . . . . . . . . . . . . . . . . . . . . . . . . . . . . . . 4-33

Controls . . . . . . . . . . . . . . . . . . . . . . . . . . . . . . . . . . . . . 4-34
Heater operation . . . . . . . . . . . . . . . . . . . . . . . . . . . . 4-34
Air conditioner operation . . . . . . . . . . . . . . . . . . . . 4-35
Air flow charts . . . . . . . . . . . . . . . . . . . . . . . . . . . . . . . 4-36

Heater and air conditioner (automatic)
(if so equipped) . . . . . . . . . . . . . . . . . . . . . . . . . . . . . . . . . 4-40

Automatic operation . . . . . . . . . . . . . . . . . . . . . . . . 4-41
Manual operation . . . . . . . . . . . . . . . . . . . . . . . . . . . 4-42
Operating tips . . . . . . . . . . . . . . . . . . . . . . . . . . . . . . . 4-43

-------------------------------------------------------------------------------------------------------------------------------------------------------------

Servicing air conditioner . . . . . . . . . . . . . . . . . . . . . . . . 4-44
Audio system . . . . . . . . . . . . . . . . . . . . . . . . . . . . . . . . . . 4-45

Radio . . . . . . . . . . . . . . . . . . . . . . . . . . . . . . . . . . . . . . . 4-45
FM radio reception . . . . . . . . . . . . . . . . . . . . . . . . . . 4-45
AM radio reception . . . . . . . . . . . . . . . . . . . . . . . . . . 4-45
Audio operation precautions . . . . . . . . . . . . . . . . 4-46
FM/AM radio . . . . . . . . . . . . . . . . . . . . . . . . . . . . . . . . 4-49
USB (Universal Serial Bus) Connection
Port . . . . . . . . . . . . . . . . . . . . . . . . . . . . . . . . . . . . . . . . . 4-54
iPod®* player operation . . . . . . . . . . . . . . . . . . . . . 4-57
Bluetooth® streaming audio . . . . . . . . . . . . . . . . . 4-60
Steering wheel switch for audio control . . . . . 4-63

Antenna . . . . . . . . . . . . . . . . . . . . . . . . . . . . . . . . . . . . . . . . 4-64
Siri® Eyes Free (if so equipped) . . . . . . . . . . . . . . . . . . 4-64

Requirements . . . . . . . . . . . . . . . . . . . . . . . . . . . . . . . 4-64
Operating Siri® Eyes Free . . . . . . . . . . . . . . . . . . . . 4-65
Troubleshooting guide . . . . . . . . . . . . . . . . . . . . . . 4-66

Car phone or CB radio . . . . . . . . . . . . . . . . . . . . . . . . . . 4-67
Bluetooth® Hands-Free Phone System . . . . . . . . . 4-67

Regulatory information . . . . . . . . . . . . . . . . . . . . . . 4-69
Using the system . . . . . . . . . . . . . . . . . . . . . . . . . . . 4-69
Indicators . . . . . . . . . . . . . . . . . . . . . . . . . . . . . . . . . . . 4-71
Control buttons . . . . . . . . . . . . . . . . . . . . . . . . . . . . . 4-71
Bluetooth® connecting procedure . . . . . . . . . . . 4-72
Voice commands . . . . . . . . . . . . . . . . . . . . . . . . . . . 4-73
Phone display screen . . . . . . . . . . . . . . . . . . . . . . . 4-75
Making a call . . . . . . . . . . . . . . . . . . . . . . . . . . . . . . . . 4-76
Receiving/Ending a call . . . . . . . . . . . . . . . . . . . . . . 4-76
During a call . . . . . . . . . . . . . . . . . . . . . . . . . . . . . . . . . 4-77
Text messaging (if so equipped) . . . . . . . . . . . . . 4-77
Bluetooth® connections screen . . . . . . . . . . . . . 4-81
Phone and text message settings . . . . . . . . . . . 4-82
Volume & beeps . . . . . . . . . . . . . . . . . . . . . . . . . . . . .4-84

iPod®/iPhone® . . . . . . . . . . . . . . . . . . . . . . . . . . . . . . . . .4-84

-------------------------------------------------------------------------------------------------------------------------------------------------------------

Refer to the digital NissanConnect® Own-
er’s manual using the QR code on this
page, or your printed NissanConnect®
Owner’s manual (if so equipped). This
manual includes the following information:
• NissanConnect® Services (if so equipped)
• Navigation system (if so equipped)
• Audio system
• Apple CarPlay® (if so equipped)
• Android Auto

TM

(if so equipped)

• Bluetooth® Hands-Free Phone system
• Viewing information
• Other settings

• Voice recognition
• General system information

LHA5538

NISSANCONNECT® OWNER’S
MANUAL

4-2

Monitor, climate, audio, phone and voice recognition systems

-------------------------------------------------------------------------------------------------------------------------------------------------------------

1. Display screen

2. TUNE·SCROLL knob / PUSH SOUND

button

3.

BACK button

4. DISP button

5.

button*

6.

MENU button

7.

(brightness control) button

8. VOL (volume) knob / PUSH

(power)

button

* For additional information regarding the
Bluetooth® Hands-Free Phone System
control button, see “Bluetooth® Hands-
Free Phone System” (P. 4-67).

When you use this system, make sure the
engine is running.

If you use the system with the engine not
running for a long time, it will discharge
the battery, and the engine will not start.

Reference symbols:

“Example” — Words marked in quotes refer
to a key shown only on the display. These
keys can be selected by touching the
screen.

LHA4960

CONTROL PANEL BUTTONS

Monitor, climate, audio, phone and voice recognition systems

4-3

-------------------------------------------------------------------------------------------------------------------------------------------------------------

HOW TO USE THE TOUCH-SCREEN

CAUTION

The glass display screen may break if
it is hit with a hard or sharp object. If
the glass screen breaks, do not touch
it. Doing so could result in an injury.

To clean the display, never use a
rough cloth, alcohol, benzine, thinner
or any kind of solvent or paper towel
with a chemical cleaning agent. They
will scratch or deteriorate the panel.

Do not splash any liquid such as wa-
ter or car fragrance on the display.
Contact with liquid will cause the sys-
tem to malfunction.

To help ensure safe driving, some functions
cannot be operated while driving.

The on-screen functions that are not avail-
able while driving will be “grayed out” or
muted.

WARNING

ALWAYS give your full attention to
driving.

Avoid using vehicle features that
could distract you. If distracted, you
could lose control of your vehicle and
cause an accident.

Touch-screen operation

Menu Item

Result

Selecting the item

Touch an item to select. To select the “Phone” key, touch the “Phone” key on the screen. Touch the “

” key to

return to the previous screen.

Adjusting the item

Touch the “+” key or the “−” key to adjust the settings of an item. Touch the up arrow to scroll up the page one
item at a time. Touch the down arrow to scroll down the page one item at a time.

Inputting characters

Touch the number key. There are some options available when inputting characters.

123

Touch to manually enter numbers.

OK

Completes the character input.

LHA5318

4-4

Monitor, climate, audio, phone and voice recognition systems

-------------------------------------------------------------------------------------------------------------------------------------------------------------

Touch-screen maintenance

If you clean the display screen, use a dry,
soft cloth. If additional cleaning is neces-
sary, use a small amount of neutral deter-
gent with a soft cloth. Never spray the
screen with water or detergent. Dampen
the cloth first and then wipe the screen.

HOW TO USE THE

MENU

BUTTON

To select and/or adjust several functions,
features and modes that are available for
your vehicle:

1. Press the

MENU button.

2. Touch the “Settings” key.

3. Touch the desired item.

LHA5319

LHA5318

Monitor, climate, audio, phone and voice recognition systems

4-5

-------------------------------------------------------------------------------------------------------------------------------------------------------------

Menu item

Result

Settings

Touch to change the following settings.

Connections

Touch this key to select either Bluetooth® phone, Bluetooth® audio or USB audio options. For additional
information, see “USB connections screen” (P. 4-55) and “Bluetooth® connections screen” (P. 4-81) in this
section.

Phone

For additional information, see “Bluetooth® Hands-Free Phone System” (P. 4-67) in this section.

Sound

For additional information, see “Audio system” (P. 4-45) in this section.

Volume & Beeps

For additional information, see “Volume & beeps” (P. 4-84) in this section.

Clock

Touch this key to adjust clock settings.

On-screen Clock

Touch to toggle ON or OFF the clock display on the upper right corner of the display screen.

Clock Format

Touch to set the clock to 12 hour or 24 hour formats.

Daylight Savings Time

Touch to adjusts the daylight saving time to on or off.

Set Clock Manually

Touch to adjust the clock manually; then touch to change between AM and PM, the hour and the min-
utes.

System Voice

For additional information, see “Settings” (P. 4-75) in this section.

Camera

Touch this key to change the camera settings.

Others

Touch this key to select and/or adjust various functions of this system. A screen with additional options
will appear.

Display

Touch this key to adjust the appearance of the display. For additional information, see “Adjusting the
screen” (P. 4-13, 4-24) in this section.

Language

Touch this key to change the language on the display.

OSS Licenses

Touch this key to display software licensing information.

Return All Settings to Default

Touch this key to return all settings to default and to clear the memory.

4-6

Monitor, climate, audio, phone and voice recognition systems

-------------------------------------------------------------------------------------------------------------------------------------------------------------

(brightness control) BUTTON

To change the display brightness, press the

button. Pressing the button again will

change the display to the day or the night
display.

Press and hold the

button for more

than 2 seconds to turn the display off. Press
and hold the button again to turn the dis-
play on.

HOW TO USE THE VOL (volume)
KNOB / PUSH

(power)

BUTTON

Press the PUSH

(power) button to turn

audio function on and off. Turn the VOL
(volume) knob to adjust audio volume.

SELECTING MENU FROM LAUNCH
BAR

Various system functions can be accessed
by touching the items on the Launch Bar

O

1

which is displayed on most of the main

menu screens (the Launch Bar does not
appear on some screens such as settings
screens, camera screens, etc.)

Touch the keys on the Launch Bar to dis-
play the corresponding menu screens.

The following menu items are available on
the Launch Bar:
• AM
• FM
• USB/iPod
• Bluetooth
• AUX
• Settings

LHA4707

Monitor, climate, audio, phone and voice recognition systems

4-7

-------------------------------------------------------------------------------------------------------------------------------------------------------------


Content      ..     11      12      13      14     ..