Nissan Armada (2022 year). Manual in english - page 18
 

  Index      Manuals     Nissan Armada (2022 year). Manual in english


Search            copyright infringement  


Content      ..     16      17      18      19     ..


Nissan Armada (2022 year). Manual in english - page 18


to operate monitor A (Driver side).

3.

Directional pad

Press these buttons to increase/de-

crease the volume or navigate up/

down when displaying a menu or file

list.

4.

Home

Press this button to return to the

home screen.

5.

Back

Press this button to go back to the

previous screen.

6.

Monitor B

Press this button to transmit the

remote control codes and functions

to operate monitor B (Passenger side).

7.

Select

Press this button to make a selection

when displaying a menu or file list.

8.

Menu

Press this button to open the context

menu (when available).

NOTE:
You must first select the desired moni-

tor (press A or B) to control it. Example -

Press A, then press Power to turn

monitor A on/off.

WAE0718X

Monitor, heater, air conditioner, audio, phone and voice recognition systems

4-53

-------------------------------------------------------------------------------------------------------------------------------------------------------------

4-54

Monitor, heater, air conditioner, audio, phone and voice recognition systems

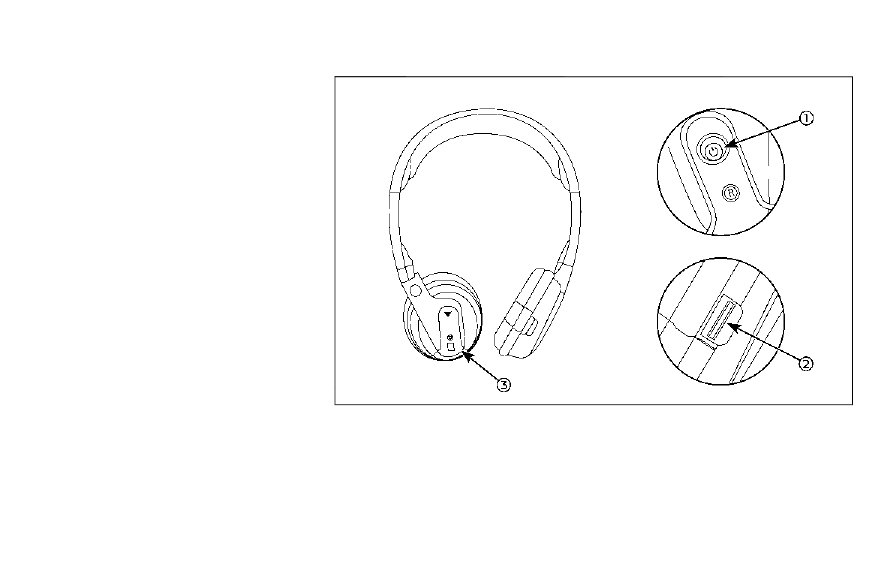
WIRELESS HEADPHONE OPERATION
Installing the batteries

Before attempting to operate the head-

phones, install the batteries as described

below:
1. Remove the headphone battery cover

by using a screwdriver.

2. Install two “AAA” batteries into the

headphones. Make sure that proper

polarity (+ or -) is observed.

3. Reinstall headphone battery cover.

Headphone operation

Press the power button

on the head-

phones to turn on and off the head-

phones. The amber (Monitor A) or green

(Monitor B) LED will illuminate when the

headphone is turned on. Set the select

switch to “A” or “B” for use with the “A”

monitor or “B” monitor respectively. Use

the volume thumb wheel

to adjust the

volume level for the headphone audio.

NOTE:
If the headphones are accidentally left

on and system is powered off, a battery

saver feature will automatically turn off

the headphones after approximately 3

minutes.

WARNING

Keep the batteries out of the reach of

children. In case the batteries are

accidentally swallowed, immediately

consult a doctor. Also, when dispos-

ing of used batteries, please comply

with governmental regulations or

environmental public institution

rules that apply in your country/

area.

CAUTION

.

Always ensure that the batteries

are inserted with the positive and

negative terminals in the correct

direction as shown in the battery

compartment

.

.

Different types of batteries have

different characteristics. Do not

mix different types.

.

Do not mix old and new batteries.

Mixing old and new batteries will

shorten battery life and/or cause

chemical leaks from the old bat-

teries.

.

When batteries fail to function,

replace them immediately.

.

Remove the batteries if the head-

phones are not used for a month

or longer.

-------------------------------------------------------------------------------------------------------------------------------------------------------------

WAE0719X

GENERAL OPERATION
Navigating menus

When fully powered on, the Home screen

can be accessed at any time by pressing

the

button on the remote control, or

the

button on the monitor.

The main menu

is located on the far-

left side of the screen and allows users to

select a source, change settings, USB

fast-charge certain devices, and mirror

content playing from the opposite moni-

tor.
To the right of the main menu is a

preview menu

, which gives a preview

of the highlighted option in the main

menu. The preview menu options will

change with each selection.
Press

or

to scroll through the

options in each menu. The current selec-

tion is highlighted in the center of the

menu when scrolling up and down. Press

or

when an item is highlighted to

select the item. Press

or

to

move back one level in the menu.

Mirror

For additional information on how to

mirror content playing from the opposite

monitor, see “Mirroring content” (P.4-56)

and “Using Miracast®” (P.4-67).

Fast-Charge (USB)

For additional information, see “Fast-

Charge (USB)” (P.4-58).

Settings

For additional information, see “Settings”

(P.4-69).

WAE0720X

Sources

The following sources can be accessed

from the main menu:

HDMI

Play content from an external audio/

video source using a standard HDMI cable

(sold separately).

USB

Play videos, music, and images stored on

most USB devices. Provides up to 2 amps

of output to charge most mobile devices.

This system does not support wired USB

data transfer or audio/video playback

from mobile devices.

SD CARD

Monitor, heater, air conditioner, audio, phone and voice recognition systems

4-55

-------------------------------------------------------------------------------------------------------------------------------------------------------------

4-56

Monitor, heater, air conditioner, audio, phone and voice recognition systems

Play videos, music, and images stored on

most SD cards.

Slingplayer®

Stream content wirelessly from a Sling-

box® (sold separately) to the RSI system.

*Requires external internet connection.

Miracast®

Stream content wirelessly from a Mira-

cast-enabled device to the RSI system.
NOTE: Miracast® works with Android OS

mobile devices only. This feature is not

supported on iOS devices.

SmartStream

Stream content wirelessly between mo-

bile devices and to the RSI system.

*Requires compatible UPnP application

to be installed on the mobile device. For

additional information, see “SmartStream”

(P.4-67).
NOTE: SmartStream works on both An-

droid and iOS devices using mobile app

(VOXX-RSI).

NOTE:
The top left corner of the screen in-

cludes a graphic representation that

shows the navigational path of the

current menu. For example: Home >

Source > HDMI.

WAE0721X

VIDEO OPERATION
Volume control

Volume level can be adjusted by pressing

or

any time video is playing, or

by selecting the volume icon in the play-

back controls menu.

NOTE:
For hearing protection, there is a max-

imum volume setting to limit the audio

output of the front panel 3.5mm head-

phone output. Using the directional pad

on the remote navigate to “SETTINGS”

then “AUDIO” then “HEADPHONES” to

adjust the maximum volume. Once set,

the maximum volume is limited to this

setting.

Mirroring content

To mirror the content of the opposite

monitor, using the directional pad on the

remote, select “MIRROR” from the Home

Screen. This will allow the identical con-

tent to play on both monitors.

Multicast

Multicast (Off/On) provides the ability to

watch a video over the built-in Wi-Fi

network using an application installed

on a mobile device. When turned on, the

video content will be "cast" over the

network to allow users with multiple

mobile devices to enjoy the same movie.

*Requires application to be installed on

the mobile device.

Bluetooth

Selecting “BLUETOOTH” allows the Blue-

tooth® feature to be turned off/on, audio

source selection, and lip-sync adjust-

ments. For additional information, see

“Bluetooth® streaming” (P.4-74) and “Lip-

Sync adjustment” (P.4-75).

-------------------------------------------------------------------------------------------------------------------------------------------------------------

WAE0722X

HDMI/MHL CONNECTION
HDMI connection

Display content from an external source

connected to the system using the HDMI

port located on the front of monitor A. A

standard HDMI cable is required (sold

separately).
To access the HDMI source, using the

directional pad on the remote, select

“SOURCE” from the Home Screen and

navigate to HDMI in the menu. When HDMI

is highlighted, a preview of the HDMI input

will be displayed in the preview screen.
Press

to return to the source menu.

NOTE:
HDMI connected devices are indepen-

dent and must be controlled directly

from the source device.

MHL connection

The system also allows mobile devices

supporting Mobile High-Definition Link

(MHL) to be connected. An MHL-to-HDMI

cable is required (sold separately).
Mobile High-Definition Link (MHL) is an

industry standard mobile audio/video

interface that allows connection of

smartphones, tablets, and other portable

consumer electronics devices to the sys-

tem. MHL transports high-quality uncom-

pressed audio and video from a mobile

source device to the system and at the

same time provides power to recharge

the device.

NOTE:
MHL connected devices are indepen-

dent and must be controlled directly

from the source device.

WAE0723X

USB/SD CARD OPERATION
USB operation

Insert a USB device into the USB port

located on the front of monitor A. Using

the directional pad on the remote, select

“SOURCE” from the Home Screen and

navigate to “USB” in the menu. When

USB is highlighted, music, video and

photo icons will appear in the preview

menu to the right. The front panel USB

port provides up to 2 amps of output to

charge most mobile devices. Please note

this system does not support USB data

transfer or audio/video playback from

mobile devices.

Monitor, heater, air conditioner, audio, phone and voice recognition systems

4-57

-------------------------------------------------------------------------------------------------------------------------------------------------------------

4-58

Monitor, heater, air conditioner, audio, phone and voice recognition systems

NOTE:
When inserting a USB storage device

with a large library of content, there

may be a delay before the content is

accessible.

WAE0724X

Fast-Charge (USB)

Fast-Charge allows you to charge certain

USB devices faster than normal. To en-

able, using the directional pad on the

remote, select “FAST-CHARGE” when

highlighted in the main menu. The USB

icon will display a green lightning bolt

when active.

NOTE:
Enabling the Fast-Charge mode dis-

ables the USB port from reading data

or content from USB devices. When

selecting USB as the source, the Fast-

Charge feature is automatically dis-

abled.

WAE0725X

SD card operation

Insert a full-size SD card into the SD card

slot located on the left side monitor A.

Using the directional pad on the remote,

select “SOURCE” from the Home Screen

and navigate to “SD CARD” in the menu.

When SD Card is highlighted, music, video

and photo icons will appear in the pre-

view menu to the right.

-------------------------------------------------------------------------------------------------------------------------------------------------------------

Basic navigation

USB and SD card are characterized by

three different categories which are vi-

deos, music, and photos. Each media type

will show a preview of the available

content. After selecting a media type,

navigate the content, and select the

desired file or photo. When a media item

is highlighted, the preview image is en-

larged and surrounded by a white border.

If available, the item’s metadata (video

title, filename, or photo name) will be

displayed in the information bar at the

bottom of the screen.

Context menu

Press

on the remote while navigating

content to open the context menu. The

context menu provides options to adjust

the page view, sorting, and searching. The

options will vary, depending on the con-

tent. Press

to select or toggle the

highlighted item on the menu. Press

to exit the context menu.

WAE0726X

Page view — music and videos

Using the directional pad on the remote,

select “PAGE VIEW” to change between

List or Grid. List provides an alphanumeric

text listing of all content, whereas Grid

provides an alphanumeric thumbnail gra-

phic view of the content.

Page view — photos

Using the directional pad on the remote,

select “PAGE VIEW” to change between

Grid, Overview, Slideshow, or Full Screen.

Grid provides a large thumbnail graphic

view, whereas Overview provides a small

thumbnail graphic view of the content.

Slideshow will play photos in sequence

and Full Screen fills the entire screen.

Monitor, heater, air conditioner, audio, phone and voice recognition systems

4-59

-------------------------------------------------------------------------------------------------------------------------------------------------------------

4-60

Monitor, heater, air conditioner, audio, phone and voice recognition systems

WAE0727X

Search

Search provides an easy way to find and

play content by name. Using the direc-

tional pad on the remote, select “SEARCH”

to display the on-screen keyboard. Use

the directional pad to navigate the key-

board and enter the first few characters

of the filename. Once the desired file is

displayed, press

to hide the key-

board. Press

to begin playback.

Sorting — videos

Using the directional pad on the remote,

select “SORTING” to select between Title,

Rating, Year, Filename, or Genre.

Sorting — music

Using the directional pad on the remote,

select “SORTING” to select between Artist,

Album, Year, Filename, Song, or Genre.

Sorting — photos

Using the directional pad on the remote,

select “SORTING” to select between Date

or Filename.

-------------------------------------------------------------------------------------------------------------------------------------------------------------

WAE0728X

USB/SD card USB/SD card video

playback controls

During video playback, press

to dis-

play the playback controls. Press

or

to navigate the controls. Press

to

select the highlighted function or option.

The playback controls will disappear after

approximately 5 seconds of no activity.
1.

Context Menu

Press

on the remote to open the

context menu. The menu options will

vary, depending on the source.

2.

Progress Bar

Shows elapsed time, total time and

video progress bar indicator.

3.

Volume

Select to display the volume level

indicator. Press

or

to in-

crease or decrease the volume.

4.

Night Mode

Select to dim the screen and reduce

eye strain during operation at night.

5.

Previous

Select to go to the beginning of the

chapter. Select again to go to the

previous chapter.

6.

Rewind

Select to rewind at 2x, 4x, 8x, and 16x

speeds. Select

to resume play-

back.

7.

Stop

Select to stop video playback and

return to the menu.

8.

Play/Pause

Select once to pause video playback.

Select again to resume video play-

back.

9.

Fast Forward

Select to fast forward at 2x, 4x, 8x, and

16x speeds. Select

to resume

playback.

Monitor, heater, air conditioner, audio, phone and voice recognition systems

4-61

-------------------------------------------------------------------------------------------------------------------------------------------------------------

4-62

Monitor, heater, air conditioner, audio, phone and voice recognition systems

10.

Next

Select to go to the next chapter.

11.

Repeat

Select once to repeat the entire video.

Select again to repeat the currently

playing chapter one time.

WAE0725X

Playing videos

Using the directional pad on the remote,

select “VIDEOS” to navigate the content.

When a media item is highlighted in Grid

mode, the preview image is enlarged and

surrounded by a white border. The video

title will be displayed in the information

bar at the bottom of the screen. Press

to begin playback. When choosing a video

that has previously been started, a "Re-

sume" option is available.

Context menu

Press

on the remote to open the

context menu during playback. The con-

text menu provides options to adjust the

display settings, aspect settings, and

Bluetooth® settings. Press

to select

or toggle the highlighted item on the

menu. Press

to exit the context menu.

Display settings

Brightness is adjustable between Low,

Medium, High, and Default.
Contrast is adjustable between Low,

Medium, High, and Default.
Sharpness is adjustable between Low,

Medium, High, and Default.
Aspect is adjustable between Preserve,

Crop, and Stretch.

-------------------------------------------------------------------------------------------------------------------------------------------------------------

WAE0729X

Bluetooth® settings

Selecting “BLUETOOTH” allows the Blue-

tooth® feature to be turned off/on, audio

source selection, and lip-sync adjust-

ments. For additional information, see

“Lip-Sync adjustment” (P.4-75).

WAE0730X

Playing music

Navigating through a music library is

identical to navigating through the video

library. The default sorting option for

music is Artist. Selecting an artist will then

sort by Album and will display all available

albums by that artist. There is also an

option to Play ALL albums from the

selected artist.
Select an album to display all songs in the

album. Press

or

to navigate

the songs. Press

to begin playback.

During playback, press

to select the

Now Playing screen. The Now Playing

screen includes the following controls:

Previous Song, Next Song, Rewind, Fast-

Forward, Play/Pause, Shuffle, Repeat, Vo-

lume Control, and Night mode.
Press

to return to the Playlist screen.

The audio will continue to play while

navigating the playlist screen. The system

will return to the Now Playing screen after

approximately 15 seconds of no activity.

Monitor, heater, air conditioner, audio, phone and voice recognition systems

4-63

-------------------------------------------------------------------------------------------------------------------------------------------------------------

4-64

Monitor, heater, air conditioner, audio, phone and voice recognition systems

WAE0731X

Navigating photos

To view photos, using the directional pad

on the remote navigate to “SOURCE” then

“USB” or “SD CARD” then “PHOTOS” from

the home screen. Storage device must be

connected to display to read media. Use

the directional pad to highlight the photo

then press

to view.

Highlight the vertical arrows on menu to

access the page selector feature to

quickly scan photos.
Press

to highlight additional options

including Sorting, Page View, Set As Back-

ground, and Search.
Sorting lets you arrange the photos by

filename or date.
Page View allows the user to view photos

in Fullscreen, Grid, Overview, or Slideshow.
Set As Background sets the selected

photo as the home screen background.
Search prompts the user to input a

filename or date to find a photo.

SLINGPLAYER®
About Slingplayer®

A Slingbox® (sold separately) connects to

your home network and sits between

your cable or set-top box and your TV.

When accessed remotely, your Slingbox®

slings your content to the RSI system. To

use Slingplayer®, an external internet

connection is required. For additional

information, see “Using Wi-Fi” (P.4-70) to

enable Client Mode in the Wi-Fi Settings

and allow the system to connect to a Wi-

Fi hotspot.

WAE0732X

Using Slingplayer®

Using the directional pad on the remote,

select “SOURCE” from the Home Screen

and navigate to “SLINGPLAYER” in the

menu. The first use of Slingplayer® will

prompt you for login credentials. Use the

remote control to navigate the on-screen

keyboard and enter the e-mail address

and password associated with your Sling-

player® account.

-------------------------------------------------------------------------------------------------------------------------------------------------------------

WAE0733X

Slingplayer® options

Once logged in, the main Slingplayer®

menu page is displayed with 3 options:
1. Select “DIRECTORY” to watch live tele-

vision from a Slingbox®.

2. Select “SETTINGS” to change the set-

tings of the Slingplayer® application.

3. Select “HELP” to display information

on how to properly use the Sling-

player® application.

WAE0734X

Connect to a live video stream

Press

to access the navigational

menu that will display two sets of Menu

Control Bars. The upper Menu Control Bar

displays types of controls. Press

to

select the desired type of control. Press

to hide the menus and return to the

live stream.
Slingplayer® control options include:

.

Main

.

DVR

.

Directional Pad

.

Number

.

Miscellaneous

WAE0735X

Accessing the program guide

Press

to display the upper and lower

Menu Control Bar for Slingplayer®. By

default, the "Main" icon on the upper

Menu Control Bar is highlighted, showing

the "Main" menu options in the lower

Menu Control Bar. Press

or

to

navigate to the lower options and select

"GUIDE". This will launch the Program

Guide. Once the guide has loaded, use

the directional pad and press

to

select the desired channel or program.

Press

multiple times or

to exit.

Monitor, heater, air conditioner, audio, phone and voice recognition systems

4-65

-------------------------------------------------------------------------------------------------------------------------------------------------------------

4-66

Monitor, heater, air conditioner, audio, phone and voice recognition systems

WAE0736X

Exiting Slingplayer®

There are two ways to exit the Sling-

player® application. Press

or

while on the main screen to return to the

main menu. When exiting the application,

you will be prompted to confirm: "Are you

sure you want to exit Slingplayer? There

will be no data usage once exited". Select

“Yes” to return to the Home Screen or

select “No” to return to the stream.

Connection quality

The quality of a mobile network connec-

tion, whether it’s Wi-Fi or a mobile hotspot

can vary, due to network conditions.

Connection speed and bandwidth can

fluctuate, creating conditions that aren’t

optimal for smooth streaming.

Slingbox® compatibility

The following legacy Slingbox® devices

are not supported: Slingbox PRO, Slingbox

AV, Slingbox TUNER, Slingbox Classic.
Visit www.slingbox.com for more infor-

mation on Slingbox® or where to pur-

chase.

MIRACAST®
About Miracast®

Miracast® is a dedicated wireless connec-

tion technology that allows content

streaming between a mobile device and

the RSI system. The connection is made

without cables or a network connection.

It provides the ability to “cast” (display)

content, such as images or videos from

the mobile device to the RSI system.

There is no need for an external internet

connection and the ability to connect is

inside Miracast-certified devices.
NOTE: Miracast® works with Android OS

mobile devices only. This feature is not

supported on iOS devices.

-------------------------------------------------------------------------------------------------------------------------------------------------------------

WAE0737X

Using Miracast®

Using the directional pad on the remote

select “SOURCE” from the Home Screen

and navigate to “MIRACAST” in the menu.

"Ready to Connect" will be displayed.

Enable Screen Mirroring on the mobile

device and look for "RSI-Miracast" in the

list of possible devices to connect to. Note

that Miracast® may be labeled differently,

depending on the mobile device and its

operating system. If Miracast® is not

available, look for Smart View or Screen

Mirroring in the settings menu of your

mobile device. Remember to end your

Miracast® connection when finished to

avoid draining the battery of your mobile

device.
This screen must be active to be able to

connect your mobile device to the moni-

tor.
Visit www.wi-fi.org for a current list of

Miracast® certified devices.

USING THE MOBILE APPLICATION

ON YOUR MOBILE DEVICE

Download the free ”VOXX-RSI” mobile

application on your mobile device from

Apple iTunes or Google Play store. A full

version of the RSI Owner’s Manual is also

included within the mobile application.

WARNING

THIS MOBILE APP IS NOT FOR DRIVER

USE
To reduce risk of a crash which can

result in death or serious injury,

always drive carefully and in accor-

dance with traffic laws. The driver

should not use the mobile app while

the vehicle is in motion. Mobile app

may only be used by the driver after

you have stopped your vehicle in an

appropriate location permitted by

law. The mobile app is specifically

designed to be used by passengers

other than the driver, provided it

does not interfere with driving, and

does not distract the driver’s atten-

tion to the road.

SMARTSTREAM
About SmartStream

SmartStream is a wireless connection

technology that allows content stream-

ing between a mobile device and the RSI

system and between mobile devices.

Content is streamed over the built-in Wi-

Fi network using an application installed

on a mobile device. There is no need for

an external internet connection.

Using SmartStream

Before using the SmartStream feature, a

compatible UPnP application is required

to be downloaded and installed on your

mobile device. To stream content from a

mobile device, you must first connect it to

the RSI network.

Monitor, heater, air conditioner, audio, phone and voice recognition systems

4-67

-------------------------------------------------------------------------------------------------------------------------------------------------------------

4-68

Monitor, heater, air conditioner, audio, phone and voice recognition systems

WAE0738X

Connecting a mobile device to the RSI
network:

1. Using the directional pad on the

remote, select “SOURCE” from the

Home Screen and then select “SMART-

STREAM” in the menu. A device con-

nection screen will be displayed on

the monitor.

2. Navigate to the “Wi-Fi” settings menu

of the mobile device and establish a

connection to the network named

“Nissan RSE”.

3. When prompted, enter the network

password to join the Nissan RSE net-

work. Select the Show Password

check box in the Wi-Fi Settings menu

to display the current password. For

additional information, see “Using Wi-

Fi” (P.4-70).

NOTE:
Access Point must be selected to use

the SmartStream feature. For additional

information, see “Using Wi-Fi” (P.4-70).

WAE0739X

Streaming content from a mobile de-
vice:

1. Once connected, launch the applica-

tion, and select SmartStream on the

mobile device.

2. Choose the desired monitor to stream

to by selecting Monitor A or Monitor B.

Note: To stream content from a mo-

bile device, the monitor must be set to

SmartStream in the source menu.

3. Select the desired source content

from the list of available devices.

Content can be browsed from all

devices that are connected to the RSI

Wi-Fi network and have a compatible

UPnP application installed.

-------------------------------------------------------------------------------------------------------------------------------------------------------------


Content      ..     16      17      18      19     ..