Nissan Murano (2022 year). Manual in english - page 10


  Index      Manuals     Nissan Murano (2022 year). Manual in english


Search            copyright infringement  


Content      ..     8      9      10      11     ..


Nissan Murano (2022 year). Manual in english - page 10


Installing crossbars (if so
equipped)

WARNING

It is recommended that you have the
roof rack crossbars installed by a
NISSAN dealer.

Protect the painted area on the vehi-
cle’s roof under the crossbars by
placing a piece of cloth under the
cross

bars

to

prevent

scratch

damage.

Make

sure

the

moonroof

(if

so

equipped) is in the closed position
during the installation process.

POWER WINDOWS

WARNING

Make sure that all passengers have
their hands, etc., inside the vehicle
while it is in motion and before clos-
ing the windows. Use the window
lock switch to prevent unexpected
use of the power windows.

To help avoid risk of injury or death
through unintended operation of the
vehicle and/or its systems, including
entrapment in windows or inadver-
tent door lock activation, do not
leave children, people who require
the assistance of others or pets unat-
tended in your vehicle. Additionally,
the temperature inside a closed ve-
hicle on a warm day can quickly be-
come high enough to cause a signifi-
cant risk of injury or death to people
and pets.

The power windows operate when the ig-
nition switch is placed in the ON position or
for a period of time after the ignition switch
is placed in the OFF position. If the driver's
or passenger's door is opened during this
period of time, the power to the windows is
canceled.

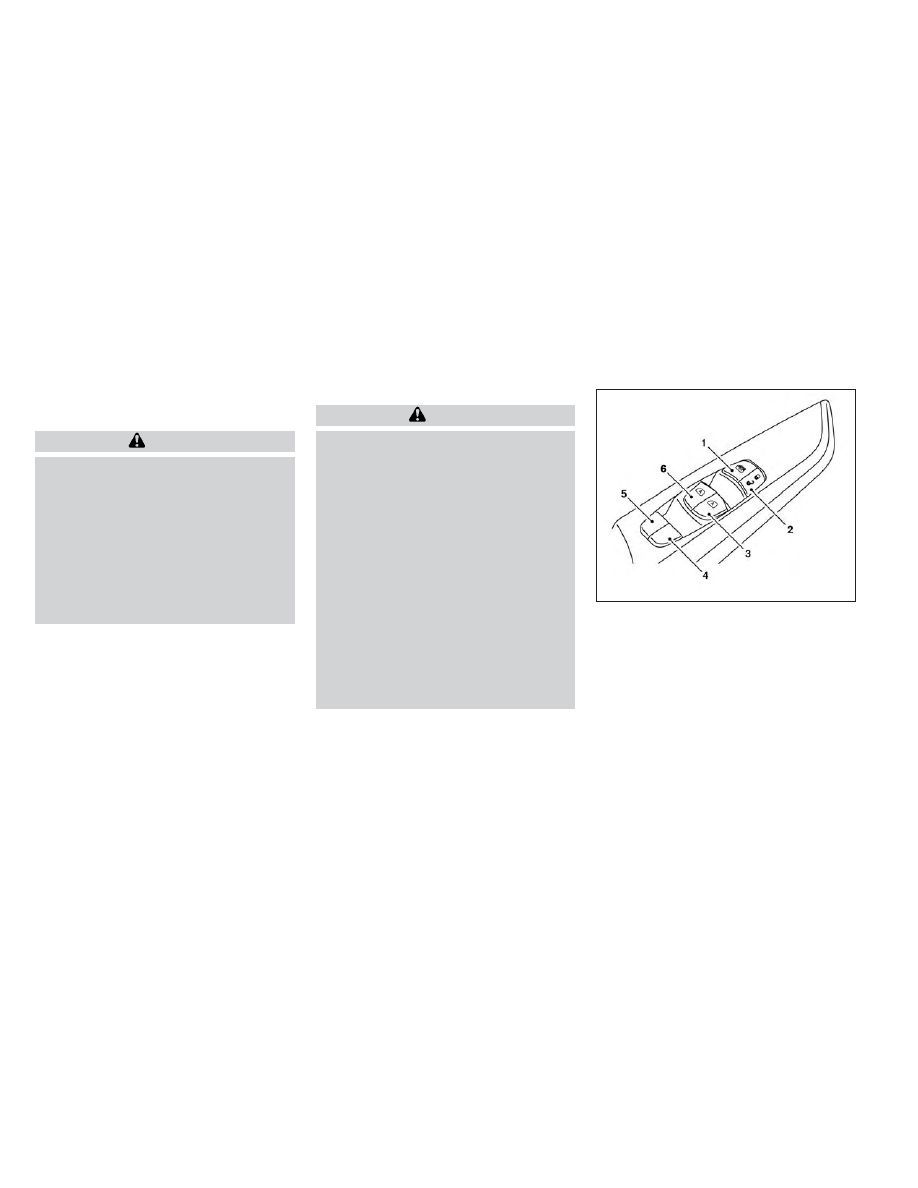
Driver's side power window
switch

The driver's side control panel is equipped
with switches to open or close all of the
windows.

LIC3238

1. Window lock button

2. Power door lock switch

3. Front passenger side automatic switch

4. Right rear passenger side switch

5. Left rear passenger side switch

6. Driver’s side automatic switch

WINDOWS

Instruments and controls

2-61

-------------------------------------------------------------------------------------------------------------------------------------------------------------

To open a window, push the switch to the
detent and continue to hold down until the
desired window position is reached. To
close a window, pull the switch to the de-
tent and continue to hold up until the de-
sired window position is reached.

Locking passengers' windows

When the window lock switch is pushed,
only the driver's side window can be
opened or closed. Push it again to cancel
the window lock function.

Front passenger's power window
switch

The passenger's window switch operates
only the corresponding passenger's win-
dow. To open the window partially, push the
switch down lightly until the desired win-
dow position is reached. To close the win-
dow partially, pull the switch up until the
desired window position is reached.

Rear power window switch

The rear power window switches open or
close only the corresponding windows. To
open the window, push the switch and hold
it down

O

1

. To close the window, pull the

switch up

O

2

.

LIC2397

LIC2663

2-62

Instruments and controls

-------------------------------------------------------------------------------------------------------------------------------------------------------------

Automatic operation

To fully open a window, push the window
switch down to the second detent and re-
lease it; it need not be held. The window
automatically opens all the way. To stop
the window, lift the switch up while the win-
dow is opening.

To fully close a window, pull the switch up to
the second detent and release it; it need
not be held. To stop the window, push the
switch down while the window is closing.

Auto-reverse function

The auto-reverse function can be acti-
vated when a window is closed by auto-
matic operation.

Depending on the environment or driv-
ing conditions, the auto-reverse func-
tion may be activated if an impact or
load similar to something being caught
in the window occurs.

WARNING

There are some small distances imme-
diately

before

the

closed

position

which cannot be detected. Make sure
that all passengers have their hands,
etc., inside the vehicle before closing
the window.

If the vehicle's battery is disconnected, re-
placed, or jump started, the power window
auto-reverse function may not operate
properly. Have the power window auto-
reverse system re-initialized. It is recom-
mended that you visit a NISSAN dealer for
this service.

If the control unit detects something
caught in a window equipped with auto-
matic operation as it is closing, the window
will be immediately lowered.

LIC0410

Instruments and controls

2-63

-------------------------------------------------------------------------------------------------------------------------------------------------------------

The moonroof will only operate when the
ignition switch is placed in the ON position.
The moonroof is operational for a period of
time, even if the ignition switch is placed in
the ACC (if so equipped) or OFF position. If
the driver's door or the front passenger's
door is opened during this period of time,
the power to the moonroof is canceled.

When operating the power moonroof or
panoramic sunshade, the switch need not
be held continuously. To stop the moon-
roof or sunshade at any point while it is
opening

or

closing, push

the

switch

momentarily.

Sliding the moonroof

To open the moonroof, push the switch to
the open

O

1

position and release it; it need

not be held. The roof will automatically
open or close all the way.

Push the switch again to fully open the
moonroof.

To close the moonroof, push the switch to
the

O

2

position and release it. The roof will

automatically close all the way.

To stop the moonroof, push the switch
once more while it is opening or closing.

Tilting the moonroof

To tilt the moonroof up, first close the
moonroof. Push the switch to the

O

2

posi-

tion and release it; it need not be held.

To tilt down the moonroof, push the switch
to the

O

2

position and release it.

Auto-reverse function (when
closing or tilting down the
moonroof)

The auto-reverse function can be acti-
vated when the moonroof is closed or
tilted down by automatic operation when
the ignition switch is placed in the ON po-

sition or for a period of time after the igni-
tion switch is placed in the OFF position.

Depending on the environment or driv-
ing conditions, the auto-reverse func-
tion may be activated if an impact or
load similar to something being caught
in the moonroof occurs.

WARNING

There are some small distances imme-
diately

before

the

closed

position

which cannot be detected. Make sure
that all passengers have their hands,
etc., inside the vehicle before closing
the moonroof.

When closing

If the control unit detects something
caught in the moonroof as it moves to the
front, the moonroof will immediately open
backward.

When tilting down

If the control unit detects something
caught in the moonroof as it tilts down, the
moonroof will immediately tilt up.

LIC4148

POWER MOONROOF (if so equipped)

2-64

Instruments and controls

-------------------------------------------------------------------------------------------------------------------------------------------------------------

If the auto-reverse function malfunctions
and repeats opening or tilting up the
moonroof, keep pushing the tilt down
switch within 5 seconds after it happens;
the moonroof will fully close gradually.
Make sure nothing is caught in the
moonroof.

WARNING

In an accident you could be thrown
from the vehicle through an open
moonroof. Always use seat belts and
child restraints.

Do not allow anyone to stand up or
extend any portion of their body out
of the moonroof opening while the
vehicle is in motion or while the
moonroof is closing.

CAUTION

Remove water drops, snow, ice or
sand from the moonroof before
opening.

Do not place heavy objects on the
moonroof or surrounding area.

Panoramic sunshade

The panoramic sunshade operates when
the ignition switch is in the ON position. The
sunshade switch is located near the roof
console. When opening or closing the sun-
shade the switch need not be held.

To open the sunshade:
• To fully open the sunshade, push the

switch toward the open position

O

1

.

To close the sunshade:
• To fully close the sunshade, push the

switch toward the close position

O

2

.

WARNING

To avoid personal injury, keep your
hands, fingers and head away from
the sunshade arm, the arm rail and
sunshade inlet port.

Do not allow children near the rear
sunshade system. They could be
injured.

Do not place objects on or near the
rear sunshade. This could cause im-
proper operation or damage it.

Do not pull or push the rear sun-
shade. This could cause improper op-
eration or damage it.

CAUTION

Do not place objects (such as news-
papers, handkerchiefs, etc.) on the
sunshade inlet port. Doing so may
entangle these objects in the sun-
shade when it is extending or retract-
ing, causing improper operation or
damage to the sunshade.

Do not push the sunshade arm with
your hands, etc., as this may deform
it. Improper operation or damage to
the sunshade may result.

LIC4149

Instruments and controls

2-65

-------------------------------------------------------------------------------------------------------------------------------------------------------------

Do not put any object into the sun-
shade inlet port as this may result in
improper operation or damage the
sunshade.

Do not hang any object on the arm
rail as this may result in improper op-
eration or damage the sunshade.

Do not forcefully pull the sunshade.
Doing so may elongate the sun-
shade. Improper operation or dam-
age to the sunshade may result.

If the moonroof does not close

Have your moonroof checked and re-
paired. It is recommended that you visit a
NISSAN dealer for this service.

When the ON switch

O

1

is pushed, the foot-

well lights (if so equipped), step lights (if so
equipped), map lights and rear personal
lights will automatically turn on and stay on
for a period of time when:
• The doors are unlocked by the Intelligent

Key, a key or the request switch (if so
equipped) while all doors are closed and
the ignition switch is in the OFF position.

• The driver’s door is opened and then

closed while the ignition switch is in the
OFF position.

• Individually pushed.

When the OFF switch

O

2

is pushed, the in-

terior lights will illuminate when pushed.
When the DOOR/OFF switch is pushed and
the ON switch is pushed, all of the lights will
come on.

NOTE:

The footwell lights (if so equipped) and
step lights (if so equipped) illuminate
when the driver and passenger doors
are open regardless of the interior light
switch position. These lights will turn off
automatically after a period of time
while doors are open to prevent the bat-
tery from becoming discharged.

CAUTION

Do not use for extended periods of time
with the engine stopped. This could re-
sult in a discharged battery.

LIC2302

INTERIOR LIGHTS

2-66

Instruments and controls

-------------------------------------------------------------------------------------------------------------------------------------------------------------

CONSOLE LIGHT

The console light will turn on whenever the
parking lights or headlights are illuminated.

The console light brightness can be ad-
justed with the illumination brightness
control in the vehicle information display.

MAP LIGHTS

Press the button to turn the map lights on.
To turn them off, press the button again.

CAUTION

Do not use for extended periods of time
with the engine stopped. This could re-
sult in a discharged battery.

PERSONAL LIGHTS

To turn the rear personal lights on, push the
switch. To turn them off, push the switch
again.

LUGGAGE COMPARTMENT LIGHT

The light illuminates when the liftgate is
opened. When the liftgate is closed, the
light will turn off. The lights will turn off au-
tomatically after a period of time while
doors are open to prevent the battery from
becoming discharged.

LIC2303

LIC2304

LIC3907

Rear personal lights

Instruments and controls

2-67

-------------------------------------------------------------------------------------------------------------------------------------------------------------

CAUTION

Do not use for extended periods of time
with the engine stopped. This could re-
sult in a discharged battery.

The HomeLink® Universal Transceiver pro-
vides a convenient way to consolidate the
functions of up to three individual hand-
held transmitters into one built-in device.

HomeLink® Universal Transceiver:
• Will operate most radio frequency de-

vices such as garage doors, gates, home
and office lighting, entry door locks and
security systems.

• Is powered by your vehicle's battery. No

separate batteries are required. If the ve-
hicle's battery is discharged or is discon-
nected,

HomeLink®

will

retain

all

programming.

When the HomeLink® Universal Trans-
ceiver is programmed, retain the original
transmitter for future programming pro-
cedures (Example: new vehicle pur-
chases). Upon sale of the vehicle, the
programmed

HomeLink®

Universal

Transceiver buttons should be erased for
security purposes. For additional infor-
mation, see “Programming HomeLink®”
(P. 2-69).

WARNING

Your vehicle's engine should be
turned off while programming the
HomeLink® Universal Transceiver. For
additional information, see “Push-
button ignition switch” (P. 5-13). 
Do
not breathe exhaust gases; they con-
tain colorless and odorless carbon
monoxide. Carbon monoxide is dan-
gerous. It can cause unconscious-
ness or death.

Do not use the HomeLink® Universal
Transceiver with any garage door
opener that lacks safety stop and re-
verse features as required by federal
safety standards. (These standards
became effective for opener models
manufactured after April 1, 1982.) A
garage door opener which cannot
detect an object in the path of a clos-
ing garage door and then automati-
cally stop and reverse does not meet
current federal safety standards. Us-
ing a garage door opener without
these features increases the risk of
serious injury or death.

HOMELINK® UNIVERSAL
TRANSCEIVER (if so equipped)

2-68

Instruments and controls

-------------------------------------------------------------------------------------------------------------------------------------------------------------

During the programming procedure
your garage door or security gate will
open and close (if the transmitter is
within range). Make sure that people
or objects are clear of the garage
door,

gate,

etc.,

that

you

are

programming.

PROGRAMMING HOMELINK®

If you have any questions or are having
difficulty programming your HomeLink®
buttons, refer to the HomeLink® web site at:
www.homelink.com or call 1-800-355-3515.

NOTE:

Place the ignition switch in the ON or ACC
position (without starting the engine)
when programming HomeLink®. It is also
recommended that a new battery be
placed in the hand-held transmitter of
the

device

being

programmed

to

HomeLink® for quicker programming
and accurate transmission of the radio
frequency.

1. Position the end of your hand-held

transmitter 1–3 in (2–8 cm) away from
the HomeLink® surface, keeping the
HomeLink® indicator light

O

1

in view.

2. Using both hands, simultaneously press

and hold the desired HomeLink® button
and hand-held transmitter button. DO
NOT release until the HomeLink® indica-
tor light

O

1

flashes slowly and then rap-

idly. When the indicator light flashes rap-
idly, both buttons may be released. (The
rapid

flashing

indicates

successful

programming.)

LIC2365

LIC4600

Instruments and controls

2-69

-------------------------------------------------------------------------------------------------------------------------------------------------------------

NOTE:

Some devices may require you to replace
Step 2 with the cycling procedure noted
in “Programming HomeLink® for Cana-
dian

customers

and

gate

openers”

(P. 2-70).

3. Press

and

hold

the

programmed

HomeLink® button and observe the indi-
cator light.

• If the indicator light

O

1

is solid/

continuous, programming is com-
plete

and your device should activate

when

the

HomeLink®

button

is

pressed and released.

• If the indicator light

O

1

blinks

rapidly

for 2 seconds and then turns to a
solid/continuous

light,

continue

with Steps 4-6

for a rolling code de-

vice. A second person may make the
following steps easier. Use a ladder or
other device. Do not stand on your ve-
hicle to perform the next steps.

4. At the receiver located on the garage

door opener motor in the garage, locate
the “learn” or “smart” button (the name
and color of the button may vary by
manufacturer but it is usually located
near where the hanging antenna wire is
attached to the unit). If there is difficulty
locating the button, reference the ga-
rage door opener’s manual.

5. Press and release the “learn” or “smart”

button.

NOTE:
Once the button is pressed, you have
approximately 30 seconds to initiate
the next step.

6. Return to the vehicle and firmly press

and hold the trained HomeLink® button
for 2 seconds and release. Repeat the
“press/hold/release” sequence up to
three times to complete the training
process. HomeLink® should now acti-
vate your rolling code equipped device.

7. If you have any questions or are having

difficulty programming your HomeLink®
buttons, refer to the HomeLink® web site
at:

www.homelink.com

or

call

1-800-355-3515.

PROGRAMMING HOMELINK® FOR
CANADIAN CUSTOMERS AND GATE
OPENERS

Canadian radio-frequency laws require
transmitter signals to “time-out” (or quit)
after several seconds of transmission –
which may not be long enough for
HomeLink® to pick up the signal during
training. Similar to this Canadian law, some
U.S. gate operators are designed to “tim-
eout” in the same manner.

If you live in Canada or you are having diffi-
culties training a gate operator

or

garage

door opener by using the “Training” proce-
dures,

replace

“Programming HomeLink®”

step 2

with the following:

NOTE:

When

programming

a

garage

door

opener, etc., unplug the device during
the “cycling” process to prevent possible
damage to the garage door opener
components.

1. For additional information, see “Pro-

gramming HomeLink®” step 1 (P. 2-69).

2-70

Instruments and controls

-------------------------------------------------------------------------------------------------------------------------------------------------------------

2. Using both hands, simultaneously press

and hold the desired HomeLink® button
and the hand-held transmitter button.
During training, your hand-held trans-
mitter may automatically stop transmit-
ting. Continue to press and hold the de-
sired HomeLink® button while you press
and re-press (“cycle”) your hand-held
transmitter every 2 seconds until the
frequency signal has been learned. The
HomeLink® indicator light will flash
slowly and then rapidly after several
seconds upon successful training. DO
NOT release until the HomeLink® indica-
tor light flashes slowly and then rapidly.
When the indicator light flashes rapidly,
both buttons may be released. The rapid
flashing indicates successful training.
Proceed with “Programming HomeLink®”
step 3 to complete.
If the device was unplugged during the
programming procedure, remember to
plug it back in when programming is
completed.

OPERATING THE HOMELINK®
UNIVERSAL TRANSCEIVER

The HomeLink® Universal Transceiver, after
it is programmed, can be used to activate
the programmed device. To operate, sim-
ply press and release the appropriate pro-
grammed HomeLink® Universal Trans-
ceiver button. The amber indicator light will
illuminate

while

the

signal

is

being

transmitted.

For convenience, the hand-held transmit-
ter of the device may also be used at any
time.

PROGRAMMING TROUBLE-
DIAGNOSIS

If the HomeLink® does not quickly learn the
hand-held transmitter information:
• replace the hand-held transmitter bat-

teries with new batteries.

• position the hand-held transmitter with

its battery area facing away from the
HomeLink® surface.

• press and hold both the HomeLink® and

hand-held transmitter buttons without
interruption.

• position the hand-held transmitter 1 - 3 in

(26 - 76 mm) away from the HomeLink®
surface. Hold the transmitter in that posi-
tion for up to 15 seconds. If HomeLink® is
not programmed within that time, try
holding the transmitter in another posi-
tion – keeping the indicator light in view at
all times.

If you have any questions or are having
difficulty programming your HomeLink®
buttons, refer to the HomeLink® web site at:
www.homelink.com or call 1-800-355-3515.

CLEARING THE PROGRAMMED
INFORMATION

The following procedure clears the pro-
grammed information from both buttons.
Individual buttons cannot be cleared. How-
ever, individual buttons can be repro-
grammed. For additional information, see
“Reprogramming a single HomeLink® but-
ton” (P. 2-72).

To clear all programming:

1. Press and hold the two outer HomeLink®

buttons until the indicator light begins to
flash in approximately 10 seconds. Do
not hold for longer than 20 seconds.

2. Release both buttons.

Instruments and controls

2-71

-------------------------------------------------------------------------------------------------------------------------------------------------------------

HomeLink® is now in the programming
mode and can be programmed at any
time

beginning

with

“Programming

HomeLink®” - Step 1 (P. 2-69).

REPROGRAMMING A SINGLE
HOMELINK® BUTTON

To reprogram a HomeLink® Universal
Transceiver button, complete the following:

1. Press and hold the desired HomeLink®

button.

DO NOT

release the button.

2. The indicator light will begin to flash af-

ter 20 seconds. Without releasing the
HomeLink® button, proceed with “Pro-
gramming HomeLink®” - Step 1 (P. 2-69).

For

questions

or

comments,

contact

HomeLink®

at:

www.homelink.com

or

1–800–355–3515 (except Mexico).

The HomeLink® Universal Transceiver but-
ton has now been reprogrammed. The
new device can be activated by pressing
the HomeLink® button that was just pro-
grammed. This procedure will not affect
any

other

programmed

HomeLink®

buttons.

IF YOUR VEHICLE IS STOLEN

If your vehicle is stolen, you should change
the codes of any non-rolling code device
that

has

been

programmed

into

HomeLink®. Consult the Owner's Manual of
each device or call the manufacturer or
dealer of those devices for additional
information.

When your vehicle is recovered, you will
need to reprogram the HomeLink® Uni-
versal Transceiver with your new trans-
mitter information.

FCC Notice:

For USA:

This device complies with Part 15 of the
FCC Rules. Operation is subject to the fol-
lowing two conditions: (1) This device
may not cause harmful interference, and
(2) this device must accept any interfer-
ence received, including interference
that may cause undesired operation.

NOTE:

Changes or modifications not expressly
approved by the party responsible for
compliance could void the user’s author-
ity to operate the equipment.

For Canada:

This

device

contains

licence-exempt

transmitter(s)/receiver(s) that comply
with Innovation, Science and Economic
Development Canada’s licence-exempt
RSS(s). Operation is subject to the fol-
lowing two conditions: (1) This device
may not cause interference. (2) This de-
vice must accept any interference, in-
cluding interference that may cause un-
desired operation of the device.

2-72

Instruments and controls

-------------------------------------------------------------------------------------------------------------------------------------------------------------

3 Pre-driving checks and adjustments

Keys . . . . . . . . . . . . . . . . . . . . . . . . . . . . . . . . . . . . . . . . . . . . . 3-2

NISSAN Intelligent Key® . . . . . . . . . . . . . . . . . . . . . . . 3-2
NISSAN Vehicle Immobilizer System
keys . . . . . . . . . . . . . . . . . . . . . . . . . . . . . . . . . . . . . . . . . . 3-4

Doors . . . . . . . . . . . . . . . . . . . . . . . . . . . . . . . . . . . . . . . . . . . 3-5

Locking with key . . . . . . . . . . . . . . . . . . . . . . . . . . . . . 3-5
Locking with inside lock knob . . . . . . . . . . . . . . . . 3-6
Locking with power door lock switch . . . . . . . . . 3-6
Automatic door locks . . . . . . . . . . . . . . . . . . . . . . . . 3-6
Child safety rear door lock . . . . . . . . . . . . . . . . . . . . 3-7

NISSAN Intelligent Key® system . . . . . . . . . . . . . . . . . . 3-7

Operating range . . . . . . . . . . . . . . . . . . . . . . . . . . . . . 3-8
Door locks/unlocks precaution . . . . . . . . . . . . . . . 3-9
NISSAN Intelligent Key® Operation . . . . . . . . . . . . 3-9
How to use the remote keyless entry
function . . . . . . . . . . . . . . . . . . . . . . . . . . . . . . . . . . . . . 3-12
Warning signals . . . . . . . . . . . . . . . . . . . . . . . . . . . . . 3-16
Troubleshooting guide . . . . . . . . . . . . . . . . . . . . . . 3-16

Remote Engine Start (if so equipped) . . . . . . . . . . . 3-18

Remote Engine Start operating range . . . . . . . 3-18
Remote starting the vehicle . . . . . . . . . . . . . . . . . 3-19
Extending engine run time . . . . . . . . . . . . . . . . . . 3-19
Canceling a Remote Engine Start . . . . . . . . . . . 3-19
Conditions the Remote Engine Start will
not work . . . . . . . . . . . . . . . . . . . . . . . . . . . . . . . . . . . . 3-20

Hood . . . . . . . . . . . . . . . . . . . . . . . . . . . . . . . . . . . . . . . . . . . 3-21

Liftgate . . . . . . . . . . . . . . . . . . . . . . . . . . . . . . . . . . . . . . . . 3-21

Operating the manual liftgate
(if so equipped) . . . . . . . . . . . . . . . . . . . . . . . . . . . . . . 3-22
Operating the power liftgate
(if so equipped) . . . . . . . . . . . . . . . . . . . . . . . . . . . . . . 3-22
Motion-Activated Liftgate
(if so equipped) . . . . . . . . . . . . . . . . . . . . . . . . . . . . . . 3-25
Liftgate release . . . . . . . . . . . . . . . . . . . . . . . . . . . . . 3-27
Liftgate position setting
(if so equipped) . . . . . . . . . . . . . . . . . . . . . . . . . . . . . . 3-28

Fuel-filler door . . . . . . . . . . . . . . . . . . . . . . . . . . . . . . . . . . 3-29

Opener operation . . . . . . . . . . . . . . . . . . . . . . . . . . . 3-29
Fuel-filler cap . . . . . . . . . . . . . . . . . . . . . . . . . . . . . . . . 3-29

Steering wheel . . . . . . . . . . . . . . . . . . . . . . . . . . . . . . . . . 3-31

Manual operation (if so equipped) . . . . . . . . . . . 3-31
Automatic operation (if so equipped) . . . . . . . . 3-32

Sun visors . . . . . . . . . . . . . . . . . . . . . . . . . . . . . . . . . . . . . . 3-33

Vanity mirrors . . . . . . . . . . . . . . . . . . . . . . . . . . . . . . . 3-33
Card holder . . . . . . . . . . . . . . . . . . . . . . . . . . . . . . . . . 3-34

Mirrors . . . . . . . . . . . . . . . . . . . . . . . . . . . . . . . . . . . . . . . . . 3-34

Manual anti-glare rearview mirror
(if so equipped) . . . . . . . . . . . . . . . . . . . . . . . . . . . . . . 3-34
Automatic anti-glare rearview mirror
(if so equipped) . . . . . . . . . . . . . . . . . . . . . . . . . . . . . . 3-34
Outside mirrors . . . . . . . . . . . . . . . . . . . . . . . . . . . . . 3-35

-------------------------------------------------------------------------------------------------------------------------------------------------------------

-------------------------------------------------------------------------------------------------------------------------------------------------------------

NISSAN INTELLIGENT KEY®

Your vehicle can only be driven with the
Intelligent Keys which are registered to
your vehicle’s Intelligent Key System com-
ponents and NISSAN Vehicle Immobilizer
System components.

Never leave these keys in the vehicle.

As many as four Intelligent Keys can be
registered and used with one vehicle. The
new keys must be registered prior to use
with the Intelligent Key System and NISSAN
Vehicle Immobilizer System of your vehicle.
It is recommended that you visit a NISSAN
dealer for this service. Since the registra-
tion process requires erasing all memory in
the Intelligent Key components when reg-
istering new keys, be sure to take all Intelli-
gent Keys that you have to the NISSAN
dealer.

A key number plate is supplied with your
keys. Record the key number and keep it in
a safe place (such as your wallet), not in the
vehicle. If you lose your keys, it is recom-
mended that you visit a NISSAN dealer for
duplicates by using the key number.
NISSAN does not record key numbers so it
is very important to keep track of your key
number plate.

A key number is only necessary when you
have lost all keys and do not have one to
duplicate from. If you still have a key, it can
be duplicated without knowing the key
number.

LPD2842

Type A (if so equipped)

1. Intelligent Key (two sets)

2. Mechanical key

3. Key number plate (one plate)

LPD2844

Type B (if so equipped)

LPD3021

Type C (if so equipped)

KEYS

3-2

Pre-driving checks and adjustments

-------------------------------------------------------------------------------------------------------------------------------------------------------------

CAUTION

Listed below are conditions or occur-
rences which will damage the Intelli-
gent Key:

Do not allow the Intelligent Key,
which contains electrical compo-
nents, to come into contact with wa-
ter or salt water. This could affect the
system function.

Do not drop the Intelligent Key.

Do not strike the Intelligent Key
sharply against another object.

Do not change or modify the Intelli-
gent Key.

Wetting may damage the Intelligent
Key. If the Intelligent Key gets wet,
immediately wipe until it is com-
pletely dry.

Do not place the Intelligent Key for an
extended period in an area where
temperatures exceed 140°F (60°C).

Do not attach the Intelligent Key with
a key holder that contains a magnet.

Do not place the Intelligent Key near
equipment that produces a magnetic
field, such as a TV, audio equipment
and personal computers.

If an Intelligent Key is lost or stolen,
NISSAN recommends erasing the ID
code of that Intelligent Key from the
vehicle. This may prevent the unau-
thorized use of the Intelligent Key to
operate the vehicle. For information re-
garding the erasing procedure, it is rec-
ommended that you visit a NISSAN
dealer.

Mechanical key

The Intelligent Key contains the mechani-
cal key.

To remove the mechanical key, release the
lock knob on the back of the Intelligent Key.

To install the mechanical key, firmly insert it
into the Intelligent Key until the lock knob
returns to the lock position.

Use the mechanical key to lock or unlock
the driver's door and glove box.

SPA1951

Pre-driving checks and adjustments

3-3

-------------------------------------------------------------------------------------------------------------------------------------------------------------


Content      ..     8      9      10      11     ..