Nissan Murano Z51 (2013 year). Manual - part 45
 

  Index      Manuals     Nissan Murano Z51 (2013 year) - Service and Repair Manual


Search            copyright infringement  


Content      ..     43      44      45      46     ..


Nissan Murano Z51 (2013 year). Manual - part 45


MIR-60

< PRECAUTION >

[WITHOUT ADP]

PRECAUTIONS

PRECAUTION

PRECAUTIONS

FOR USA AND CANADA

FOR USA AND CANADA : Precaution for Supplemental Restraint System (SRS) "AIR 
BAG" and "SEAT BELT PRE-TENSIONER"

INFOID:0000000008455809

The Supplemental Restraint System such as “AIR BAG” and “SEAT BELT PRE-TENSIONER”, used along
with a front seat belt, helps to reduce the risk or severity of injury to the driver and front passenger for certain
types of collision. This system includes seat belt switch inputs and dual stage front air bag modules. The SRS
system uses the seat belt switches to determine the front air bag deployment, and may only deploy one front
air bag, depending on the severity of a collision and whether the front occupants are belted or unbelted.
Information necessary to service the system safely is included in the “SRS AIR BAG” and “SEAT BELT” of this
Service Manual.

WARNING:

Always observe the following items for preventing accidental activation.
• To avoid rendering the SRS inoperative, which could increase the risk of personal injury or death in

the event of a collision that would result in air bag inflation, all maintenance must be performed by
an authorized NISSAN/INFINITI dealer.

• Improper maintenance, including incorrect removal and installation of the SRS, can lead to personal

injury caused by unintentional activation of the system. For removal of Spiral Cable and Air Bag
Module, see “SRS AIR BAG”.

• Never use electrical test equipment on any circuit related to the SRS unless instructed to in this Ser-

vice Manual. SRS wiring harnesses can be identified by yellow and/or orange harnesses or harness
connectors.

PRECAUTIONS WHEN USING POWER TOOLS (AIR OR ELECTRIC) AND HAMMERS

WARNING:

Always observe the following items for preventing accidental activation.
• When working near the Air Bag Diagnosis Sensor Unit or other Air Bag System sensors with the

ignition ON or engine running, never use air or electric power tools or strike near the sensor(s) with
a hammer. Heavy vibration could activate the sensor(s) and deploy the air bag(s), possibly causing
serious injury.

• When using air or electric power tools or hammers, always switch the ignition OFF, disconnect the

battery, and wait at least 3 minutes before performing any service.

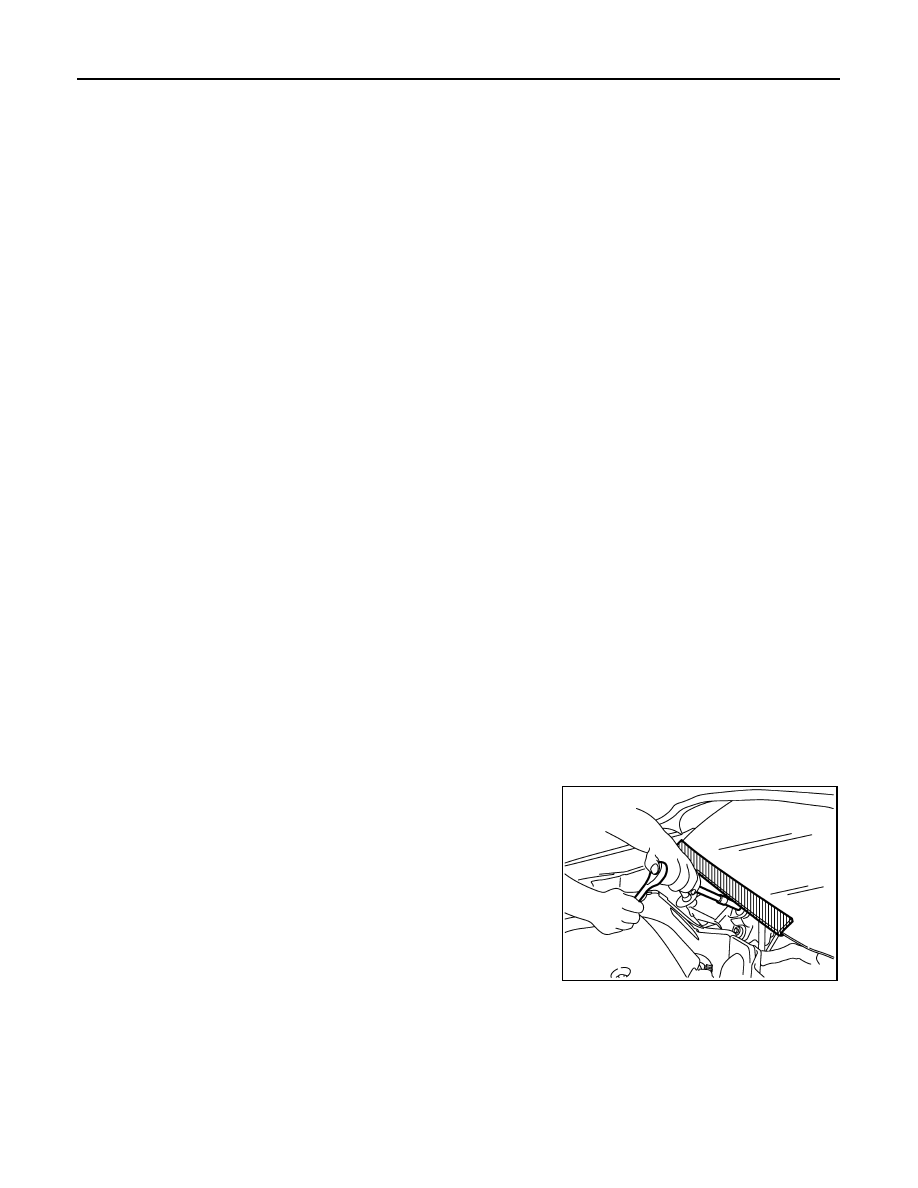
FOR USA AND CANADA : Precaution for Procedure without Cowl Top Cover

INFOID:0000000008455810

When performing the procedure after removing cowl top cover, cover
the lower end of windshield with urethane, etc to prevent damage to
windshield.

FOR USA AND CANADA : Precaution for Work

INFOID:0000000008455811

• After removing and installing the opening/closing parts, be sure to carry out fitting adjustments to check their

operation.

• Check the lubrication level, damage, and wear of each part. If necessary, grease or replace it.

FOR MEXICO

FOR MEXICO : Precaution for Supplemental Restraint System (SRS) "AIR BAG" and 

PIIB3706J

Revision: 2012 September

2013 MURANO

PRECAUTIONS

MIR-61

< PRECAUTION >

[WITHOUT ADP]

C

D

E

F

G

H

I

J

K

M

A

B

MIR

N

O

P

"SEAT BELT PRE-TENSIONER"

INFOID:0000000008455812

The Supplemental Restraint System such as “AIR BAG” and “SEAT BELT PRE-TENSIONER”, used along
with a front seat belt, helps to reduce the risk or severity of injury to the driver and front passenger for certain
types of collision. Information necessary to service the system safely is included in the “SRS AIR BAG” and
“SEAT BELT” of this Service Manual.

WARNING:

Always observe the following items for preventing accidental activation.
• To avoid rendering the SRS inoperative, which could increase the risk of personal injury or death in

the event of a collision that would result in air bag inflation, all maintenance must be performed by
an authorized NISSAN/INFINITI dealer.

• Improper maintenance, including incorrect removal and installation of the SRS, can lead to personal

injury caused by unintentional activation of the system. For removal of Spiral Cable and Air Bag
Module, see “SRS AIR BAG”.

• Never use electrical test equipment on any circuit related to the SRS unless instructed to in this Ser-

vice Manual. SRS wiring harnesses can be identified by yellow and/or orange harnesses or harness
connectors.

PRECAUTIONS WHEN USING POWER TOOLS (AIR OR ELECTRIC) AND HAMMERS

WARNING:

Always observe the following items for preventing accidental activation.
• When working near the Air Bag Diagnosis Sensor Unit or other Air Bag System sensors with the

ignition ON or engine running, never use air or electric power tools or strike near the sensor(s) with
a hammer. Heavy vibration could activate the sensor(s) and deploy the air bag(s), possibly causing
serious injury.

• When using air or electric power tools or hammers, always switch the ignition OFF, disconnect the

battery, and wait at least 3 minutes before performing any service.

FOR MEXICO : Precaution for Procedure without Cowl Top Cover

INFOID:0000000008455813

When performing the procedure after removing cowl top cover, cover
the lower end of windshield with urethane, etc to prevent damage to
windshield.

FOR MEXICO : Precaution for Work

INFOID:0000000008455814

• After removing and installing the opening/closing parts, be sure to carry out fitting adjustments to check their

operation.

• Check the lubrication level, damage, and wear of each part. If necessary, grease or replace it.

PIIB3706J

Revision: 2012 September

2013 MURANO

MIR-62

< PREPARATION >

[WITHOUT ADP]

PREPARATION

PREPARATION

PREPARATION

Special Service Tools

INFOID:0000000008455815

The actual shapes of Kent-Moore tools may differ from those of special service tools illustrated here.

Commercial Service Tools

INFOID:0000000008455816

Tool number
(Kent-Moore No.)
Tool name

Description

(J-39570)
Chassis ear

Location the noise

(J-43980)
NISSAN Squeak and Rattle 
Kit

Repairing the cause of noise

SIIA0993E

SIIA0994E

Tool name

Description

Engine ear

Locating the noise

Remover tool

Remove clips, pawls, metal clips 

Power tool

SIIA0995E

PIIB7923J

PIIB1407E

Revision: 2012 September

2013 MURANO

INSIDE MIRROR

MIR-63

< REMOVAL AND INSTALLATION >

[WITHOUT ADP]

C

D

E

F

G

H

I

J

K

M

A

B

MIR

N

O

P

REMOVAL AND INSTALLATION

INSIDE MIRROR

Exploded View

INFOID:0000000008455817

Removal and Installation

INFOID:0000000008455818

CAUTION:

Never reuse the inside mirror disassembled from mirror base.

REMOVAL

1.

Remove the inside mirror cover.

2.

Remove TORX bolt.

3.

Slide the inside mirror upward to remove.

INSTALLATION

Install in the reverse order of removal.

CAUTION:

When inserting the inside mirror into the mirror base, be sure to push the pawl until it get connected to
the mirror base.

1.

Inside mirror

2.

Inside mirror cover

3.

Mirror base

4.

TORX bolt

: Always replace after every disassembly.

: N·m (kg-m, in-lb)

JMLIA0136GB

Revision: 2012 September

2013 MURANO

MIR-64

< REMOVAL AND INSTALLATION >

[WITHOUT ADP]

OUTSIDE MIRROR

OUTSIDE MIRROR

DOOR MIRROR ASSEMBLY

DOOR MIRROR ASSEMBLY : Exploded View

INFOID:0000000008455819

REMOVAL

DISASSEMBLY

1.

Door mirror assembly

2.

Front door assembly

3.

Door mirror corner cover

4.

Door mirror corner cover
(with BSW indicator)

5.

BSW indicator assembly

: Clip

JMLIA3464ZZ

JMLIA0123ZZ

Revision: 2012 September

2013 MURANO

OUTSIDE MIRROR

MIR-65

< REMOVAL AND INSTALLATION >

[WITHOUT ADP]

C

D

E

F

G

H

I

J

K

M

A

B

MIR

N

O

P

DOOR MIRROR ASSEMBLY : Removal and Installation

INFOID:0000000008455820

CAUTION:

Never damage the mirror bodies.

REMOVAL

1.

Remove the front door finisher. Refer to 

INT-12, "FRONT DOOR FINISHER : Removal and Installation"

.

2.

Disconnect BSW indicator harness connector (with BSW indicator models).

3.

Disengage the fixing clips and remove the door mirror corner cover.

4.

Disconnect the door mirror harness connector.

5.

Remove the door mirror mounting nuts, and remove the door mirror assembly.

INSTALLATION

Install in the reverse order of removal.

GLASS MIRROR

GLASS MIRROR : Exploded View

INFOID:0000000008455821

GLASS MIRROR : Disassembly and Assembly

INFOID:0000000008455822

CAUTION:

Never damage the mirror bodies.

DISASSEMBLY

1.

Door mirror cover

2.

Door mirror assembly

3.

Glass mirror

: Pawl

1.

Door mirror cover

2.

Door mirror assembly

3.

Glass mirror

: Pawl

JMLIA0123ZZ

Revision: 2012 September

2013 MURANO

MIR-66

< REMOVAL AND INSTALLATION >

[WITHOUT ADP]

OUTSIDE MIRROR

1.

Place the glass mirror upward.

2.

Put a strip of protective tape (A) on the housing.

3.

Insert flat-bladed screwdriver (B) into the recess at lower side
between glass mirror (1) and actuator (2), and push up pawls to
remove glass mirror lower side.
NOTE:
 Insert a small slotted screwdriver into recess, and push up while
rotating (twist) to make work easier.

4.

Insert flat-bladed screwdriver at RH/LH side between glass mirror and actuator, and push up pawls to
remove glass mirror RH/LH side.
NOTE:
 Insert flat-bladed screwdriver into recesses, and push up while rotating (twist) to make work easier.

5.

Remove two terminals of mirror heater attachment. (With heater mirror model)

6.

Pull glass mirror as shown in the figure in order to disengage
both upper pawls, and then remove glass mirror.

ASSEMBLY

Install in the reverse order of removal.

CAUTION:

After installation, visually check that pawls are securely engaged.

DOOR MIRROR COVER

JMLIA0124ZZ

1.

Glass mirror

2.

Actuator

JMLIA0092ZZ

Revision: 2012 September

2013 MURANO

OUTSIDE MIRROR

MIR-67

< REMOVAL AND INSTALLATION >

[WITHOUT ADP]

C

D

E

F

G

H

I

J

K

M

A

B

MIR

N

O

P

DOOR MIRROR COVER : Exploded View

INFOID:0000000008455823

DOOR MIRROR COVER : Disassembly and Assembly

INFOID:0000000008455824

CAUTION:

Never damage the mirror bodies.

DISASSEMBLY

1.

Remove the glass mirror. Refer to 

MIR-65, "GLASS MIRROR : Disassembly and Assembly"

.

2.

Remove the pawls, and disassemble the door mirror cover from the mirror assembly.

ASSEMBLY

Install in the reverse order of removal.
NOTE:
After installation, visually check that pawls are securely engaged.

1.

Door mirror cover

2.

Door mirror assembly

3.

Glass mirror

: Pawl

JMLIA0123ZZ

Revision: 2012 September

2013 MURANO

MIR-68

< REMOVAL AND INSTALLATION >

[WITHOUT ADP]

DOOR MIRROR REMOTE CONTROL SWITCH

DOOR MIRROR REMOTE CONTROL SWITCH

Exploded View

INFOID:0000000008455825

Refer to 

INT-12, "FRONT DOOR FINISHER : Exploded View"

.

Removal and Installation

INFOID:0000000008455826

REMOVAL

1.

Remove the power window main switch finisher (2). Refer to

PWC-92, "Removal and Installation"

.

2.

Remove door mirror remote control switch (1) from power win-
dow main switch finisher (2) using remover tool (A).

INSTALLATION

Install in the reverse order of removal.

: Pawl

JMLIA0118ZZ

Revision: 2012 September

2013 MURANO

MWI

MWI-1

DRIVER INFORMATION & MULTIMEDIA

C

D

E

F

G

H

I

J

K

L

M

B

SECTION 

MWI

A

O

P

CONTENTS

METER, WARNING LAMP & INDICATOR

BASIC INSPECTION  ....................................

4

DIAGNOSIS AND REPAIR WORKFLOW  ..........

4

Work flow  ..................................................................

4

SYSTEM DESCRIPTION  ..............................

6

METER SYSTEM .................................................

6

METER SYSTEM  .........................................................

6

METER SYSTEM : System Diagram ........................

6

METER SYSTEM : System Description  ....................

6

METER SYSTEM : Component Parts Location  ........

9

METER SYSTEM : Component Description  ...........

10

SPEEDOMETER ........................................................

10

SPEEDOMETER : System Diagram  .......................

10

SPEEDOMETER : System Description ...................

10

SPEEDOMETER : Component Parts Location  .......

11

SPEEDOMETER : Component Description  ............

12

TACHOMETER ..........................................................

12

TACHOMETER : System Diagram  .........................

12

TACHOMETER : System Description  .....................

12

TACHOMETER : Component Parts Location  .........

13

TACHOMETER : Component Description  ..............

14

ENGINE COOLANT TEMPERATURE GAUGE  ........

14

ENGINE COOLANT TEMPERATURE GAUGE : 
System Diagram ......................................................

14

ENGINE COOLANT TEMPERATURE GAUGE : 
System Description  .................................................

14

ENGINE COOLANT TEMPERATURE GAUGE : 
Component Parts Location ......................................

15

ENGINE COOLANT TEMPERATURE GAUGE : 
Component Description ...........................................

16

FUEL GAUGE ............................................................

16

FUEL GAUGE : System Diagram  ...........................

16

FUEL GAUGE : System Description  .......................

16

FUEL GAUGE : Component Parts Location  ...........

17

FUEL GAUGE : Component Description  ................

18

ODO/TRIP METER .....................................................

18

ODO/TRIP METER : System Diagram  ....................

18

ODO/TRIP METER : System Description ................

18

ODO/TRIP METER : Component Parts Location ....

19

ODO/TRIP METER : Component Description  .........

20

SHIFT POSITION INDICATOR  ..................................

20

SHIFT POSITION INDICATOR : System Diagram ....

20

SHIFT POSITION INDICATOR : System Descrip-
tion ...........................................................................

20

SHIFT POSITION INDICATOR : Component 
Parts Location ..........................................................

21

SHIFT POSITION INDICATOR : Component De-
scription ...................................................................

22

WARNING LAMPS/INDICATOR LAMPS  ..................

22

WARNING LAMPS/INDICATOR LAMPS : System 
Diagram ...................................................................

22

WARNING LAMPS/INDICATOR LAMPS : System 
Description ...............................................................

22

WARNING LAMPS/INDICATOR LAMPS : Com-
ponent Parts Location ..............................................

23

WARNING LAMPS/INDICATOR LAMPS : Com-
ponent Description ...................................................

24

METER ILLUMINATION CONTROL  .........................

24

METER ILLUMINATION CONTROL : System Di-
agram ......................................................................

24

METER ILLUMINATION CONTROL : System De-
scription ...................................................................

24

METER ILLUMINATION CONTROL : Component 
Parts Location ..........................................................

25

METER ILLUMINATION CONTROL : Component 
Description ...............................................................

26

INFORMATION DISPLAY ..........................................

26

INFORMATION DISPLAY : System Diagram ..........

26

INFORMATION DISPLAY : System Description  .....

26

INFORMATION DISPLAY : Component Parts Lo-
cation .......................................................................

30

INFORMATION DISPLAY : Component Descrip-
tion ...........................................................................

31

Revision: 2012 September

2013 MURANO

MWI-2

COMPASS .........................................................

32

Description ..............................................................

32

Component Parts Location  .....................................

33

Special Repair Requirement ...................................

33

DIAGNOSIS SYSTEM (METER)  .......................

34

Diagnosis Description  .............................................

34

CONSULT Function (METER/M&A)  .......................

35

DTC/CIRCUIT DIAGNOSIS .........................

39

U1000 CAN COMM CIRCUIT  ............................

39

Description ..............................................................

39

DTC Logic ...............................................................

39

Diagnosis Procedure .............................................

39

U1010 CONTROL UNIT (CAN)  .........................

40

Description ..............................................................

40

DTC Logic ...............................................................

40

Diagnosis Procedure  ..............................................

40

B2205 VEHICLE SPEED  ...................................

41

Description ..............................................................

41

DTC Logic ...............................................................

41

Diagnosis Procedure .............................................

41

B2267 ENGINE SPEED  .....................................

42

Description ..............................................................

42

DTC Logic ...............................................................

42

Diagnosis Procedure  ..............................................

42

B2268 WATER TEMP ........................................

43

Description ..............................................................

43

DTC Logic ...............................................................

43

Diagnosis Procedure  ..............................................

43

POWER SUPPLY AND GROUND CIRCUIT  .....

44

COMBINATION METER  ...........................................

44

COMBINATION METER : Diagnosis Procedure  ....

44

IPDM E/R (INTELLIGENT POWER DISTRIBU-
TION MODULE ENGINE ROOM)  ............................
.

44

IPDM E/R (INTELLIGENT POWER DISTRIBU-
TION MODULE ENGINE ROOM) : Diagnosis Pro-
cedure ....................................................................
.

44

FUEL LEVEL SENSOR SIGNAL CIRCUIT  .......

46

Description ..............................................................

46

Component Function Check  ...................................

46

Diagnosis Procedure .............................................

46

Component Inspection ............................................

47

METER CONTROL SWITCH SIGNAL CIR-
CUIT ...................................................................

49

Description ..............................................................

49

Diagnosis Procedure  ..............................................

49

Component Inspection ............................................

50

OIL PRESSURE SWITCH SIGNAL CIRCUIT ...

52

Description ..............................................................

52

Component Function Check  ...................................

52

Diagnosis Procedure ...............................................

52

Component Inspection  ............................................

52

PARKING BRAKE SWITCH SIGNAL CIR-
CUIT ...................................................................

54

Description ..............................................................

54

Diagnosis Procedure ...............................................

54

Component Inspection  ............................................

54

WASHER LEVEL SWITCH SIGNAL CIRCUIT ...

55

Description ..............................................................

55

Diagnosis Procedure ...............................................

55

Component Inspection  ............................................

55

A/C AUTO AMP. CONNECTION RECOGNI-
TION SIGNAL CIRCUIT  ....................................

56

Description ..............................................................

56

Diagnosis Procedure ..............................................

56

COMPASS .........................................................

57

Wiring Diagram - COMPASS - ................................

57

ECU DIAGNOSIS INFORMATION .............

58

COMBINATION METER  ....................................

58

Reference Value  .....................................................

58

Wiring Diagram - METER -  .....................................

64

Fail-Safe ..................................................................

66

DTC Index ...............................................................

67

IPDM E/R (INTELLIGENT POWER DISTRI-
BUTION MODULE ENGINE ROOM) .................

69

Reference Value  .....................................................

69

Wiring Diagram - IPDM E/R - ..................................

77

Fail-safe ..................................................................

79

DTC Index ..............................................................

81

SYMPTOM DIAGNOSIS  ............................

82

THE FUEL GAUGE POINTER DOES NOT 
MOVE .................................................................

82

Description ..............................................................

82

Diagnosis Procedure ...............................................

82

THE METER CONTROL SWITCH IS INOPER-
ATIVE .................................................................

83

Description ..............................................................

83

Diagnosis Procedure ...............................................

83

THE OIL PRESSURE WARNING LAMP 
DOES NOT TURN ON .......................................

84

Description ..............................................................

84

Diagnosis Procedure ...............................................

84

THE OIL PRESSURE WARNING LAMP 
DOES NOT TURN OFF .....................................

85

Description ..............................................................

85

Diagnosis Procedure ...............................................

85

Revision: 2012 September

2013 MURANO

MWI

MWI-3

C

D

E

F

G

H

I

J

K

L

M

B

A

O

P

THE PARKING BRAKE RELEASE WARNING 
CONTINUES DISPLAYING, OR DOES NOT 
DISPLAY ............................................................

86

Description ..............................................................

86

Diagnosis Procedure ...............................................

86

THE LOW WASHER FLUID WARNING CON-
TINUES DISPLAYING, or DOES NOT DIS-
PLAY ..................................................................

87

Description ..............................................................

87

Diagnosis Procedure ...............................................

87

THE DOOR OPEN WARNING CONTINUES 
DISPLAYING, OR DOES NOT DISPLAY  ..........

88

Description ..............................................................

88

Diagnosis Procedure ...............................................

88

THE AMBIENT TEMPERATURE DISPLAY IS 
INCORRECT .......................................................

89

Description ..............................................................

89

Diagnosis Procedure ...............................................

89

NORMAL OPERATING CONDITION .................

90

COMPASS .................................................................

90

COMPASS : Description  .........................................

90

INFORMATION DISPLAY  .........................................

90

INFORMATION DISPLAY : Description ..................

90

PRECAUTION ..............................................

91

PRECAUTIONS .................................................

91

FOR USA AND CANADA  ..........................................

91

FOR USA AND CANADA : Precaution for Supple-
mental Restraint System (SRS) "AIR BAG" and 
"SEAT BELT PRE-TENSIONER" ............................

91

FOR MEXICO .............................................................

91

FOR MEXICO : Precaution for Supplemental Re-
straint System (SRS) "AIR BAG" and "SEAT BELT 
PRE-TENSIONER" ..................................................

91

PREPARATION ...........................................

93

PREPARATION .................................................

93

Commercial Service Tools .......................................

93

REMOVAL AND INSTALLATION  ...............

94

COMBINATION METER  ...................................

94

Exploded View .........................................................

94

Removal and Installation  .........................................

94

Disassembly and Assembly .....................................

94

METER CONTROL SWITCH  ............................

95

Exploded View .........................................................

95

Removal and Installation  .........................................

95

COMPASS .........................................................

96

Exploded View .........................................................

96

Removal and Installation  .........................................

96

Revision: 2012 September

2013 MURANO

MWI-4

< BASIC INSPECTION >

DIAGNOSIS AND REPAIR WORKFLOW

BASIC INSPECTION

DIAGNOSIS AND REPAIR WORKFLOW

Work flow

INFOID:0000000008459029

OVERALL SEQUENCE

• Reference 1···

MWI-34, "Diagnosis Description"

.

• Reference 2···

MWI-67, "DTC Index"

.

• Reference 3···

MWI-44, "COMBINATION METER : Diagnosis Procedure"

.

DETAILED FLOW

1.

OBTAIN INFORMATION ABOUT SYMPTOM

Interview the customer to obtain as much information as possible about the conditions and environment under
which the malfunction occurred.

>> GO TO 2.

2.

CHECK SYMPTOM

JSNIA4484GB

Revision: 2012 September

2013 MURANO

MWI

DIAGNOSIS AND REPAIR WORKFLOW

MWI-5

< BASIC INSPECTION >

C

D

E

F

G

H

I

J

K

L

M

B

A

O

P

• Check the symptom based on the information obtained from the customer.
• Check that any other malfunctions are present.

>> GO TO 3.

3.

CHECK ON BOARD DIAGNOSIS OPERATION

Check that the on board diagnosis function operates. Refer to 

MWI-34, "Diagnosis Description"

Does the on board diagnosis function operate normally?

YES

>> GO TO 4.

NO

>> GO TO 6.

4.

CHECK CONSULT SELF-DIAGNOSIS RESULTS

1.

Connect CONSULT and perform self-diagnosis. Refer to 

MWI-67, "DTC Index"

.

2.

When DTC is detected, follow the instructions below:

-

Record DTC and Freeze Frame Data.

Are self-diagnosis results normal?

YES

>> GO TO 5.

NO

>> GO TO 8.

5.

NARROW DOWN THE MALFUNCTIONING PARTS BY SYMPTOM DIAGNOSIS

Perform symptom diagnosis and narrow down the malfunctioning parts.

>> GO TO 8.

6.

CHECK COMBINATION METER POWER SUPPLY AND GROUND CIRCUITS

Inspect combination meter power supply and ground circuits. Refer to 

MWI-44, "COMBINATION METER :

Diagnosis Procedure"

Is inspection result OK?

YES

>> GO TO 7.

NO

>> GO TO 8.

7.

REPLACE COMBINATION METER

Replace combination meter.

>> GO TO 9.

8.

REPAIR OR REPLACE MALFUNCTIONING PARTS

Repair or replace the malfunctioning parts.
NOTE:
If DTC is displayed, erase DTC after repair or replace malfunctioning parts.

>> GO TO 9.

9.

FINAL CHECK

Check that the combination meter operates normally.
Do they operate normally?

YES

>> INSPECTION END

NO

>> GO TO 1.

Revision: 2012 September

2013 MURANO

MWI-6

< SYSTEM DESCRIPTION >

METER SYSTEM

SYSTEM DESCRIPTION

METER SYSTEM

METER SYSTEM

METER SYSTEM : System Diagram

INFOID:0000000008459030

METER SYSTEM : System Description

INFOID:0000000008459031

COMBINATION METER

• The combination meter receives the information required to control the operation of each gauge, indicator/

warning lamp, and information display via CAN communication from each unit, each switch, and sensor.

• The combination meter incorporates a trip computer that displays warnings and messages on the informa-

tion display according to the information received from various units.

• The combination meter incorporates a buzzer function that sounds an audible alarm with the integrated

buzzer device. Refer to 

WCS-5, "WARNING CHIME SYSTEM : System Description"

 for further details.

• The combination meter integrates the meter circuit check function and the segment check function that

checks the information display operation.

IPDM E/R

• IPDM E/R reads the ON/OFF signals of the oil pressure switch and transmits the oil pressure switch signal to

the combination meter via BCM with the CAN communication line.

• IPDM E/R is equipped with the diagnosis function. It can perform the operation check of oil pressure warning

lamp with the auto active test and the diagnosis with CONSULT.

METER CONTROL FUNCTION LIST

JSNIA2249GB

Revision: 2012 September

2013 MURANO

MWI

METER SYSTEM

MWI-7

< SYSTEM DESCRIPTION >

C

D

E

F

G

H

I

J

K

L

M

B

A

O

P

System

Description

Signal source

Meter/gauge

Speedometer

Receives vehicle speed signal and indicates vehicle speed.

ABS actuator and elec-
tric unit (control unit)

Tachometer

Receives engine speed signal and indicates engine speed.

ECM

Fuel gauge

Receives fuel level sensor signal and indicates fuel level.

Fuel level sensor unit

Engine coolant tem-
perature gauge

Receives engine coolant temperature signal and indicates coolant 
temperature.

ECM

Warning lamp/
indicator lamp

Oil pressure warning 
lamp

Receives oil pressure warning lamp signal and illuminates warning 
lamp.

IPDM E/R

Master warning

Illuminates according to warning output on information display.

Information 
display

Door open warning

Receives door switch signals and displays warning.

BCM

Parking brake re-
lease warning

Receives parking brake switch signal and vehicle speed signal and 
displays warnings.

Parking brake switch

ABS actuator and elec-
tric unit (control unit)

Low fuel warning

Receives fuel gauge signal and displays warning if fuel level de-

creases to 11 

 (2-7/8 US gal, 2-3/8 Imp gal) or less.

Fuel level sensor unit

Low washer fluid 
warning

Receives washer level switch signal and displays warning.

Washer level switch

Low outside tempera-
ture warning

Monitors ambient sensor signal and displays warning if ambient 
temperature decreases to 3

°

C (37

°

F) or less. (If enabled)

Ambient sensor

Low tire pressure 
warning

Receives low tire pressure warning lamp signal and displays warn-
ing.

BCM

Fuel filler cap warning

Receives fuel filler cap warning display signals and displays warn-
ing.

ECM

Instantaneous fuel 
consumption

Calculates instantaneous fuel consumption based on received ve-
hicle speed signals and fuel consumption monitor signal and dis-
plays it.

ECM

ABS actuator and elec-
tric unit (control unit)

Average fuel con-
sumption

Calculates average fuel consumption in a reset-to-reset interval 
based on received vehicle speed signals and fuel consumption 
monitor signal and displays it.

ECM

ABS actuator and elec-
tric unit (control unit)

Average vehicle 
speed

Calculates average vehicle speed in a reset-to-reset interval based 
on received vehicle speed signals and displays it.

ABS actuator and elec-
tric unit (control unit)

Travel time

Displays accumulated key switch ON time from reset to reset.

Travel distance

Calculates accumulated travel distance in a reset-to-reset interval 
based on received vehicle speed signals and displays it.

ABS actuator and elec-
tric unit (control unit)

Possible driving dis-
tance

Calculates possible driving distance based on received fuel con-
sumption monitor signal, vehicle speed signals and fuel level sen-
sor signal and displays it.

ABS actuator and elec-
tric unit (control unit)

ECM

Fuel level sensor unit

Ambient air tempera-
ture

Corrects ambient air temperature value based on received ambient 
sensor signals and displays it.

Ambient sensor

Revision: 2012 September

2013 MURANO


Content      ..     43      44      45      46     ..