Nissan Murano Z51 (2013 year). Manual - part 36


  Index      Manuals     Nissan Murano Z51 (2013 year) - Service and Repair Manual


Search            copyright infringement  


Content      ..     34      35      36      37     ..


Nissan Murano Z51 (2013 year). Manual - part 36


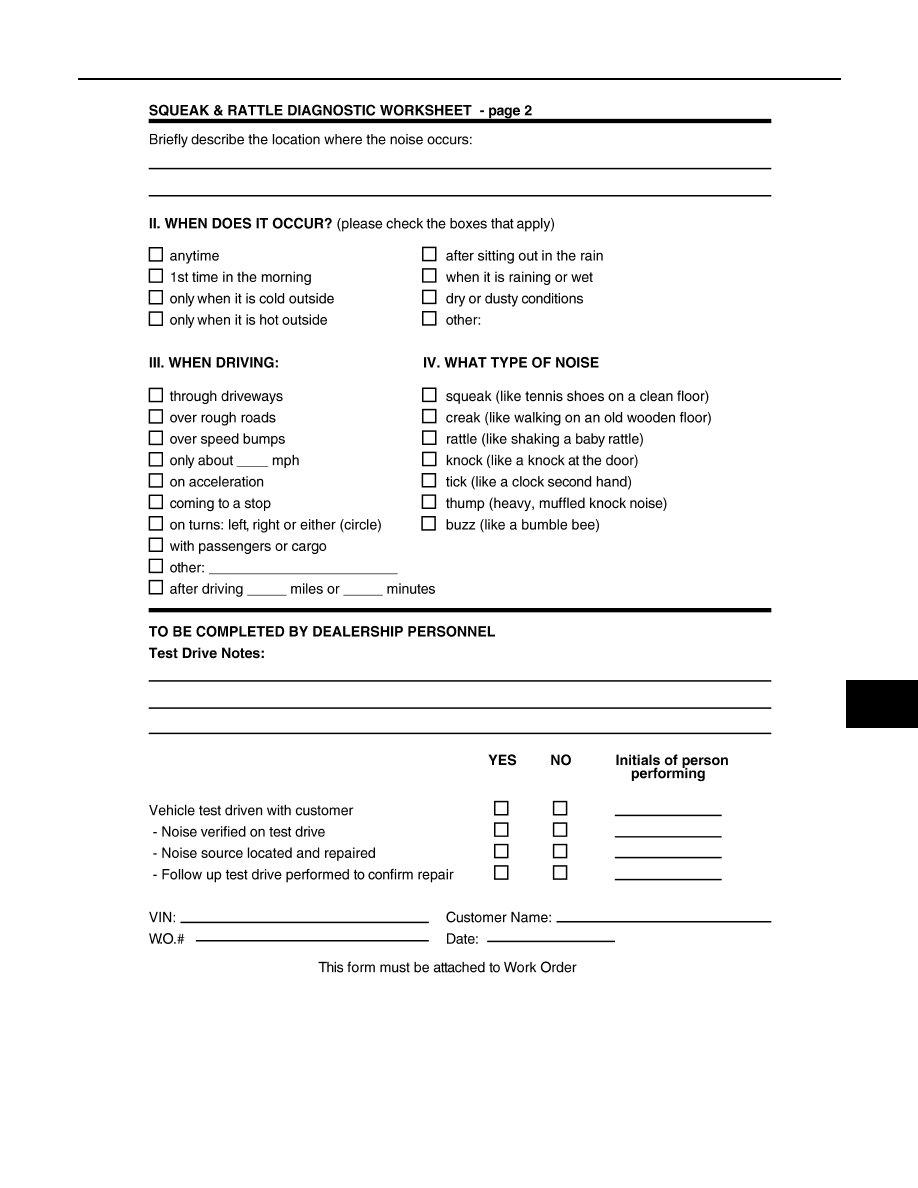
SQUEAK AND RATTLE TROUBLE DIAGNOSES

GW-7

< SYMPTOM DIAGNOSIS >

C

D

E

F

G

H

I

J

L

M

A

B

GW

N

O

P

PIIB8742E

Revision: 2012 September

2013 MURANO

GW-8

< PRECAUTION >

PRECAUTIONS

PRECAUTION

PRECAUTIONS

FOR USA AND CANADA

FOR USA AND CANADA : Precaution for Supplemental Restraint System (SRS) "AIR 
BAG" and "SEAT BELT PRE-TENSIONER"

INFOID:0000000008455274

The Supplemental Restraint System such as “AIR BAG” and “SEAT BELT PRE-TENSIONER”, used along
with a front seat belt, helps to reduce the risk or severity of injury to the driver and front passenger for certain
types of collision. This system includes seat belt switch inputs and dual stage front air bag modules. The SRS
system uses the seat belt switches to determine the front air bag deployment, and may only deploy one front
air bag, depending on the severity of a collision and whether the front occupants are belted or unbelted.
Information necessary to service the system safely is included in the “SRS AIR BAG” and “SEAT BELT” of this
Service Manual.

WARNING:

Always observe the following items for preventing accidental activation.
• To avoid rendering the SRS inoperative, which could increase the risk of personal injury or death in

the event of a collision that would result in air bag inflation, all maintenance must be performed by
an authorized NISSAN/INFINITI dealer.

• Improper maintenance, including incorrect removal and installation of the SRS, can lead to personal

injury caused by unintentional activation of the system. For removal of Spiral Cable and Air Bag
Module, see “SRS AIR BAG”.

• Never use electrical test equipment on any circuit related to the SRS unless instructed to in this Ser-

vice Manual. SRS wiring harnesses can be identified by yellow and/or orange harnesses or harness
connectors.

PRECAUTIONS WHEN USING POWER TOOLS (AIR OR ELECTRIC) AND HAMMERS

WARNING:

Always observe the following items for preventing accidental activation.
• When working near the Air Bag Diagnosis Sensor Unit or other Air Bag System sensors with the

ignition ON or engine running, never use air or electric power tools or strike near the sensor(s) with
a hammer. Heavy vibration could activate the sensor(s) and deploy the air bag(s), possibly causing
serious injury.

• When using air or electric power tools or hammers, always switch the ignition OFF, disconnect the

battery, and wait at least 3 minutes before performing any service.

FOR USA AND CANADA : Precaution for Procedure without Cowl Top Cover

INFOID:0000000008455275

When performing the procedure after removing cowl top cover, cover
the lower end of windshield with urethane, etc to prevent damage to
windshield.

FOR USA AND CANADA : Handling for Adhesive and Primer

INFOID:0000000008455276

• Never use an adhesive which is past its usable date. Shelf life of this product is limited to six months after the

date of manufacture. Carefully adhere to the expiration or manufacture date printed on the box.

• Keep primers and adhesive in a cool, dry place. Ideally, they should be stored in a refrigerator.
• Open the seal of the primer and adhesive just before application. Discard the remainder.
• Before application, be sure to shake the primer container to stir the contents. If any floating material is found,

do not use it.

PIIB3706J

Revision: 2012 September

2013 MURANO

PRECAUTIONS

GW-9

< PRECAUTION >

C

D

E

F

G

H

I

J

L

M

A

B

GW

N

O

P

• If any primer or adhesive contacts the skin, wipe it off with gasoline or equivalent and wash the skin with

soap.

• When using primer and adhesive, always observe the precautions in the instruction manual.

FOR MEXICO

FOR MEXICO : Precaution for Supplemental Restraint System (SRS) "AIR BAG" and 
"SEAT BELT PRE-TENSIONER"

INFOID:0000000008455277

The Supplemental Restraint System such as “AIR BAG” and “SEAT BELT PRE-TENSIONER”, used along
with a front seat belt, helps to reduce the risk or severity of injury to the driver and front passenger for certain
types of collision. Information necessary to service the system safely is included in the “SRS AIR BAG” and
“SEAT BELT” of this Service Manual.

WARNING:

Always observe the following items for preventing accidental activation.
• To avoid rendering the SRS inoperative, which could increase the risk of personal injury or death in

the event of a collision that would result in air bag inflation, all maintenance must be performed by
an authorized NISSAN/INFINITI dealer.

• Improper maintenance, including incorrect removal and installation of the SRS, can lead to personal

injury caused by unintentional activation of the system. For removal of Spiral Cable and Air Bag
Module, see “SRS AIR BAG”.

• Never use electrical test equipment on any circuit related to the SRS unless instructed to in this Ser-

vice Manual. SRS wiring harnesses can be identified by yellow and/or orange harnesses or harness
connectors.

PRECAUTIONS WHEN USING POWER TOOLS (AIR OR ELECTRIC) AND HAMMERS

WARNING:

Always observe the following items for preventing accidental activation.
• When working near the Air Bag Diagnosis Sensor Unit or other Air Bag System sensors with the

ignition ON or engine running, never use air or electric power tools or strike near the sensor(s) with
a hammer. Heavy vibration could activate the sensor(s) and deploy the air bag(s), possibly causing
serious injury.

• When using air or electric power tools or hammers, always switch the ignition OFF, disconnect the

battery, and wait at least 3 minutes before performing any service.

FOR MEXICO : Precaution for Procedure without Cowl Top Cover

INFOID:0000000008455278

When performing the procedure after removing cowl top cover, cover
the lower end of windshield with urethane, etc to prevent damage to
windshield.

FOR MEXICO : Handling for Adhesive and Primer

INFOID:0000000008455279

• Never use an adhesive which is past its usable date. Shelf life of this product is limited to six months after the

date of manufacture. Carefully adhere to the expiration or manufacture date printed on the box.

• Keep primers and adhesive in a cool, dry place. Ideally, they should be stored in a refrigerator.
• Open the seal of the primer and adhesive just before application. Discard the remainder.
• Before application, be sure to shake the primer container to stir the contents. If any floating material is found,

do not use it.

• If any primer or adhesive contacts the skin, wipe it off with gasoline or equivalent and wash the skin with

soap.

• When using primer and adhesive, always observe the precautions in the instruction manual.

PIIB3706J

Revision: 2012 September

2013 MURANO

GW-10

< PREPARATION >

PREPARATION

PREPARATION

PREPARATION

Special Service Tools

INFOID:0000000008455280

The actual shapes of Kent-Moore tools may differ from those of special service tools illustrated here.

Commercial Service Tools

INFOID:0000000008455281

Tool number
(Kent-Moore No.)
Tool name

Description

(J-39570)
Chassis ear

Locates the noise

(J-43980)
NISSAN Squeak and Rat-
tle Kit

Repairs the cause of noise

SIIA0993E

SIIA0994E

Tool name

Description

Engine ear

Locates the noise

Suction lifter

Holds the windshield glass, side window 
glass, back door window glass and door 
glass

Remover tools

Removes the clips, pawls and metal clips

SIIA0995E

PIIB1805J

JMKIA3050ZZ

Revision: 2012 September

2013 MURANO

WINDSHIELD GLASS

GW-11

< REMOVAL AND INSTALLATION >

C

D

E

F

G

H

I

J

L

M

A

B

GW

N

O

P

REMOVAL AND INSTALLATION

WINDSHIELD GLASS

Exploded View

INFOID:0000000008455282

JMKIA3095GB

Revision: 2012 September

2013 MURANO

GW-12

< REMOVAL AND INSTALLATION >

WINDSHIELD GLASS

Removal and Installation

INFOID:0000000008455283

REMOVAL

CAUTION:

Replace the windshield glass assembly with a new part after removal as it cannot be reused.

1.

Remove the front pillar garnish (LH/RH). Refer to 

INT-19, "Removal and Installation"

.

2.

Remove partially the headlining (front edge). Refer to the following.
• For normal roof. Refer to 

INT-25, "NORMAL ROOF : Removal and Installation"

.

• For sunroof. Refer to 

INT-29, "SUNROOF : Removal and Installation"

.

3.

Remove the front wiper arms (LH/RH). Refer to 

WW-108, "Removal and Installation"

.

4.

Remove the cowl top cover. Refer to 

EXT-20, "Removal and Installation"

.

5.

Remove the roof side molding. Refer to 

EXT-31, "SUNROOF : Removal and Installation"

.

6.

Remove glass using piano wire or power cutting tool (A) and an inflatable pump bag (B) after removing
moldings.

WARNING:

Always wear safety glasses and heavy gloves to prevent injury.

CAUTION:

• Be careful not to scratch the glass when removing.
• Never set or stand the glass on its edge. Small chips may develop into cracks.

INSTALLATION

• The dam rubber and insulator should be installed in position.
• Use a genuine Nissan Urethane Adhesive Kit (if available) or equivalent and follow the instructions provided

with it.

• Open a door window while the urethane adhesive is curing. This prevents the glass from being forced out by

passenger room air pressure when all door windows are closed.

• The molding must be installed securely so that it is in position and leaves no clearance.
• Inform the customer that the vehicle should remain stationary until the urethane adhesive is completely

cured (approximately 24 hours). Curing time varies with temperature and humidity.

WARNING:

• Keep heat and open flames away as primers and adhesive are flammable.

1.

Windshield glass

2.

Fastener

3.

Windshield molding (side)

4.

Windshield molding (upper)

5.

Spacer

6.

Mirror base

7.

Rain sensor bracket

8.

Insulator seal

9.

Dam sealant rubber

10.

Roof panel

11.

Headlining ASSY

12. Adhesive

13.

Primer

14. Roof rail

15. Cowl top center

16.

Insulator dash lower

17. Body side outer

18. Front pillar garnish

19.

Cowl top cover

: Pawl

: Always replace after every disassembly.

Unit

: mm (in)

Note

•  D and E on the exploded view are sections of sunroof models.
• The windshield glass, windshield molding upper, spacer, mirror base, rain sensor bracket, insulator seal and dam sealant 

rubber constitute the windshield glass assembly.

PIIB5779E

Revision: 2012 September

2013 MURANO

WINDSHIELD GLASS

GW-13

< REMOVAL AND INSTALLATION >

C

D

E

F

G

H

I

J

L

M

A

B

GW

N

O

P

• The materials contained in the kit are harmful if swallowed, and may irritate skin and eyes. Never let

them in contact with the skin and eyes.

• Use in an open, well ventilated location. Never breathe the vapors. They may be harmful if inhaled.

Move immediately to an area with fresh air if affected by vapor inhalation.

• Driving the vehicle before the urethane adhesive is completely cured may affect the performance of

the windshield in case of an accident.

CAUTION:

• Perform adjustment of front wiper arms stop location. Refer to 

WW-108, "Adjustment"

.

• Never use an adhesive which is past its usable term. Shelf life of this product is limited to six months

after the date of manufacture. Carefully adhere to the expiration or manufacture date printed on the
box.

• Keep primers and adhesive in a cool, dry place. Ideally, they should be stored in a refrigerator.
• Never leave primers or adhesive cartridge unattended with their caps open or off.
• The vehicle should not be driven for at least 24 hours or until the urethane adhesive is completely

cured. Curing time varies depending on temperature and humidity. The curing time increases under
lower temperature and lower humidity.

Inspection

INFOID:0000000008455284

REPAIRING WATER LEAKAGE FOR WINDSHIELD

Leakage can be repaired without removing the glass.
Determine the extent of leakage if water is leaking between the urethane adhesive material and body or glass.
This can be done by applying water to the windshield area while pushing glass outward.
Apply primer (if necessary) and then urethane adhesive to the leakage point to stop the leakage.

Revision: 2012 September

2013 MURANO

GW-14

< REMOVAL AND INSTALLATION >

SIDE WINDOW GLASS

SIDE WINDOW GLASS

Exploded View

INFOID:0000000008455285

Removal and Installation

INFOID:0000000008455286

REMOVAL

CAUTION:

1.

Side window glass

2.

Adhesive

3.

Primer

4.

Body side outer panel

5.

Luggage side upper finisher 

6.

Rear pillar inner

7.

Molding

8.

Spacer

: Clip

: Always replace after every disassembly.

Unit

: mm (in)

Note

: The side window glass, molding, spacer and clip constitute the side window glass assembly.

JMKIA3415GB

Revision: 2012 September

2013 MURANO

SIDE WINDOW GLASS

GW-15

< REMOVAL AND INSTALLATION >

C

D

E

F

G

H

I

J

L

M

A

B

GW

N

O

P

Replace the side window glass with a new part after removal as it cannot be reused.

1.

Remove the luggage side upper finisher. Refer to 

INT-19, "Removal and Installation"

.

2.

Apply protective tape around the side window to protect the painted surface from damage.

3.

Remove the side window glass using piano wire.

WARNING:

Always wear safety glasses and heavy gloves to prevent injury.

CAUTION:

• Be careful not to scratch the glass when removing.
• Never set or stand the glass on its edge. Small chips may develop into cracks.

INSTALLATION

• Use a genuine Nissan Urethane Adhesive Kit (if available) or equivalent and follow the instructions provided

with it.

• Open a door window while the urethane adhesive is curing. This prevents the glass from being forced out by

passenger room air pressure when all door windows are closed.

• The molding must be installed securely so that it is in position and leaves no clearance.
• Inform the customer that the vehicle should remain stationary until the urethane adhesive is completely

cured (approximately 24 hours). Curing time varies with temperature and humidity.

WARNING:

• Keep heat and open flames away as primers and adhesive are flammable.
• The materials contained in the kit are harmful if swallowed, and may irritate skin and eyes. Never let

them in contact with the skin and eyes.

• Use in an open, well ventilated location. Never breathe the vapors. They may be harmful if inhaled.

Move immediately to an area with fresh air if affected by vapor inhalation.

• Driving the vehicle before the urethane adhesive is completely cured may affect the performance of

the side window in case of an accident.

CAUTION:

• Never use an adhesive which is past its usable term. Shelf life of this product is limited to six months

after the date of manufacture. Carefully adhere to the expiration or manufacture date printed on the
box.

• Keep primers and adhesive in a cool, dry place. Ideally, they should be stored in a refrigerator.
• Never leave primers or adhesive cartridge unattended with their caps open or off.
• The vehicle should not be driven for at least 24 hours or until the urethane adhesive is completely

cured. Curing time varies depending on temperature and humidity. The curing time will increase
under lower temperature and lower humidity.

Inspection

INFOID:0000000008455287

Repairing Water Leakage for side window glass

Leakage can be repaired without removing glass.
Determine the extent of leakage if water is leaking between the urethane adhesive material and body or glass.
This can be done by applying water to the side window glass area while pushing glass outward.
Apply primer (if necessary) and then urethane adhesive to the leakage point to stop the leakage.

Revision: 2012 September

2013 MURANO

GW-16

< REMOVAL AND INSTALLATION >

BACK DOOR WINDOW GLASS

BACK DOOR WINDOW GLASS

Exploded View

INFOID:0000000008455288

Removal and Installation

INFOID:0000000008455289

REMOVAL

1.

Remove the back door finisher inner. Refer to 

INT-37, "Removal and Installation"

.

2.

Remove the connectors and grounds for the back door window defogger.

3.

Remove the rear wiper arm and motor. Refer to 

WW-116, "Removal and Installation"

.

1.

Back door outer

2.

Back door inner

3.

Back door window glass

4.

Dam rubber

5.

Adhesive

6.

Primer

7.

Fastener

: Always replace after every disassembly.

Unit

: mm (in)

JMKIA3567GB

Revision: 2012 September

2013 MURANO

BACK DOOR WINDOW GLASS

GW-17

< REMOVAL AND INSTALLATION >

C

D

E

F

G

H

I

J

L

M

A

B

GW

N

O

P

4.

Remove glass using piano wire or power cutting tool (A) and an inflatable pump bag (B) after removing
molding using pliers.

NOTE:
Mark the body and the glass with matching marks if the back door window glass is reused.

WARNING:

Always wear safety glasses and heavy gloves to prevent injury.

CAUTION:

• Never use a cutting knife or power cutting tool when the back door window glass is reused. 
• Be careful not to scratch the glass when removing.
• Never set or stand the glass on its edge. Small chips may develop into cracks. 

INSTALLATION

• The dam rubber should be installed in position.
• Use a genuine Nissan Urethane Adhesive Kit (if available) or equivalent and follow the instructions provided

with it.

• Open a door window while the urethane adhesive is curing. This prevents the glass from being forced out by

passenger compartment air pressure when all door windows are closed.

• Inform the customer that the vehicle should remain stationary until the urethane adhesive is completely

cured (approximately 24 hours). Curing time varies with temperature and humidity.

WARNING:

• Keep heat and open flames away as primers and adhesive are flammable.
• The materials contained in the kit are harmful if swallowed, and may irritate skin and eyes. Never

let them in contact with the skin and eyes.

• Use in an open, well ventilated location. Never breathe the vapors. They may be harmful if inhaled.

Move immediately to an area with fresh air if affected by vapor inhalation.

• Driving the vehicle before the urethane adhesive is completely cured may affect the performance

of the rear window in case of an accident.

CAUTION:

• Perform adjustment of rear wiper arm stop location. Refer to 

WW-116, "Adjustment"

.

• Never use an adhesive which is past its usable term. Shelf life of this product is limited to six

months after the date of manufacture. Carefully adhere to the expiration or manufacture date
printed on the box.

• Keep primers and adhesive in a cool, dry place. Ideally, they should be stored in a refrigerator.
• Never leave primers or adhesive cartridge unattended with their caps open or off.
• The vehicle should not be driven for at least 24 hours or until the urethane adhesive is completely

cured. Curing time varies depending on temperature and humidity. The curing time increases
under lower temperature and lower humidity.

• If the substrate of the glass joining surface on the back door panel side is exposed to the air,

exchange the back door assembly without recoating.

• Never apply paint on the back door panel surface which is in contact with the glass when replacing

the back door assembly.

Inspection

INFOID:0000000008455290

REPAIRING WATER LEAKAGE FOR BACK DOOR WINDOW GLASS

Leakage can be repaired without removing the glass.
Determine the extent of leakage if water is leaking between the urethane adhesive material and body or glass.
This can be done by applying water to the back door window glass area while pushing glass outward.
Apply primer (if necessary) and then urethane adhesive to the leakage point to stop the leakage.

PIIB5779E

Revision: 2012 September

2013 MURANO

GW-18

< REMOVAL AND INSTALLATION >

FRONT DOOR GLASS

FRONT DOOR GLASS

Exploded View

INFOID:0000000008455291

Removal and Installation

INFOID:0000000008455292

REMOVAL

1.

Remove the front door finisher. Refer to 

INT-12, "FRONT DOOR FINISHER : Removal and Installation"

.

2.

Remove both seals (1) as shown in the figure.

3.

Reconnect the power window main switch.

1.    Front door glass run

2.

Front door glass 

3.

Regulator assembly

4.

Module base

5.

Power window motor

6.

Front door inside seal

7.

Front door lower sash

8.

Front door panel

: Vehicle front

JMKIA3604ZZ

JMKIA1279ZZ

Revision: 2012 September

2013 MURANO

FRONT DOOR GLASS

GW-19

< REMOVAL AND INSTALLATION >

C

D

E

F

G

H

I

J

L

M

A

B

GW

N

O

P

4.

Operate the power window main switch to raise or lower the
door window until the glass mounting bolts can be seen.

5.

Remove the glass mounting bolts.

6.

Remove the front door mirror inner cover.

7.

Remove the front door inside seal.

8.

Hold securely the front door glass and pull it out of the sash to
remove the door glass.
NOTE:
Never raise the front glass at the top upper of the door after the
door glass is removed.

9.

Remove the front door glass run.

10. Remove the front door lower sash lower bolt, then remove the front door lower sash.

INSTALLATION

Install in the reverse order of removal.

Inspection and Adjustment

INFOID:0000000008455293

SYSTEM INITIALIZATION

Initialize the system if any of the following work has been done.
• Electric power supply to power window switch or motor is interrupted by blown fuse or disconnecting battery

cable, etc.

• Removal and installation of the regulator assembly.
• Removal and installation of the motor from the regulator assembly.
• Removal and installation of the harness connector of the power window switch.
• Removal and installation of the door glass.
• Removal and installation of the front door glass run.
• Disconnection and connection of the minus terminal of the battery.

 Initialization

Follow the steps below after installing each component to the vehicle.

1.

Disconnect the minus terminal of battery or disconnect power window switch harness connector tempo-
rarily. Then reconnect after at least 1 minute.

2.

Turn ignition switch ON.

3.

Operate power window switch to fully open the window.

4.

Draw fully the power window switch in the up direction (auto close position) and hold. Continue holding
the switch even when window is completely closed and then release after more than 3 seconds.

5.

Inspect the anti-pinch system function.
NOTE:
Initialization may be cancelled with continuous opening and closing operation. In this case, initialize the
system.

INSPECT THE FUNCTION OF THE ANTI-PINCH SYSTEM

: Bolt

JMKIA1785ZZ

JMKIA0626ZZ

Revision: 2012 September

2013 MURANO

GW-20

< REMOVAL AND INSTALLATION >

FRONT DOOR GLASS

1.

Fully open the door glass.

2.

Place a wooden piece (wooden hammer handle, etc.) at near fully closed position.

3.

Perform fully closing operation with auto up switch.

• Check that the glass reverses without pinching the wooden piece, is lowered approximately 150 mm (5.906

in) or for more than 3 seconds and then stops.

• The glass should not be raised with power window main switch operated while it is reversing or lowering.

CAUTION:

• Be careful not to be pinched.
• Check that the auto up function is normal before the inspection following the system initialization.

FITTING INSPECTION

• Check that the glass is fit securely into the sash groove.
• Lower the glass slightly [approximately 10 to 20 mm (0.394 to 0.787 in)], and check that the clearance to the

sash is parallel. Loosen the regulator mounting bolts, guide rail mounting bolts, and glass and guide rail
mounting bolts to correct the glass position if the clearance between the glass and sash is not parallel.

Revision: 2012 September

2013 MURANO

FRONT REGULATOR

GW-21

< REMOVAL AND INSTALLATION >

C

D

E

F

G

H

I

J

L

M

A

B

GW

N

O

P

FRONT REGULATOR

Exploded View

INFOID:0000000008455294

Removal and Installation

INFOID:0000000008455295

REMOVAL

1.

Remove the front door glass. Refer to 

GW-18, "Removal and Installation"

.

2.

Disconnect the power window motor harness connector.

3.

Remove the mounting bolts, and pull out the module assembly.

4.

Disengage the harness clip from the back of the module assem-
bly, and then remove the module assembly.

INSTALLATION

Install in the reverse order of removal.

1.    Front door glass run

2.

Front door glass 

3.

Regulator assembly

4.

Module base

5.

Power window motor

6.

Front door inside seal

7.

Front door lower sash

8.

Front door panel

: Vehicle front

JMKIA3604ZZ

: Bolt

JMKIA1786ZZ

Revision: 2012 September

2013 MURANO

GW-22

< REMOVAL AND INSTALLATION >

FRONT REGULATOR

Disassembly and Assembly

INFOID:0000000008455296

DISASSEMBLY

1.

Remove the power window motor from the module assembly.

2.

Remove the regulator assembly mounting bolts, then remove the regulator assembly from module base.

ASSEMBLY

Assemble in the reverse order of disassembly.

Inspection and Adjustment

INFOID:0000000008455297

Inspection after Removal

Check the regulator assembly for the following items. Replace or
grease it if a malfunction is detected.
• Wire wear
• Regulator deformation
The shadow area in the figure show the application points of the
multi-purpose grease.

SYSTEM INITIALIZATION

Initialize the system if any of the following work has been done.
• Electric power supply to power window switch or motor is interrupted by blown fuse or disconnecting battery

cable, etc.

• Removal and installation of the regulator assembly.
• Removal and installation of the motor from the regulator assembly.
• Removal and installation of the harness connector of the power window switch.
• Removal and installation of the door glass.
• Removal and installation of the front door glass run.
• Disconnection and connection of the minus terminal of battery.

Initialization

Follow the steps below after installing each component to the vehicle.
1.

Disconnect the minus terminal of battery or disconnect power window switch harness connector tempo-
rarily. Then reconnect after at least 1 minute.

2.

Turn ignition switch ON.

3.

Operate power window switch to fully open the window.

4.

Draw fully the power window switch in the up direction (auto close position) and hold. Continue holding
the switch even when window is completely closed and then release after more than 3 seconds.

5.

Inspect the anti-pinch system function.
NOTE:
Initialization may be cancelled with continuous opening and closing operation. In this case, initialize the
system.

INSPECT THE FUNCTION OF THE ANTI-PINCH SYSTEM

1.

Fully open the door glass.

2.

Place a wooden piece (wooden hammer handle, etc.) at near fully closed position.

3.

Perform fully closing operation with auto up switch.

• Check that the glass reverses without pinching the wooden piece, is lowered approximately 150 mm (5.906

in) or for more than 3 seconds and then stops.

• The glass should not be raised with power window main switch operated while it is reversing or lowering.

CAUTION:

• Be careful not to be pinched.
• Check that the auto up function is normal before the inspection following the system initialization.

JMKIA1787ZZ

Revision: 2012 September

2013 MURANO


Content      ..     34      35      36      37     ..