Nissan Murano Z51 (2012 year). Manual - part 84
 

  Index      Manuals     Nissan Murano Z51 (2012 year) - Service and Repair Manual


Search            copyright infringement  


Content      ..     82      83      84      85     ..


Nissan Murano Z51 (2012 year). Manual - part 84


ST-30

< SYMPTOM DIAGNOSIS >

[WITH HEATED STEERING WHEEL]

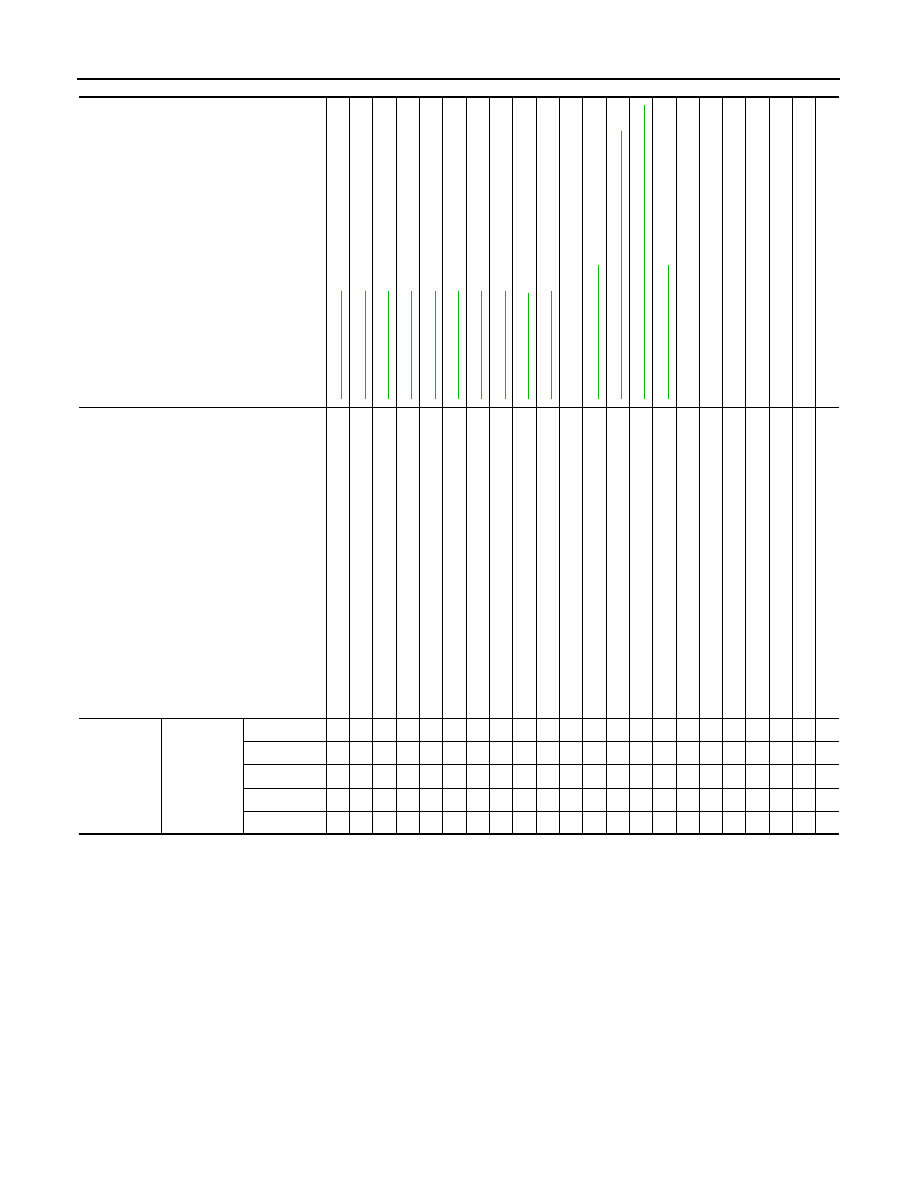
NOISE, VIBRATION AND HARSHNESS (NVH) TROUBLESHOOTING

Use the chart below to find the cause of the symptom. If necessary, repair or replace these parts.

×

: Applicable

Reference

ST

-3

1,

 "

Inspe

c

ti

on

"

ST

-3

1,

 "

Inspe

c

ti

on

"

ST

-5

4,

 "

Inspe

c

ti

on

"

ST

-5

4,

 "

Inspe

c

ti

on

"

ST

-5

4,

 "

Inspe

c

ti

on

"

ST

-3

1,

 "

Inspe

c

ti

on

"

ST

-3

3,

 "

Inspe

c

ti

on

"

ST

-3

3,

 "

Inspe

c

ti

on

"

EM

-1

7

, "

Checking

"

ST

-3

3,

 "

Inspe

c

ti

on

"

ST

-4

4,

 "

Ex

pl

od

ed

 V

iew

"

ST

-3

9,

 "

WITH 

E

L

ECTRIC MOT

O

R : 

In

sp

ecti

on

"

ST

-3

8,

 "

WITH E

L

ECTRIC 

MOT

O

: Ex

pl

od

ed

 V

iew

"


ST

-4

4,

 "

Ex

pl

od

ed

 V

iew

"

NVH in DLN 

section.

NVH in DLN 

section.

NVH in F

AX, 

RAX, FSU, 

RSU section.

NVH in WT 

section.

NVH in WT 

section.

NVH in F

AX,

 RAX 

secti

on.

NVH in BR 

section.

Possible cause and SUSPECTED PARTS

Fl

ui

d l

e

v

e

l

Ai

r in

 hy

d

raul

ic

 s

y

s

tem

Ou

ter/i

n

n

e

s

o

ck

et ba

ll joi

n

t swin

gi

ng

 to

rqu

e

Ou

ter/i

n

n

e

so

cket ba

ll joi

n

t rot

a

tin

g

 torq

ue

Ou

ter/i

n

n

e

s

o

ck

et ba

ll joi

n

t en

p

la

y

S

tee

rin

g

 f

lui

d l

e

a

k

a

g

e

S

te

e

ri

ng

 whe

e

l pl

ay

S

te

e

ri

ng

 ge

ar ra

ck s

lid

in

g f

o

rc

e

Dri

ve b

el

lo

os

en

es

s

Im

p

rope

r s

tee

rin

g

 wh

ee

l

Im

p

rope

r i

n

s

tal

lat

io

n

 o

r lo

os

en

es

of 

til

t lo

ck

 l

e

v

e

r

M

ou

nti

ng

 lo

os

en

es

s

S

tee

rin

g

 c

o

lu

m

n

 d

e

fo

rm

ati

o

n

 or 

da

ma

ge

Im

p

rope

r i

n

s

tal

lat

io

n

 o

r lo

os

en

es

of 

ste

e

ri

ng

 c

o

lu

mn

S

tee

rin

g l

ink

a

ge 

lo

os

en

es

s

PROPELLER SHAFT

DIF

F

ERENTIA

L

AX

LE and SUSPE

N

S

ION

TI

RE

ROAD WHE

E

L

DRIVE

 SHAFT

BRAK

E

Symptom

Steering

Noise

× × × × × × × × ×

× ×

× × × × × × ×

Shake

× × ×

×

× × × × ×

Vibration

× × × × ×

×

× ×

×

Shimmy

×

×

×

× × ×

×

Judder

× ×

×

× × ×

×

Revision: 2013 February

2012 MURANO

POWER STEERING FLUID

ST-31

< PERIODIC MAINTENANCE >

[WITH HEATED STEERING WHEEL]

C

D

E

F

H

I

J

K

L

M

A

B

ST

N

O

P

PERIODIC MAINTENANCE

POWER STEERING FLUID

Inspection

INFOID:0000000007540135

FLUID LEVEL

1.

Check fluid level with engine stopped.

2.

Ensure that fluid level is between MIN and MAX.

3.

Fluid levels at HOT and COLD are different. Do not confuse
them.

CAUTION:

• The fluid level should not exceed the MAX line. Excessive fluid causes fluid leakage from the

cap.

• Never reuse drained power steering fluid.

FLUID LEAKAGE

Check hydraulic connections for fluid leakage, cracks, damage,
looseness, or wear.

1.

Run the engine until the fluid temperature reaches 50 to 80

°

C

(122 to 176

°

F) in reservoir tank, and keep engine speed idle.

2.

Turn steering wheel several times from full left stop to full right
stop.

3.

Hold steering wheel at each lock position for five seconds and
carefully check for fluid leakage.

CAUTION:

Never hold the steering wheel in a locked position for more
than 10 seconds. (There is the possibility that power steer-
ing oil pump assembly may be damaged.)

4.

If fluid leakage at connections is noticed, then loosen flare nut and then retighten. Do not overtighten con-
nector as this can damage O-ring, washer and connector.

5.

If fluid leakage from oil pump is noticed, check oil pump.

6.

Check steering gear boots for accumulation of fluid leaked from steering gear.

AIR BLEEDING HYDRAULIC SYSTEM

If air bleeding is not complete, the following symptoms can be observed.
• Bubbles are created in reservoir tank.
• Clicking noise can be heard from oil pump.
• Excessive buzzing in the oil pump.

NOTE:
Fluid noise may occur in the steering gear or oil pump. This does not affect performance or durability of the
system.

1.

Turn steering wheel several times from full left stop to full right stop with engine off.

CAUTION:

HOT (A)

: Fluid temperature 50 – 80

°

C (122 – 176

°

F)

COLD (B)

: Fluid temperature 0 – 30

°

C (32 – 86

°

F)

Recommended fluid

Refer to 

MA-16, "FOR NORTH 

AMERICA : Fluids and Lubri-
cants"

 (For North America), 

MA-

17, "FOR MEXICO : Fluids and 
Lubricants"

 (For Mexico).

Fluid capacity

Refer to 

ST-65, "General Speci-

fications"

.

ALGIA0002GB

SGIA0506E

Revision: 2013 February

2012 MURANO

ST-32

< PERIODIC MAINTENANCE >

[WITH HEATED STEERING WHEEL]

POWER STEERING FLUID

Fill reservoir tank with a sufficient amount of fluid so that fluid level is not below the MIN line while
turning steering wheel.

2.

Start the engine and hold steering wheel at each lock position for 3 second at idle to check for fluid leak-
age.

3.

Repeat step 2 above several times at approximately 3 second intervals.

CAUTION:

Never hold the steering wheel in a locked position for more than 10 seconds. (There is the possi-
bility that oil pump may be damaged.)

4.

Check fluid for bubbles and white contamination.

5.

Stop the engine if bubbles and white contamination do not drain out. Perform step 2 and 3 above after
waiting until bubbles and white contamination drain out.

6.

Stop the engine, and then check fluid level.

Revision: 2013 February

2012 MURANO

STEERING WHEEL

ST-33

< PERIODIC MAINTENANCE >

[WITH HEATED STEERING WHEEL]

C

D

E

F

H

I

J

K

L

M

A

B

ST

N

O

P

STEERING WHEEL

Inspection

INFOID:0000000007540136

STEERING WHEEL AXIAL END PLAY

1.

Check installation conditions of steering gear assembly, front suspension assembly, axle and steering col-
umn assembly.

2.

Check if movement exists when steering wheel is moved up and down, to the left and right and to the axial
direction.

3.

Check the following items when steering wheel axial end play is out of the standard.
• Check the steering column assembly mounting condition. Refer to 

ST-35, "WITHOUT ELECTRIC

MOTOR : Exploded View"

 (Without electric motor), 

ST-38, "WITH ELECTRIC MOTOR : Exploded View"

(with electric motor).

• Check steering gear assembly mounting condition for looseness. Refer to 

ST-44, "Exploded View"

.

STEERING WHEEL PLAY

1.

Turn steering wheel so that front wheels come to the straight-ahead position.

2.

Start the engine and lightly turn steering wheel to the left and right until front wheels start to move.

3.

Measure steering wheel movement on the outer circumference.

4.

Check the following items when steering wheel play is out of the standard.
• Check backlash for each joint of steering column assembly.
• Check installation condition of steering gear assembly.

Standard

Steering wheel axial end 
play

: Refer to 

ST-65, "Steering 

Wheel Axial End Play and 
Play"

.

Standard

Steering wheel play

: Refer to 

ST-65, "Steering 

Wheel Axial End Play and 
Play"

.

Revision: 2013 February

2012 MURANO

ST-34

< REMOVAL AND INSTALLATION >

[WITH HEATED STEERING WHEEL]

STEERING WHEEL

REMOVAL AND INSTALLATION

STEERING WHEEL

Exploded View

INFOID:0000000007540137

Removal and Installation

INFOID:0000000007540138

REMOVAL

NOTE:
When reconnecting spiral cable, fix cable with a tape so that fixing case and rotating part keep aligned. This
will omit neutral position alignment procedure during spiral cable installation.
1.

Set the vehicle to the straight-ahead position.

2.

Remove driver air bag module. Refer to 

SR-11, "Exploded View"

.

3.

Remove steering wheel lock nut after steering is locked.

4.

Remove steering wheel with the steering wheel puller (A) [SST:
ST27180001 (J-25726-A)].
NOTE:
Put paint marks on the steering wheel and the column shaft
head for supporting accurate positioning during the installation
procedure.

INSTALLATION

Note the following, and install in the reverse order of removal.
• Check the spiral cable neutral position after replacing or rotating spiral cable. Refer to 

SR-14, "Exploded

View"

CAUTION:

Never twist spiral cable freely on excessively after it becomes tight (doing so may cause the cable to
tear off).

• Never reuse steering wheel lock nut.

1.

Steering wheel

Refer to 

GI-4, "Components"

 for symbols in the figure.

JSGIA0704GB

JSGIA0304ZZ

Revision: 2013 February

2012 MURANO

STEERING COLUMN

ST-35

< REMOVAL AND INSTALLATION >

[WITH HEATED STEERING WHEEL]

C

D

E

F

H

I

J

K

L

M

A

B

ST

N

O

P

STEERING COLUMN

WITHOUT ELECTRIC MOTOR

WITHOUT ELECTRIC MOTOR : Exploded View

INFOID:0000000007540139

WITHOUT ELECTRIC MOTOR : Removal and Installation

INFOID:0000000007540140

REMOVAL

1.

Set the vehicle to the straight-ahead position.

2.

Place the tilt to the highest level. Place the telescopic to the longest level.

3.

Remove driver air bag module. Refer to 

SR-11, "Exploded View"

.

4.

Remove steering wheel. Refer to 

ST-34, "Exploded View"

.

5.

Remove instrument driver lower panel. Refer to 

IP-12, "Exploded View"

.

6.

Remove steering column cover. Refer to 

IP-12, "Exploded View"

.

7.

Remove spiral cable. Refer to 

SR-11, "Exploded View"

.

8.

Remove cluster lid A. Refer to 

IP-12, "Exploded View"

.

1.

Steering column assembly

2.

Bracket

3.

Bracket

4.

Slide plate

5.

Slide bracket

6.

Lower mount bracket

7.

Bracket

8.

Upper joint

9.

Spring

10. Tilt lever

11.

Clip

Refer to 

GI-4, "Components"

 for symbols in the figure.

JSGIA0610GB

Revision: 2013 February

2012 MURANO

ST-36

< REMOVAL AND INSTALLATION >

[WITH HEATED STEERING WHEEL]

STEERING COLUMN

9.

Remove knee protector (1).

10. Disconnect each switch harness connectors installed to steering

column assembly.

11. Remove the upper joint mounting bolt and nut (lower shaft side),

and separate the upper joint from lower shaft.

CAUTION:

When removing upper joint, never insert a tool, such as a
screwdriver, into the yoke groove to pull out the upper joint.
In case of the violation of the above, replace upper joint
with a new one.

12. Remove steering column assembly.

CAUTION:

• Never give axial impact to steering column assembly during removal.
• Never move steering gear assembly when removing steering column assembly.

INSTALLATION

Note the following, and install in the reverse order of removal.
• Install the slide plate (1) and steering column housing (2) so that

the mounting dimensions (L) is within the specified range as
described below.           

• Tighten the mounting bolts in the order shown in the figure when

installing the steering column assembly.

• Be careful of the following points when installing the steering col-

umn assembly.

CAUTION:

• Never give axial impact to steering column assembly during

installation.

• Never move steering gear assembly.
• Never reuse the joint mounting nut (lower shaft side).

• Adjust neutral position of steering angle sensor. Refer to 

BRC-9,

"ADJUSTMENT OF STEERING ANGLE SENSOR NEUTRAL
POSITION : Special Repair Requirement"

.

WITHOUT ELECTRIC MOTOR : Inspection

INFOID:0000000007540141

INSPECTION AFTER REMOVAL

• Check each part of steering column assembly for damage or other malfunctions. Replace if necessary.
• Measure steering column assembly rotating torque using a preload gauge [SST: ST3127S000 (J-25765-A)].

Replace steering column assembly if outside the standard.

: Bolt

JSGIA0306ZZ

Standard

L

: 2.0 mm (0.079 in) or less

JSGIA0315ZZ

JSGIA0310ZZ

Standard

Rotating torque

: Refer to 

ST-65, "Steering 

Column Operating 
Range"

.

Revision: 2013 February

2012 MURANO

STEERING COLUMN

ST-37

< REMOVAL AND INSTALLATION >

[WITH HEATED STEERING WHEEL]

C

D

E

F

H

I

J

K

L

M

A

B

ST

N

O

P

• Measure the length (L) as shown, if vehicle has been involved in a

minor collision. Replace steering column assembly if out side the
standard.

• Install the bracket (1) and steering column housing (2) so that the

clearance (A) is within the specified range as described below.
Replace steering column assembly if out side the standard.

INSPECTION AFTER INSTALLATION

• Check each part of steering column assembly for damage or other malfunctions. Replace if necessary.
• Check the steering wheel play, neutral position steering wheel, steering wheel turning force, and front wheel

turning angle. Refer to 

ST-33, "Inspection"

.

• Check tilt and telescopic mechanism operating range tilt operating

range (T), telescopic operating range (L) as shown in the figure.

WITH ELECTRIC MOTOR

Standard

Steering column length (L)

: Refer to 

ST-65, "Steering 

Column Length"

.

JSGIA0562ZZ

Standard

Mounting dimensions (A)

: Refer to 

ST-65, "Steering 

Column Mounting Dimen-
sions"

.

JSGIA0389ZZ

Standard

Tilt operating range (T)

Refer to 

ST-65, 

"Steering Column Op-
erating Range"

.

Telescopic operating range (L)

Refer to 

ST-65, 

"Steering Column Op-
erating Range"

.

JSGIA0307ZZ

Revision: 2013 February

2012 MURANO

ST-38

< REMOVAL AND INSTALLATION >

[WITH HEATED STEERING WHEEL]

STEERING COLUMN

WITH ELECTRIC MOTOR : Exploded View

INFOID:0000000007540142

WITH ELECTRIC MOTOR : Removal and Installation

INFOID:0000000007540143

REMOVAL

1.

Set the vehicle to the straight-ahead position.

2.

Place the tilt to the highest level. Place the telescopic to the longest level.

3.

Remove driver air bag module. Refer to 

SR-11, "Exploded View"

.

4.

Remove steering wheel. Refer to 

ST-34, "Exploded View"

.

5.

Remove instrument driver lower panel. Refer to 

IP-12, "Exploded View"

.

6.

Remove steering column cover. Refer to 

IP-12, "Exploded View"

.

7.

Remove spiral cable. Refer to 

SR-14, "Exploded View"

.

8.

Remove cluster lid A. Refer to 

IP-12, "Exploded View"

.

1.

Bracket

2.

Steering column assembly

3.

Bracket

4.

Clip

5.

Tilt motor

6.

Bracket

7.

Bracket

8.

Bracket

9.

Slide bracket

10. Lower mount bracket

11.

Upper joint

12. Bracket

13. Telescopic motor

14. Bracket

15. Bracket

Refer to 

GI-4, "Components"

 for symbols in the figure.

JSGIA0529GB

Revision: 2013 February

2012 MURANO

STEERING COLUMN

ST-39

< REMOVAL AND INSTALLATION >

[WITH HEATED STEERING WHEEL]

C

D

E

F

H

I

J

K

L

M

A

B

ST

N

O

P

9.

Remove knee protector (1).

10. Disconnect each switch harness connectors installed to steering

column assembly.

11. Remove the upper joint mounting bolt and nut (lower shaft side),

and separate the upper joint from lower shaft.

CAUTION:

When removing upper joint, never insert a tool, such as a
screwdriver, into the yoke groove to pull out the upper joint.
In case of the violation of the above, replace upper joint
with a new one.

12. Remove steering column assembly.

CAUTION:

• Never give axial impact to steering column assembly during removal.
• Never move steering gear assembly when removing steering column assembly.

INSTALLATION

Note the following, and install in the reverse order of removal.
• Install the slide plate (1) and steering column housing (2) so that

the mounting dimensions (L) is within the specified range as
described below.           

• Tighten the mounting bolts in the order shown in the figure when

installing the steering column assembly.

• Be careful of the following points when installing the steering col-

umn assembly.

CAUTION:

• Never give axial impact to steering column assembly during

installation.

• Never move steering gear assembly.
• Never reuse the joint mounting nut (lower shaft side).

• Adjust neutral position of steering angle sensor. Refer to 

BRC-9,

"ADJUSTMENT OF STEERING ANGLE SENSOR NEUTRAL
POSITION : Special Repair Requirement"

.

WITH ELECTRIC MOTOR : Inspection

INFOID:0000000007540144

INSPECTION AFTER REMOVAL

• Check each part of steering column assembly for damage or other malfunctions. Replace if necessary.
• Measure steering column assembly rotating torque using a preload gauge [SST: ST3127S000 (J-25765-A)].

Replace steering column assembly if outside the standard.

: Bolt

JSGIA0306ZZ

Standard

L

: 2.0 mm (0.079 in) or less

JSGIA0315ZZ

JSGIA0310ZZ

Standard

Rotating torque

: Refer to 

ST-65, "Steering 

Column Operating 
Range"

.

Revision: 2013 February

2012 MURANO

ST-40

< REMOVAL AND INSTALLATION >

[WITH HEATED STEERING WHEEL]

STEERING COLUMN

• Measure the length (L) as shown, if vehicle has been involved in a

minor collision. Replace steering column assembly if out side the
standard.

• Install the bracket (1) and steering column housing (2) so that the

clearance (A) is within the specified range as described below.
Replace steering column assembly if out side the standard.

INSPECTION AFTER INSTALLATION

• Check each part of steering column assembly for damage or other malfunctions. Replace if necessary.
• Check the steering wheel play, neutral position steering wheel, steering wheel turning force, and front wheel

turning angle. Refer to 

ST-33, "Inspection"

.

• Check tilt and telescopic mechanism operating range tilt operating

range (T), telescopic operating range (L) as shown in the figure.

Standard

Steering column length (L)

: Refer to 

ST-65, "Steering 

Column Length"

.

JSGIA0563ZZ

Standard

Mounting dimensions (A)

: Refer to 

ST-65, "Steering 

Column Mounting Dimen-
sions"

.

JSGIA0389ZZ

Standard

Tilt operating range (T)

Refer to 

ST-65, 

"Steering Column 
Operating Range"

.

Telescopic operating range (L)

: Refer to 

ST-65, 

"Steering Column 
Operating Range"

.

JSGIA0309ZZ

Revision: 2013 February

2012 MURANO

LOWER SHAFT

ST-41

< REMOVAL AND INSTALLATION >

[WITH HEATED STEERING WHEEL]

C

D

E

F

H

I

J

K

L

M

A

B

ST

N

O

P

LOWER SHAFT

Exploded View

INFOID:0000000007540145

Removal and Installation

INFOID:0000000007540146

REMOVAL

1.

Set the vehicle to the straight-ahead position.

2.

Fix the steering wheel.

3.

Remove upper joint fixing bolt and nut (lower shaft side).

4.

Separate the lower shaft from the upper joint by sliding the slide
shaft (A: sliding range).

CAUTION:

• Spiral cable may be cut if steering wheel turns while sepa-

rating steering column assembly and steering column
assembly. Be sure to secure steering wheel using string
to avoid turning.

• When removing upper joint, never insert a tool, such as a

screwdriver, into the yoke groove to pull out the upper
joint. In case of the violation of the above, replace upper
joint with a new one.

5.

Remove the accelerator pedal bracket and lever assembly.
Refer to 

ACC-4, "Exploded View"

.

6.

Remove the side brake pedal bracket and wire clamp stay.

7.

Remove the hole cover mounting nuts.

8.

Remove the hole cover seal, clamp and hole cover.

9.

Remove lower shaft joint fixing bolt (steering gear side).

10. Remove the lower shaft from steering gear assembly.

CAUTION:

When removing lower shaft, never insert a tool, such as a screwdriver, into the yoke groove to pull
out the lower shaft. In case of the violation of the above, replace lower shaft with a new one.

1.

Steering column assembly

2.

Hole cover seal

3.

Clamp

4.

Hole cover

5.

Lower shaft

Refer to 

GI-4, "Components"

 for symbols in the figure.

JSGIA0311GB

JSGIA0312ZZ

Revision: 2013 February

2012 MURANO

ST-42

< REMOVAL AND INSTALLATION >

[WITH HEATED STEERING WHEEL]

LOWER SHAFT

INSTALLATION

Note the following, and install in the reverse order of removal.

CAUTION:

Spiral cable may be cut if steering wheel turns while separating steering column assembly and steer-
ing gear assembly. Be sure to secure steering wheel using string to avoid turning.
• Tighten the clamp to the specified torque and check the clamp

length (A).

• After lower shaft (steering gear side) fitted, make sure there is not

gap (A) between the yoke (1), lower shaft (2), joint fixing bolt (3).

• When installing lower joint to steering gear assembly, follow the procedure listed below.
- Set rack of steering gear in the neutral position.

NOTE:
To get the neutral position of rack, turn gear-sub assembly and measure the distance of inner socket, and
then measure the intermediate position of the distance.

- Align rear cover cap projection (A) with the marking position of

gear housing assembly (B).

- Install slit part of lower joint (C) aligning with the rear cover cap

projection (A). Make sure that the slit part of lower joint (C) is
aligned with rear cover cap projection (A) and the marking position
of gear housing assembly (B).

• Adjust neutral position of steering angle sensor. Refer to 

BRC-9,

"ADJUSTMENT OF STEERING ANGLE SENSOR NEUTRAL
POSITION : Special Repair Requirement"

.

• Check the following after installation:
- Check if steering wheel turns smoothly when it is turned several times fully to the end of the left and right.
- Check the steering wheel play, neutral position steering wheel, steering wheel turning force, and front wheel

turning angle. Refer to 

ST-33, "Inspection"

.

Clamp length “A”

: 14.0 – 18.0 mm (0.551 – 
0.709 in)

JSGIA0094ZZ

JSGIA0180ZZ

: Bolt

JSGIA0313ZZ

Revision: 2013 February

2012 MURANO

LOWER SHAFT

ST-43

< REMOVAL AND INSTALLATION >

[WITH HEATED STEERING WHEEL]

C

D

E

F

H

I

J

K

L

M

A

B

ST

N

O

P

Inspection

INFOID:0000000007540147

• Check the length (A) (extended position) of the lower shaft.

• Check each part of lower shaft for damage or other malfunctions.

Replace if there are.

Standard

Lower shaft length (A)

: Refer to 

ST-66, "Lower 

Shaft Length"

.

JSGIA0314ZZ

Revision: 2013 February

2012 MURANO

ST-44

< REMOVAL AND INSTALLATION >

[WITH HEATED STEERING WHEEL]

STEERING GEAR AND LINKAGE

STEERING GEAR AND LINKAGE

Exploded View

INFOID:0000000007540148

REMOVAL

2WD models

AWD models

DISASSEMBLY

JSGIA0606GB

1.

Steering gear assembly

2.

Cotter pin

: Vehicle front

Refer to 

GI-4, "Components"

 for symbols in the figure.

JSGIA0607GB

1.

Steering gear assembly

2.

Cotter pin

: Vehicle front

Refer to

GI-4, "Components"

 for symbols in the figure.

Revision: 2013 February

2012 MURANO

STEERING GEAR AND LINKAGE

ST-45

< REMOVAL AND INSTALLATION >

[WITH HEATED STEERING WHEEL]

C

D

E

F

H

I

J

K

L

M

A

B

ST

N

O

P

2WD models

JSGIA0571GB

1.

Low pressure piping

2.

Rear cover cap

3.

Gear-sub assembly

4.

Power steering solenoid valve

5.

O-ring

6.

Adjusting screw

7.

Spring

8.

Retainer

9.

Outer socket

10. Boot clamp

11.

Boot

12. Inner socket

13. Boot clamp (stainless wire)

14. Cylinder tube

15. Gear housing assembly

16. Rack oil seal

17. Rack assembly

18. Rack Teflon ring

19. O-ring

20. End cover assembly

: Apply power steering fluid.

: Apply Genuine Medium Strength Thread Locking Sealant or equivalent. Refer to 

GI-22, "Recommended Chemical Prod-

ucts and Sealants"

.

: Apply Genuine High Performance Thread Sealant or equivalent. Refer to 

GI-22, "Recommended Chemical Products and 

Sealants"

.

: Apply multi-purpose grease.

Refer to 

GI-4, "Components"

 for symbols not described on the above.

Revision: 2013 February

2012 MURANO


Content      ..     82      83      84      85     ..