Nissan Murano Z50 (2006 year). Manual - part 181


  Index      Manuals     Nissan Murano Z50 (2006 year) - Service and Repair Manual


Search            copyright infringement  


Content      ..     179      180      181      182     ..


Nissan Murano Z50 (2006 year). Manual - part 181


POWER STEERING OIL PUMP

PS-31

C

D

E

F

H

I

J

K

L

M

A

B

PS

Revision: 2006 August

2006 Murano

DISASSEMBLY

NOTE:
Secure oil pump in a vise if necessary.

CAUTION:

When retaining drive shaft in a vise, always use copper or aluminum plates between vise and shaft.

1.

Remove rear cover mounting bolts and then remove rear cover from body assembly.

2.

Remove gasket from body assembly.

3.

Remove dowel pin, cartridge and side plate from body assembly.

4.

Remove pulley mounting nut and then remove pulley from drive shaft.

5.

Remove bracket mounting bolts and then remove bracket from body assembly.

6.

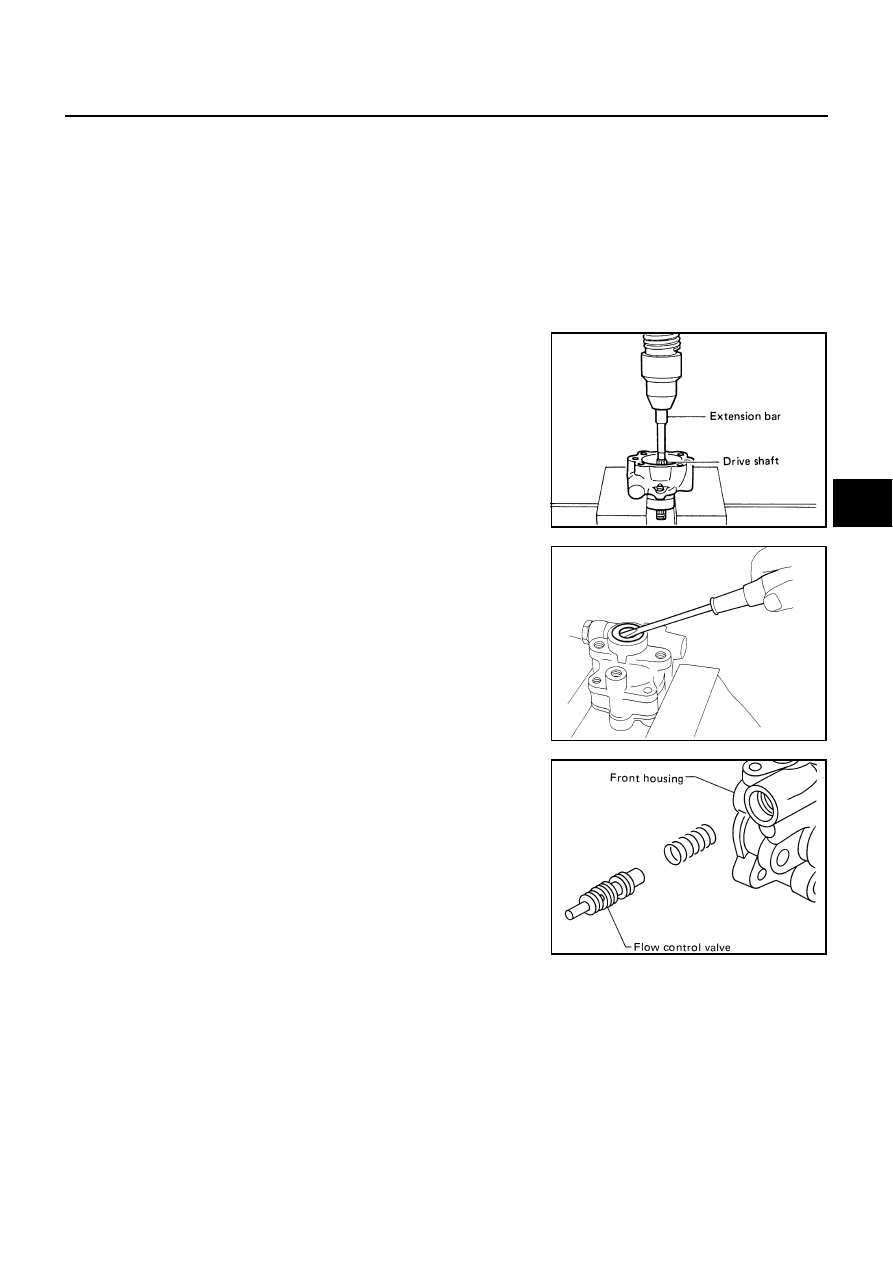
Remove snap ring from drive shaft assembly and press out it.

CAUTION:

When removing snap ring, be careful not to damage drive
shaft assembly.

7.

Remove oil seal from body assembly using a flat-bladed screw-
driver.

CAUTION:

Do not damage body assembly.

8.

Remove O-ring from body assembly.

9.

Loosen eye bolt and remove joint and washer, then pull out flow
control valve and spring from body assembly.

CAUTION:

Be careful not to drop and deform the flow control valve. 

10. Remove suction pipe from body assembly.

11. Remove O-ring for suction pipe.

INSPECTION AFTER DISASSEMBLY
Body Assembly and Rear Cover Inspection

Check body assembly and the inside of rear cover for damage. If any damage is found, replace with new part
for rear cover, and replace with new power steering pump assembly for body assembly.

Cartridge Assembly Inspection

Check cam ring, side plate, rotor and vane for damage. If any damage is found, replace cartridge assembly
with new one.

Side Plate Inspection

Check side plate for damage. Replace side plate if there are.

SST010B

SST034A

SST036A

PS-32

POWER STEERING OIL PUMP

Revision: 2006 August

2006 Murano

Flow Control Valve Inspection

Check flow control valve and spring for damage. Replace if there are.

ASSEMBLY

NOTE:
Secure oil pump in a vise if necessary.

CAUTION:

Use copper plates when securing in a vise.

1.

Apply multi purpose grease to oil seal lips (1). Apply Genuine
Nissan PSF or equivalent to around oil seal, and then install oil
seal to body assembly.

CAUTION:

Do not reuse oil seal

2.

Apply Genuine Nissan PSF or equivalent to drive shaft, and
press drive shaft into body assembly, then install snap ring.

CAUTION:

Do not reuse snap ring.

3.

Apply Genuine Nissan PSF or equivalent to O-ring, and install
O-ring into body assembly.

CAUTION:

Do not reuse O-ring.

4.

Install side plate to body assembly.

5.

Install dowel pin (3) into dowel pin hole (A), and install cam ring
(2) pointing it's D1 side toward the body assembly (1) side as
shown in the figure.

CAUTION:

When installing cam-ring, turn carved face with a letter E
(B) of it to rear cover.

Do not confuse the assembling direction of cam ring. If
cam ring is installed facing the incorrect direction, it may
cause pump operation malfunction.

SGIA1150E

SGIA0422E

SGIA1166E

POWER STEERING OIL PUMP

PS-33

C

D

E

F

H

I

J

K

L

M

A

B

PS

Revision: 2006 August

2006 Murano

6.

Install rotor to body assembly.

CAUTION:

When installing rotor, turn punch mark face on rotor to
body assembly.

7.

Install vane to rotor with arc of vane in contact with cam ring.

8.

Check if drive shaft assembly turns smoothly.

9.

Install gasket to body assembly.

CAUTION:

Do not reuse gasket.

10. Install rear cover to body assembly and tighten bolts to the spec-

ified torque.

11. Install bracket to body assembly, and tighten the two mounting

bolts to the specified torque.

12. Install pulley to drive shaft assembly, then tighten lock nut to the

specified torque.

13. Install spring, flow control valve, washer, joint and eye bolt to

body assembly. Then tighten eye bolt to the specified torque.

CAUTION:

Does not reuse spring and washer.

14. Apply a coat of Nissan PSF or equivalent to O-ring and Install O-

ring to suction pipe.

CAUTION:

Do not reuse O-ring.

15. Install suction pipe to body assembly.

SGIA0424E

SST843A

SGIA0425E

PS-34

HYDRAULIC LINE

Revision: 2006 August

2006 Murano

HYDRAULIC LINE

PFP:49721

Removal and Installation

NGS0003R

Refer to the figure for tightening torque. Install in the reverse order of removal.

1.

Reservoir tank

2.

Reservoir tank bracket

3.

Suction hose

4.

High-pressure hose

5.

Oil pump assembly

6.

Steering gear assembly

7.

Eye-bolt

8.

Pressure sensor

9.

Copper washer

SGIA1167E

HYDRAULIC LINE

PS-35

C

D

E

F

H

I

J

K

L

M

A

B

PS

Revision: 2006 August

2006 Murano

CAUTION:

Securely insert harness connector to pressure sensor.

Do not reuse O-ring (2)

Apply Genuine Nissan PSF or equivalent to around O-ring
(2), then install eye-bolt (1). 

Install eye-bolt (1) with eye-joint (assembled to high pres-
sure hose) (B) protrusion (A) facing with pump side cutout,
and then tighten it to the specified torque after tightening
by hand. Refer to 

PS-34, "Removal and Installation"

 .

Do not apply fluid to hose (2) and tube (1).

Insert hose (2) securely until it contacts spool (A) of tube
(1).

Install clamp (3) to hose (2) at 3 to 8 mm (L) from the edge of
the hose (2).

Confirm with mating marking that if it is in phase with hose
and clamp, then correct if needs.

10. Clamp

11.

Eye-joint

12. O-ring

13. Low pressure piping

14. High pressure piping

Refer to 

GI-10, "Components"

  and the followings for the symbols in the figure.

: Nissan PSF or equivalent.

SGIA1379E

SGIA1380E

SGIA0563E

PS-36

SERVICE DATA AND SPECIFICATIONS (SDS)

Revision: 2006 August

2006 Murano

SERVICE DATA AND SPECIFICATIONS (SDS)

PFP:00030

General Specifications

NGS000BF

Inspection and Adjustment

NGS000BG

STEERING WHEEL AXIAL END PLAY AND PLAY

Unit: mm (in)

STEERING WHEEL TURNING FORCE

Unit: N·m (kg-m, in-lb)

STEERING COLUMN LENGTH

Unit: mm (in)

STEERING ANGLE

Unit: Degree minute (Decimal degree)

Applied model

VQ35DE

Steering gear model

PR26AM

Fluid capacity (Approx.)

 (US qt, lmp qt)

1.0 (1-1/8, 7/8)

Relief oil pressure

kPa (kg/cm

2

 , psi)

8,500 - 9,300 (88 - 94, 1,251 - 1,337)

Item

Standard

End play of the axial direction for steering wheel

0 (0)

Steering wheel play on the outer circumference

0 - 35 (0 - 1.37)

Item

Standard

Steering wheel turning force

7.45 (0.76, 66) or less

Item

Standard

Steering column length “L

1

 ”

182 mm (7.17 in)

Steering column length “L

2

 ”

242.6 mm (9.55 in)

SGIA0475E

Item

Standard

Inner wheel

Minimum

34

°

30

 (34.5

°

)

Nominal

38

°

00

 (38.0

°

)

Maximum

39

°

00

 (39.0

°

)

Outer wheel

Nominal

31

°

30

 (31.5

°

)

SERVICE DATA AND SPECIFICATIONS (SDS)

PS-37

C

D

E

F

H

I

J

K

L

M

A

B

PS

Revision: 2006 August

2006 Murano

RACK SLIDING FORCE

Unit: N (kg, lb)

RACK STROKE

Unit: mm (in)

SOCKET SWING TORQUE AND ROTATING TORQUE
Swing Torque

Unit: N (kg, lb)

Rotating Torque

Unit: N·m (kg-m, in-lb)

SOCKET AXIAL END PLAY

Unit: mm (in)

Item

Standard

2WD

AWD

Rack sliding force

215.8 - 274.6 (22.1 - 28.0, 48.6 - 61.7)

225.4 - 284.2 (23.0 - 28.9, 50.7 - 63.8)

Item

Standard

Rack neutral position, dimension “L”

71.5 (2.815)

SGIA0549E

Item

Measuring value

Outer socket “P

1

 ”

4.84 - 46.7 (0.50 - 4.7, 1.09 - 10.4)

Inner socket “P

2

 ”

12.1 - 93.7 (1.3 - 9.5, 2.8 - 21.0)

SGIA1540E

Item

Standard

Outer socket

0.3 - 2.9 (0.03 - 0.29, 3 - 25)

Item

Standard

Outer socket

0.5 (0.02) or less

Inner socket

0.2 (0.008) or less

PS-38

SERVICE DATA AND SPECIFICATIONS (SDS)

Revision: 2006 August

2006 Murano

INNER SOCKET LENGTH

Unit: mm (in)

Item

Standard

Inner socket length “L”

147.7 (5.81)

SGIA1512E

RAX-1

REAR AXLE

D  DRIVELINE/AXLE

CONTENTS

C

E

F

G

H

I

J

K

L

M

SECTION 

A

B

RAX

Revision: 2006 August

2006 Murano

REAR AXLE

PRECAUTIONS .......................................................... 2

Caution ..................................................................... 2

PREPARATION ........................................................... 3

Commercial Service Tools ........................................ 3

NOISE, VIBRATION AND HARSHNESS (NVH) 
TROUBLESHOOTING ................................................ 4

NVH Troubleshooting Chart  ..................................... 4

WHEEL HUB  .............................................................. 5

On-Vehicle Inspection and Service  .......................... 5

WHEEL BEARING INSPECTION  ......................... 5

Removal and Installation  .......................................... 5

REMOVAL ............................................................. 5
INSPECTION AFTER REMOVAL  ......................... 6
INSTALLATION ..................................................... 6

REAR DRIVE SHAFT  ................................................. 7

Removal and Installation  .......................................... 7

REMOVAL ............................................................. 7
INSPECTION AFTER REMOVAL  ......................... 7
INSTALLATION ..................................................... 7

Disassembly and Assembly ...................................... 8

DISASSEMBLY ..................................................... 8
INSPECTION AFTER DISASSEMBLY .................. 9
ASSEMBLY ......................................................... 10

SERVICE DATA AND SPECIFICATIONS (SDS)  ...... 13

Wheel Bearing  ........................................................ 13
Drive Shaft .............................................................. 13

RAX-2

PRECAUTIONS

Revision: 2006 August

2006 Murano

PRECAUTIONS

PFP:00001

Caution

NDS00091

Observe the following precautions when disassembling and servicing drive shaft.

Perform work in a location which is as dust-free as possible.

Before disassembling and servicing, clean the outside of parts.

Prevention of the entry of foreign objects must be taken into account during disassembly of the service
location.

Disassembled parts must be carefully reassembled in the correct order. If work is interrupted, a clean
cover must be placed over parts.

Paper shop cloths must be used. Fabric shop cloths must not be used because of the danger of lint adher-
ing to parts.

Disassembled parts (except for rubber parts) should be cleaned with kerosene which shall be removed by
blowing with air or wiping with paper shop cloths.

PREPARATION

RAX-3

C

E

F

G

H

I

J

K

L

M

A

B

RAX

Revision: 2006 August

2006 Murano

PREPARATION

PFP:00002

Commercial Service Tools

NDS00092

Tool name

Description

Power tool

Loosening bolts and nuts

PBIC0190E

RAX-4

NOISE, VIBRATION AND HARSHNESS (NVH) TROUBLESHOOTING

Revision: 2006 August

2006 Murano

NOISE, VIBRATION AND HARSHNESS (NVH) TROUBLESHOOTING

PFP:00003

NVH Troubleshooting Chart

NDS00093

Use chart below to help you find the cause of the symptom. If necessary, repair or replace these parts.

×

: Applicable

Reference page

RAX-

9

RAX-

5

NVH 

in

 PR s

e

c

tio

n

NVH 

in

 RFD s

e

c

tio

n

N

V

H

 i

n

 R

AX and R

S

U

 sect

ions

Re

fe

r to

 R

E

AR 

AXL

in

 t

h

is

 c

h

a

rt.

NVH in

 W

T

 s

e

c

ti

o

n

NVH in

 W

T

 s

e

c

ti

o

n

Re

fe

r to

 D

R

IVE SHAFT i

n

 th

is

 c

h

a

rt.

NVH 

in

 BR s

e

c

tio

n

NVH 

in

 PS s

e

c

tio

n

Possible cause and SUSPECTED PARTS

Exc

e

ss

iv

e j

o

in

t a

ngl

e

Jo

in

t sl

id

in

re

si

st

an

ce

Im

bal

ance

Im

pr

o

per

 i

n

st

al

la

ti

on

lo

osen

ess

P

a

rt

s

 in

te

rf

e

re

n

c

e

PROPELL

E

R SHAF

T

DIFFERENTIAL

REAR AXLE AND 

RE

AR 

SUSPENSION

REAR AXLE

TIRES

ROAD W

H

EEL

D

R

IV

E

 SH

AF

T

BRAKES

STEERING

Symptom

DRIVE 
SHAFT

Noise

×

×

×

×

×

×

×

×

×

×

Shake

×

×

×

×

×

×

×

×

×

REAR 
AXLE

Noise

×

×

×

×

×

×

×

×

×

×

Shake

×

×

×

×

×

×

×

×

×

Vibration

×

×

×

×

×

×

×

Shimmy

×

×

×

×

×

×

×

Judder

×

×

×

×

×

×

Poor quality ride or handling

×

×

×

×

×

WHEEL HUB

RAX-5

C

E

F

G

H

I

J

K

L

M

A

B

RAX

Revision: 2006 August

2006 Murano

WHEEL HUB

PFP:43202

On-Vehicle Inspection and Service

NDS00094

Make sure the mounting conditions (looseness, back lash) of each component and component status (wear,
damage) are normal.

WHEEL BEARING INSPECTION

Move wheel hub in the axial direction by hand. Make sure there is no looseness of wheel bearings.

Rotate wheel hub and make sure there is no unusual noise or other irregular conditions. If there are any
irregular conditions, replace wheel hub and bearing assembly.

Removal and Installation

NDS00095

REMOVAL

1.

Remove tire with power tool.

2.

Remove brake caliper with power tool. Hang it in a place where it will not interfere with work. Refer to 

BR-

32, "Removal and Installation of Brake Caliper Assembly"

 .

CAUTION:

Avoid depressing brake pedal while brake caliper is removed. 

3.

Put alignment marks on disc rotor and wheel hub and bearing
assembly, then remove disc rotor.

4.

Remove wheel sensor from axle. Refer to 

BRC-43, "WHEEL

SENSORS"

 . 

CAUTION:

Do not pull on wheel sensor harness.

5.

Remove parking cable and parking brake shoe from back plate. Refer to 

PB-5, "PARKING BRAKE SHOE"

.

Axial end play

: 0.05 mm (0.002 in) or less

1.

Cotter pin (AWD models)

2.

Disc rotor

3.

Anchor block

4.

Wheel hub and bearing assembly

5.

Back plate

6.

Bushing

7.

Axle

8.

Axle cap (2WD models)
Dust shield (AWD models)

SDIA1371E

SDIA1375E

RAX-6

WHEEL HUB

Revision: 2006 August

2006 Murano

6.

Remove cotter pin. Then remove lock nut from drive shaft. (AWD models)

7.

Using a puller (suitable tool), remove wheel hub and bearing assembly from drive shaft. (AWD models)

CAUTION:

When removing axle, do not apply an excessive angle to drive shaft joint. Also be careful not to
excessively extend slide joint. 

Do not allow drive shaft to hang down without support for counter shaft, wheel joints, and other
parts.

8.

Remove fixing bolts of wheel hub and bearing assembly, then remove wheel hub and bearing assembly
from axle.

9.

Loosen fixing bolts and nuts of front lower link, radius rod and rear lower link in side of suspension mem-
ber.

10. Remove shock absorber fixing bolt (lower), front lower link fixing bolt and nut (axle-side) while supporting

rear lower link with jack.

11. Remove fixing bolt and nut in axle side of rear lower link with power tool. Then remove coil spring.

12. Remove fixing bolt and nut in axle side of radius rod with power tool. 

13. Remove suspension arm and cotter pin at axle, then loosen mounting nut.
14. Use a ball joint remover (suitable tool) to remove suspension arm from axle. Be careful not to damage ball

joint boot.

CAUTION:

To prevent damage to threads and to prevent ball joint remover (suitable tool) from coming off
suddenly, and temporarily tighten mounting nut.

15. Remove axle from vehicle.
16. Remove fixing nuts of anchor block, then remove anchor block and back plate from axle.

17. Remove axle cap (2WD) or dust shield (AWD) from axle.

INSPECTION AFTER REMOVAL

Check for deformity, cracks and damage on each parts, replace if necessary.

Ball Joint Inspection

Check for boot breakage, axial looseness, and torque of suspension arm ball joint. Refer to 

RSU-11,

"SUSPENSION ARM"

 .

INSTALLATION

Refer to 

RAX-5, "Removal and Installation"

   for tightening torque. Install in the reverse order of removal.

NOTE:
Refer to component parts location and do not reuse non-reusable parts.

To assemble disc rotor and wheel hub and bearing assembly,
align the marks.
(When not using the alignment mark, refer to 

BR-36, "DISC

ROTOR INSPECTION"

 .)

Perform final tightening of installation position of suspension
links (rubber bushing) under unladen conditions with tires on
level ground. Check wheel alignment. Refer to 

RSU-5, "Wheel

Alignment Inspection"

 .

SDIA1375E

REAR DRIVE SHAFT

RAX-7

C

E

F

G

H

I

J

K

L

M

A

B

RAX

Revision: 2006 August

2006 Murano

REAR DRIVE SHAFT

PFP:39600

Removal and Installation

NDS00096

REMOVAL

1.

Remove tire with power tool.

2.

Remove wheel sensor from axle. Refer to

BRC-43, "WHEEL SENSORS"

 .

CAUTION:

Do not pull on wheel sensor harness.

3.

Remove cotter pin. Then remove lock nut from drive shaft.

4.

Remove parking cable and parking brake shoe from back plate. Refer to 

PB-5, "PARKING BRAKE SHOE"

.

5.

Remove wheel hub and bearing assembly fixing bolts, then remove wheel hub and bearing assembly from
axle. Refer to 

RAX-5, "Removal and Installation"

 .

6.

Use a wheel wrench or other tool to remove drive shaft from final
drive.

INSPECTION AFTER REMOVAL

Move joint in the up/down, left/right, and axial direction. Check
for any rough movement or significant looseness.

Check boot for cracks or other damage, and also for grease
leakage.

If a trouble is found, disassemble drive shaft, and then replace
with new one.

INSTALLATION

Refer to 

RAX-7, "Removal and Installation"

   for tightening torque. Install in the reverse order of removal.

CAUTION:

Refer to component parts location and do not reuse non-reusable parts.

1.

Cotter pin

2.

Dust shield

SDIA1356E

SDIA1447E

SFA108A

RAX-8

REAR DRIVE SHAFT

Revision: 2006 August

2006 Murano

In order to prevent damage to final drive side oil seal, first fit to
protector (suitable tool) onto oil seal before inserting drive shaft.
Slide drive shaft into slide joint tap with a hammer to install
securely.

CAUTION:

Be sure to make sure circular clip is securely fastened.

Disassembly and Assembly

NDS00097

DISASSEMBLY
Final Drive Side

1.

Press shaft in a vise.

CAUTION:

When retaining shaft in a vice, always use copper or aluminum plates between vise and shaft.

2.

Remove boot band.

3.

Put matching marks on slide joint assembly and shaft before separating slide joint assembly.

4.

Put matching marks on spider assembly and shaft.

SDIA2297E

1.

Joint sub-assembly

2.

Circular clip

3.

Ball cage/Steel ball/Inner race 
assembly

4.

Boot band (Wheel side)

5.

Boot (Wheel side)

6.

Shaft

7.

Boot band (Final drive side)

8.

Boot (Final drive side)

9.

Spider assembly

10. Snap ring

11.

Slide joint assembly

12. Circular clip

13. Dust shield

SDIA1357E

SFA963


Content      ..     179      180      181      182     ..