Nissan Murano Z50 (2005 year). Manual - part 125
DRIVE BELTS
EM-13
C
D
E
F
G
H
I
J
K
L
M
A
EM
Revision: 2005 August
2005 Murano
DRIVE BELTS
PFP:02117
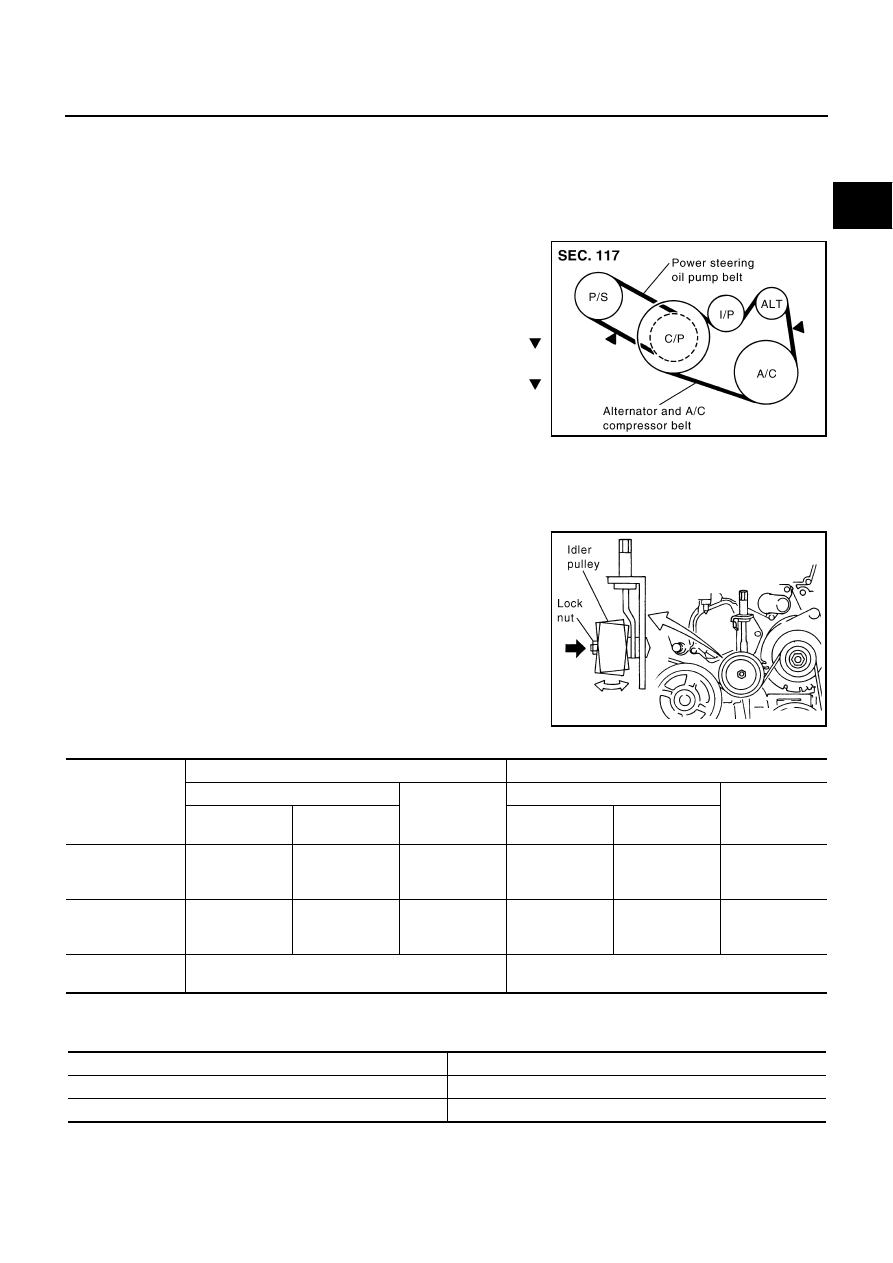
Checking Drive Belts
ABS00329
WARNING:
Be sure to perform when the engine is stopped.
1.
Inspect belts for cracks, fraying, wear and oil. If necessary, replace.
2.
Inspect drive belt deflection or tension at a point on belt midway
between pulleys.
●
Inspection should be done only when the engine is cold, or
over 30 minutes after engine is stopped.
●
Measure the belt tension with belt tension gauge (commercial
service tool: BT3373-F or equivalent) at points marked
shown in the figure.
●
When measuring deflection, apply 98 N (10 kg, 22 lb) at the
marked point.
●
Adjust if the belt deflection exceeds the limit or if the belt ten-
sion is not within specifications.
CAUTION:
●
When checking the belt deflection or the tension immediately after installation, first adjust it to
the specified value. Then, after turning the crankshaft two turns or more, re-adjust to the speci-
fied value to avoid variation in deflection between pulleys.
●
Tighten idler pulley lock nut by hand and measure the
deflection or the tension without looseness.
Belt Deflection and Tension
*: If belt tension gauge cannot be installed at check points shown, check drive belt tension at different location on the belt.
Tension Adjustment
ABS0036V
CAUTION:
●
When belt is replaced with a new one, adjust it to value for “New belt” to accommodate for insuffi-
cient adaptability with pulley grooves.
PBIC2449E
PBIC1162E
Deflection adjustment
Unit: mm (in)
Tension adjustment*
Unit: mm (in)
Used belt
New belt
Used belt
New belt
Limit
After adjustment
Limit
After adjust-
ment
Alternator and A/C
compressor
7 (0.28)
4.2 - 4.6
(0.17 - 0.18)
3.7 - 4.1
(0.15 - 0.16)
294 (30, 66)
730 - 818
(74.5 - 83.5,
164 - 184)
838 - 926
(85.5 - 94.5,
188 - 208)
Power steering oil
pump
11 (0.43)
7.3 - 8
(0.29 - 0.30)
6.5 - 7.2
(0.26 - 0.28)
196 (20, 44)
495 - 583
(50.5 - 59.5,
111 - 131)
603 - 691
(61.5 - 70.5,
135.6 - 155.4)
Applied pushing
force
98 N (10 Kg, 22 lb)
—
Portion
Belt tightening method for adjustment
Power steering oil pump belt
Adjusting bolt on power steering oil pump
Alternator and A/C compressor belt
Adjusting nut on idler pulley