Nissan Murano Z50 (2005 year). Manual - part 43


  Index      Manuals     Nissan Murano Z50 (2005 year) - Service and Repair Manual


Search            copyright infringement  


Content      ..     41      42      43      44     ..


Nissan Murano Z50 (2005 year). Manual - part 43


INTEGRATED HOMELINK TRANSMITTER

BL-257

C

D

E

F

G

H

J

K

L

M

A

B

BL

Revision: 2005 August

2005 Murano

INTEGRATED HOMELINK TRANSMITTER

PFP:96401

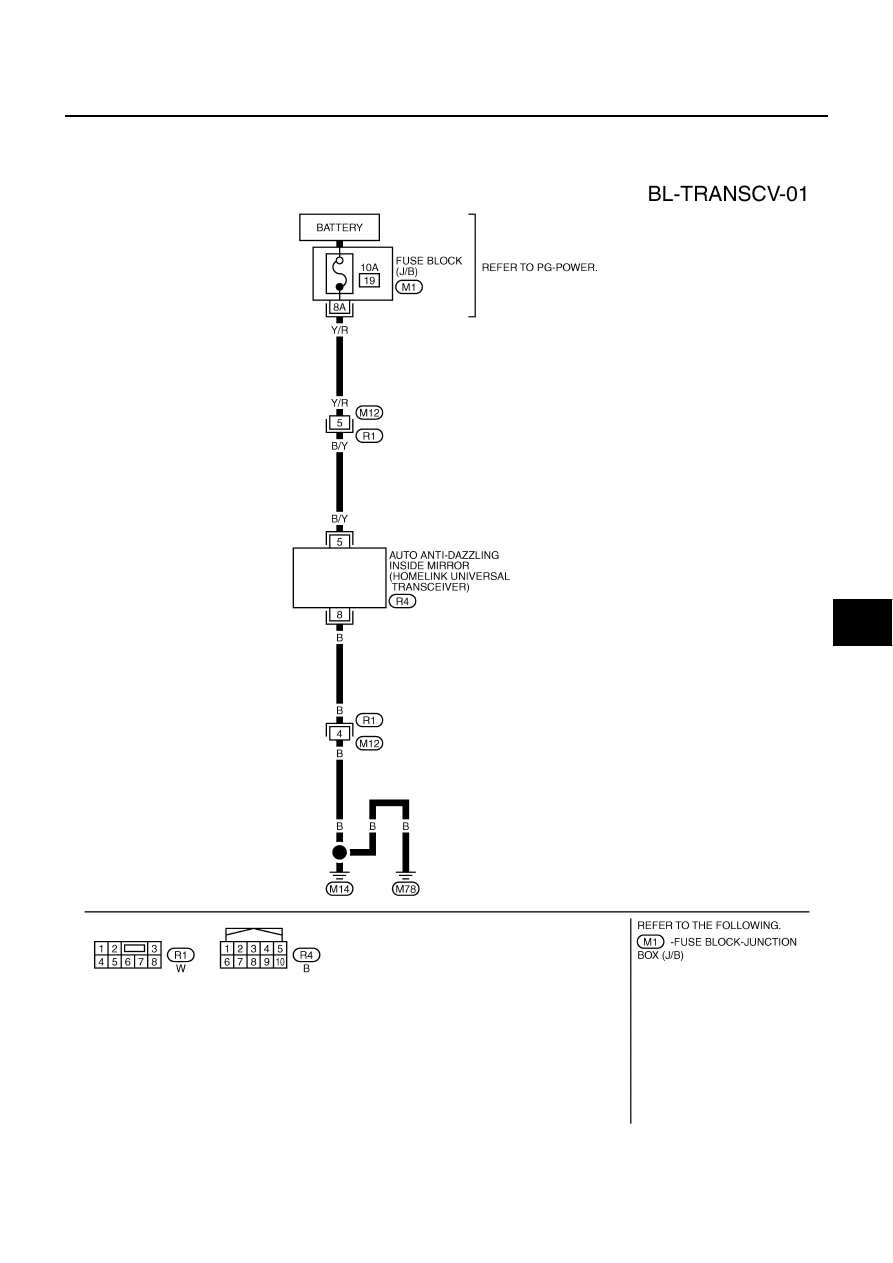
Wiring Diagram —TRNSCV—

AIS002WQ

TIWA0443E

BL-258

INTEGRATED HOMELINK TRANSMITTER

Revision: 2005 August

2005 Murano

Trouble Diagnoses

AIS002WR

DIAGNOSTIC PROCEDURE
SYMPTOM: Transmitter Does Not Activate Receiver

Before conducting the procedure given below, make sure that system receiver (garage door opener, etc.)
operates with original, hand-held transmitter. If NG, receiver or hand-held transmitter is malfunctioning, not
vehicle related.

1. 

CHECK ILLUMINATION

1.

Turn ignition switch “OFF”.

2.

Does red light (LED) of transmitter illuminate when any transmit-
ter button is pressed?

YES or NO

YES

>> GO TO 2.

NO

>> GO TO 3.

2. 

CHECK TRANSMITTER

Check auto anti-dazzling inside mirror (homelink universal transceiver) with Tool*.
*:For details, refer to Technical Service Bulletin.

OK or NG

OK

>> Receiver or hand-held transmitter malfunction, not vehicle related.

NG

>> Replace inside mirror assembly.

3. 

CHECK POWER SUPPLY

1.

Disconnect auto anti-dazzling inside mirror (homelink universal transceiver) connector.

2.

Turn ignition switch “OFF”.

3.

Check voltage between auto anti-dazzling inside mirror (homelink universal transceiver) connector R4 ter-
minal 5 (Y) and ground.

OK or NG

OK

>> GO TO 4.

NG

>>

Check 10A fuse. [No. 19 located in the fuse block (J/
B)]

Repair or replace harness between fuse and anti-daz-
zling inside mirror (homelink universal transceiver).

PIIA4815E

5 (Y) – Ground

: Battery voltage

PIIA2370E

INTEGRATED HOMELINK TRANSMITTER

BL-259

C

D

E

F

G

H

J

K

L

M

A

B

BL

Revision: 2005 August

2005 Murano

4. 

CHECK GROUND CIRCUIT

Check continuity between anti-dazzling inside mirror (homelink uni-
versal transceiver) connector R4 terminal 8 (B) and ground.

OK or NG

OK

>> Replace inside mirror assembly.

NG

>> Harness for open or short between anti-dazzling inside

mirror (homelink universal transceiver) ground.

8 (B) – Ground

:Continuity should exist.

PIIA2368E

BL-260

BODY REPAIR

Revision: 2005 August

2005 Murano

BODY REPAIR

PFP:60100

Body Exterior Paint Color

AIS001XT

2S:Solid + Clear,

M:Metallic, P:Pearl, 2P:2-Coat pearl, 3P:3-Coat pearl, FPM:Iron oxide pearl, RPM:Multi flex color

Component

Color code

BAX5

BBW9

BEY0

BK21

BKH3

BKY0

BQX1

BR10

Description

RED

Dark

Blue

Light
Gold

Gray

Black

Silver

White

Orange

Paint type

2P

2P

RPM

FPM

2S

M

3P

M

Hard clear coat

×

×

-

-

×

-

-

-

1 Bumper fas-

cia

Upper

Body color

BAX5

BBW9

BEY0

BK21

BKH3

BKY0

BQX1

BR10

Lower

Gray Metallic (M)

BKR2

BKR2

BKR2

BKR2

BKR2

BKR2

BKR2

BKR2

2 Front grille

Chromium-plate +
Color clear coat

Cr2p

Cr2p

Cr2p

Cr2p

Cr2p

Cr2p

Cr2p

Cr2p

3 Door outside

mirror

Housing

Body color

BAX5

BBW9

BEY0

BK21

BKH3

BKY0

BQX1

BR10

Base

Black

BKH3

BKH3

BKH3

BKH3

BKH3

BKH3

BKH3

BKH3

4 Door outside

handle

Chromium-plate

Cr2p

Cr2p

Cr2p

Cr2p

Cr2p

Cr2p

Cr2p

Cr2p

Body color

BAX5

BBW9

BEY0

BK21

BKH3

BKY0

BQX1

BR10

5 Back door

Body color

BAX5

BBW9

BEY0

BK21

BKH3

BKY0

BQX1

BR10

SIIA2069E

BODY REPAIR

BL-261

C

D

E

F

G

H

J

K

L

M

A

B

BL

Revision: 2005 August

2005 Murano

Body Component Parts

AIS001XU

UNDERBODY COMPONENT PARTS

SIIA2388E

BL-262

BODY REPAIR

Revision: 2005 August

2005 Murano

1.

Hoodledge assembly

23. Rear floor side

2.

Upper hoodledge

24. Spare tire clamp bracket

3.

Lower front hoodledge

25. Front side member assembly

4.

Hoodledge reinforcement

26. Front side member

5.

Air box assembly

27. Front side member connector

6.

Side cowl top

28. Bumper stay reinforcement assembly

7.

Lower dash

29. Front suspension mounting bracket

8.

Side dash

30. Front side member outrigger assembly

9.

Front floor

31. Lower dash crossmember

10. Center front floor reinforcement

32. Front side member closing plate assembly

11. Front floor reinforcement (RH&LH)

33. Front side member front closing plate

12. Front side member stiffener

34. Front side member center extension

13. Center floor member assembly

35. Front side member rear extension

14. Inner sill

36. Rear seat crossmember

15. 2ND crossmember assembly

37. Rear side member assembly

16. 3RD crossmember assembly

38. Inner sill extension

17. Rear floor

39. Jack up point bracket

18. Rear floor rear

40. Sill closing plate

19. Rear floor front extension

41. Rear side member extension

20. Rear seat back support assembly

42. Center rear crossmember assembly

21. Outer rear seat belt anchor reinforcement

43. Spare wheel crossmember

22. 2ND seat mounting bracket

BODY REPAIR

BL-263

C

D

E

F

G

H

J

K

L

M

A

B

BL

Revision: 2005 August

2005 Murano

BODY COMPONENT PARTS

1.

Hood

24. Rear roof rail assembly

2.

Front fender (RH&LH)

25. Roof bow No.1

SIIA2389E

BL-264

BODY REPAIR

Revision: 2005 August

2005 Murano

3.

Side body assembly (RH&LH)

26. Roof bow No.3

4.

Upper pillar hinge brace assembly (RH&LH)

27. Roof bow No.4

5.

Lower front pillar hinge brace (RH&LH)

28. Roof bow No.5

6.

Lower front pillar reinforcement (RH&LH)

29. Rear fender assembly (RH&LH)

7.

Center pillar reinforcement (RH&LH)

30. Rear fender extension (RH&LH)

8.

Outer sill reinforcement assembly (RH&LH)

31. Back pillar assembly (RH&LH)

9.

Rear outer sill reinforcement (RH&LH)

32. Rear combination lamp base assembly (RH&LH)

10. Outer sill (RH&LH)

33. Rear bumper fascia rear bracket (RH&LH)

11. Inner side roof rail (RH&LH)

34. Rear combination lamp base extension (RH&LH)

12. Inner center pillar (RH&LH)

35. Fuel filler lid (LH)

13. Inner rear pillar assembly (RH&LH)

36. Rear panel assembly

14. Inner rear pillar reinforcement (RH&LH)

37. Rear bumper fascia bracket

15. Back pillar reinforcement (RH&LH)

38. Front door assembly (RH&LH)

16. Outer rear wheelhouse (RH&LH)

39. Outer front door panel (RH&LH)

17. Inner rear wheelhouse assembly (RH&LH)

40. Rear door assembly (RH&LH)

18. Inner rear wheelhouse front extension (RH&LH)

41. Outer rear door panel (RH&LH)

19. Inner rear wheelhouse rear extension (RH&LH)

42. Front bumper reinforcement

20. Roof

43. Front bumper stay (RH&LH)

21. Roof assembly (for sunroof)

44. Rear bumper reinforcement

22. Front roof rail assembly

45. Rear bumper stay (RH&LH)

23. Roof bow No.2

BODY REPAIR

BL-265

C

D

E

F

G

H

J

K

L

M

A

B

BL

Revision: 2005 August

2005 Murano

Corrosion Protection

AIS001XV

DESCRIPTION

To provide improved corrosion prevention, the following anti-corrosive measures have been implemented in
NISSAN production plants. When repairing or replacing body panels, it is necessary to use the same anti-cor-
rosive measures.

Anti-corrosive Precoated Steel (Galvannealed Steel)

To improve repairability and corrosion resistance, a new type of anti-
corrosive precoated steel sheet has been adopted replacing conven-
tional zinc-coated steel sheet.
Galvannealed steel is electroplated and heated to form Zinc-iron
alloy, which provides excellent and long term corrosion resistance
with cationic electrodeposition primer.

Nissan Genuine Service Parts are fabricated from galvannealed steel. Therefore, it is recommended that
GENUINE NISSAN PARTS or equivalent be used for panel replacement to maintain the anti-corrosive perfor-
mance built into the vehicle at the factory.

Phosphate Coating Treatment and Cationic Electrodeposition Primer

A phosphate coating treatment and a cationic electrodeposition primer, which provide excellent corrosion pro-
tection, are employed on all body components.

CAUTION:

Confine paint removal during welding operations to an absolute
minimum.

Nissan Genuine Service Parts are also treated in the same manner. Therefore, it is recommended that GENU-
INE NISSAN PARTS or equivalent be used for panel replacement to maintain anti-corrosive performance built
into the vehicle at the factory.

SIIA2294E

PIIA0095E

BL-266

BODY REPAIR

Revision: 2005 August

2005 Murano

ANTI-CORROSIVE WAX

To improve corrosion resistance, anti-corrosive wax is applied inside the body sill and inside other closed sec-
tions. Accordingly, when replacing these parts, be sure to apply anti-corrosive wax to the appropriate areas of
the new parts. Select an excellent anti-corrosive wax which will penetrate after application and has a long shelf
life.

SIIA2160E

BODY REPAIR

BL-267

C

D

E

F

G

H

J

K

L

M

A

B

BL

Revision: 2005 August

2005 Murano

UNDERCOATING

The underside of the floor and wheelhouse are undercoated to prevent rust, vibration, noise and stone chip-
ping. Therefore, when such a panel is replaced or repaired, apply undercoating to that part. Use an undercoat-
ing which is rust preventive, soundproof, vibration-proof, shock-resistant, adhesive, and durable.

Precautions in Undercoating

1.

Do not apply undercoating to any place unless specified (such as the areas above the muffler and three
way catalyst which are subjected to heat).

2.

Do not undercoat the exhaust pipe or other parts which become hot.

3.

Do not undercoat rotating parts.

4.

Apply bitumen wax after applying undercoating.

5.

After putting seal on the vehicle, put undercoating on it.

SIIA2161E

BL-268

BODY REPAIR

Revision: 2005 August

2005 Murano

STONE GUARD COAT

To prevent damage caused by stones, the lower outer body panel (fender, door, etc.) have an additional layer
of Stone Guard Coating over the ED primer coating. When replacing or repairing these panels, apply Stone
Guard coating to the same portions as before. Use a coating which is rust preventive, durable, shock-resistant
and has a long shelf life.

SIIA2162E

BODY REPAIR

BL-269

C

D

E

F

G

H

J

K

L

M

A

B

BL

Revision: 2005 August

2005 Murano

Body Sealing

AIS001XW

DESCRIPTION

The following figure shows the areas which are sealed at the factory. Sealant which has been applied to these
areas should be smooth and free from cuts or gaps. Care should be taken not to apply an excess amount of
sealant and not to allow other unaffected parts to come into contact with the sealant.

SIIA2163E

BL-270

BODY REPAIR

Revision: 2005 August

2005 Murano

SIIA2164E

BODY REPAIR

BL-271

C

D

E

F

G

H

J

K

L

M

A

B

BL

Revision: 2005 August

2005 Murano

SIIA2165E

BL-272

BODY REPAIR

Revision: 2005 August

2005 Murano

Body Construction

AIS001XX

BODY CONSTRUCTION

SIIA2166E


Content      ..     41      42      43      44     ..