Nissan Murano Z51 (2008 year). Manual - part 260
RECOMMENDED FLUIDS AND LUBRICANTS
MA-15
< ON-VEHICLE MAINTENANCE >
C
D
E
F
G
H
I
J
K
L
M
B
MA
N
O
A
RECOMMENDED FLUIDS AND LUBRICANTS
FOR NORTH AMERICA
FOR NORTH AMERICA : Fluids and Lubricants
INFOID:0000000003464970
*1: For further details, see “Engine Oil Recommendation”.
*2: Using transmission fluid other than Genuine NISSAN CVT Fluid NS-2 will damage the CVT, which is not covered by the NIS-
SAN new vehicle limited warranty.
*3: For hot climates, viscosity SAE 90 is suitable for ambient temperatures above 0
°
C (32
°
F).
*4: DEXRON
TM
VI type ATF or Canada NISSAN Automatic Transmission Fluid may also be used.
*5: Available in mainland U.S.A. through a NISSAN dealer.
FOR NORTH AMERICA : Engine Oil Recommendation
INFOID:0000000003464971
NISSAN recommends the use of an energy conserving oil in order to improve fuel economy.
Select only engine oils that meet the American Petroleum Institute (API) certification and International Lubri-
cant Standardization and Approval Committee (ILSAC) certification and SAE viscosity standard. These oils
have the API certification mark on the front of the container. Oils which do not have the specified quality label
should not be used as they could cause engine damage.
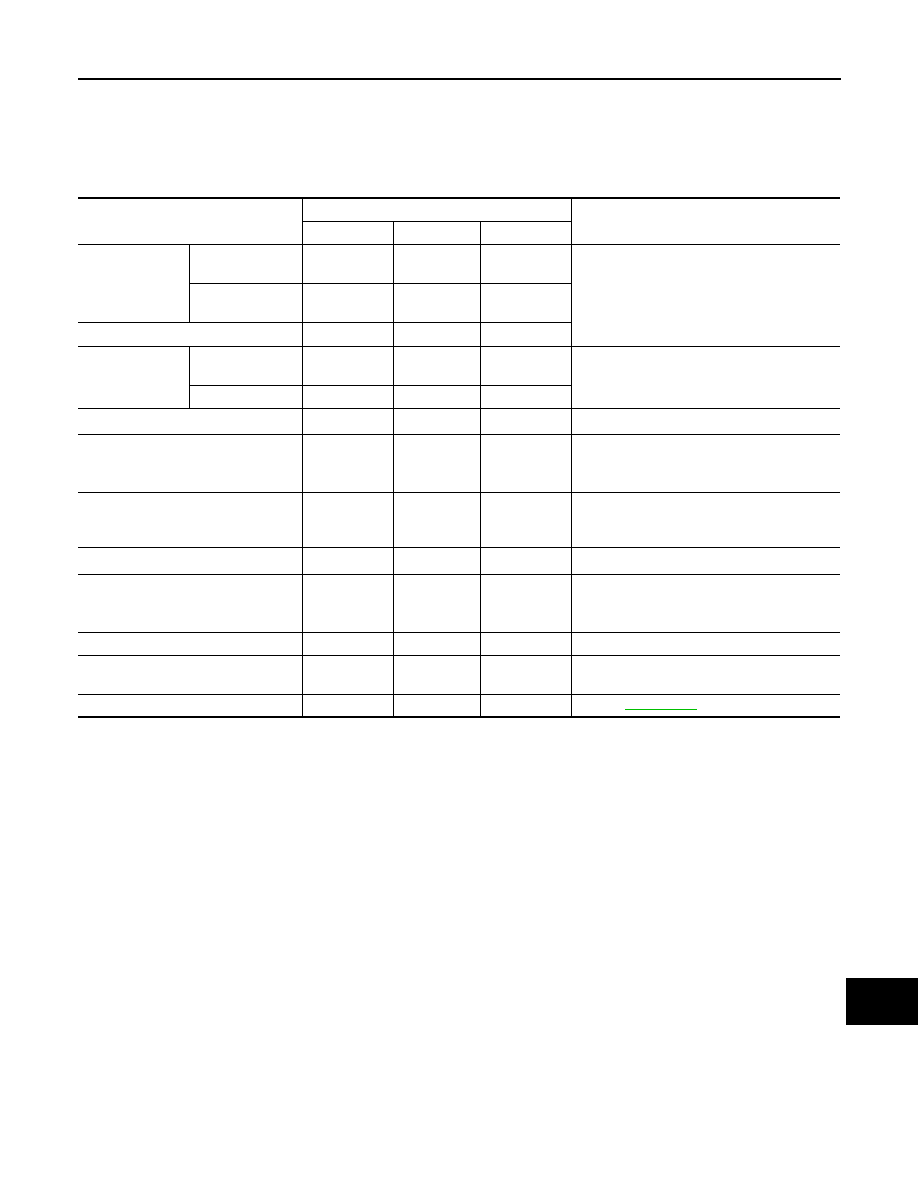
Capacity (Approximate)
Recommended Fluids/Lubricants
US measure
Imp measure
Liter
Engine oil
Drain and refill
With oil filter
change
4-7/8 qt
4 qt
4.6
Engine oil with API Certification Mark*
1
Viscosity SAE 5W-30
Without oil filter
change
4-1/2 qt
3-3/4 qt
4.3
Dry engine (Overhaul)
5-5/8 qt
4-5/8 qt
5.3
Cooling system
With reservoir
tank
9-7/8 qt
8-1/4 qt
9.4
Genuine NISSAN Long Life Antifreeze/Cool-
ant or equivalent
Reservoir tank
7/8 qt
3/4 qt
0.8
CVT fluid
10-6/8 qt
9 qt
10.2
Genuine NISSAN CVT Fluid NS-2*
2
Differential gear oil
1-1/8 pt
1 pt
0.55
Genuine NISSAN Differential Oil Hypoid Su-
per GL-5 80W-90 or API GL-5, Viscosity SAE
80W-90*
3
Transfer oil
5/8 pt
1/2 pt
0.31
Genuine NISSAN Differential Oil Hypoid Su-
per GL-5 80W-90 or API GL-5, Viscosity SAE
80W-90
Power steering fluid (PSF)
1-1/8 qt
7/8 qt
1.0
Genuine NISSAN PSF or equivalent*
4
Brake fluid
—
—
—
Genuine NISSAN Super Heavy Duty Brake
Fluid*
5
or equivalent DOT 3 (US FMVSS No.
116)
Multi-purpose grease
—
—
—
NLGI No. 2 (Lithium soap base)
Windshield washer fluid
—
—
—
Genuine NISSAN Windshield Washer Con-
centrate Cleaner & Antifreeze or equivalent
Fuel recommendation
—
—
—
Refer to
Revision: 2008 October
2009 Murano