Nissan Murano Z51 (2008 year). Manual - part 62
 

  Index      Manuals     Nissan Murano Z51 (2008 year) - Service and Repair Manual


Search            copyright infringement  


Content      ..     60      61      62      63     ..


Nissan Murano Z51 (2008 year). Manual - part 62


AV

FRONT DISPLAY UNIT

AV-765

< ON-VEHICLE REPAIR >

[BOSE AUDIO WITH NAVIGATION]

C

D

E

F

G

H

I

J

K

L

M

B

A

O

P

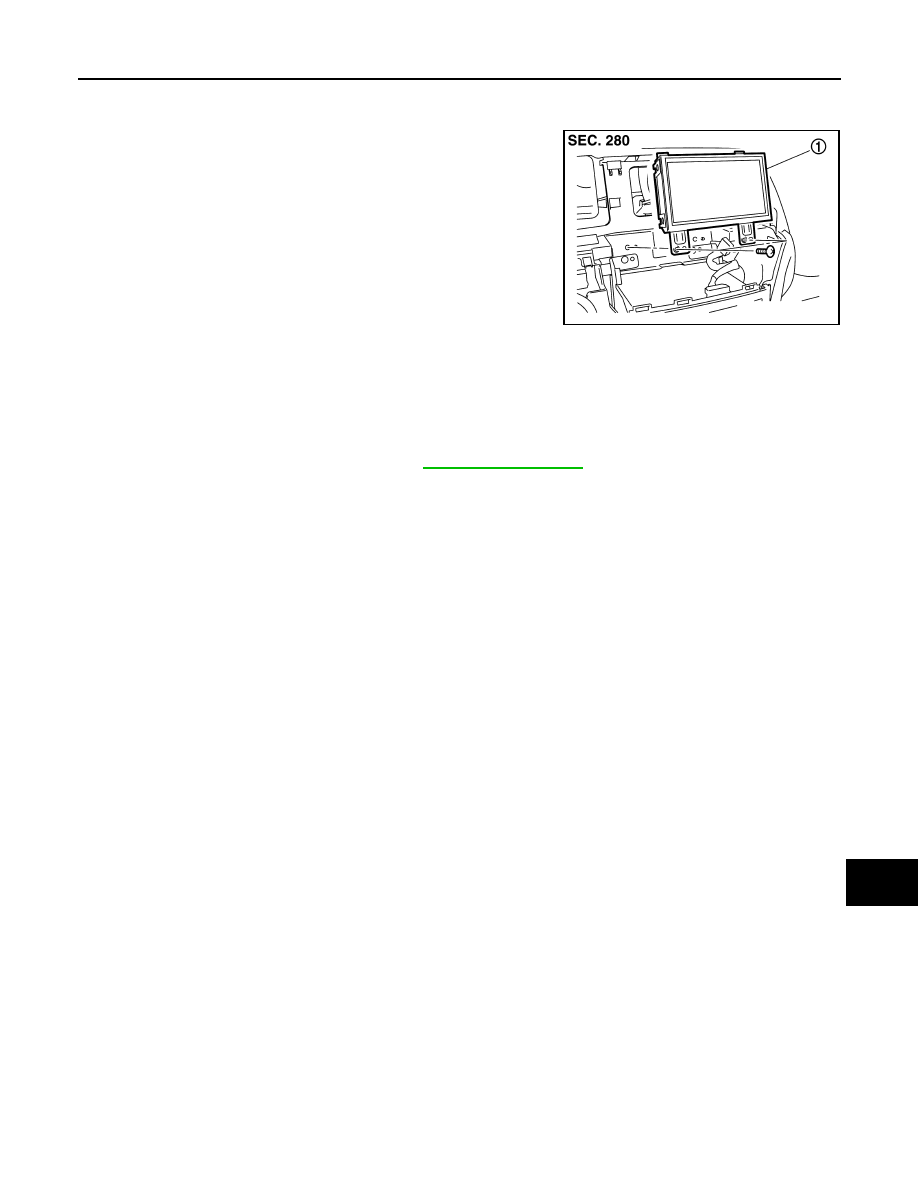
FRONT DISPLAY UNIT

Exploded View

INFOID:0000000003356696

Removal and Installation

INFOID:0000000003356697

REMOVAL

1.

Remove center ventilator assembly. Refer to 

IP-11, "Exploded View"

.

2.

Remove display unit with bracket as a single unit.

INSTALLATION

Install in the reverse order of removal.

JPNIA0779ZZ

1.

Front display unit

Revision: 2008 October

2009 Murano

AV-766

< ON-VEHICLE REPAIR >

[BOSE AUDIO WITH NAVIGATION]

FRONT DOOR SPEAKER

FRONT DOOR SPEAKER

Exploded View

INFOID:0000000003356698

Removal and Installation

INFOID:0000000003356699

REMOVAL

1.

Remove front door finisher. Refer to 

INT-11, "FRONT DOOR FINISHER : Exploded View"

.

2.

Remove front door speaker screws, then disconnect front door speaker connector and remove front door
speaker.

INSTALLATION

Install in the reverse order of removal.

JPNIA0773ZZ

1.

Front door speaker

Revision: 2008 October

2009 Murano

AV

REAR DOOR SPEAKER

AV-767

< ON-VEHICLE REPAIR >

[BOSE AUDIO WITH NAVIGATION]

C

D

E

F

G

H

I

J

K

L

M

B

A

O

P

REAR DOOR SPEAKER

Exploded View

INFOID:0000000003356702

Removal and Installation

INFOID:0000000003356703

REMOVAL

1.

Remove rear door finisher. Refer to 

INT-15, "REAR DOOR FINISHER : Exploded View"

.

2.

Remove rear door speaker screws, then disconnect rear door speaker connector and remove rear door
speaker.

INSTALLATION

Install in the reverse order of removal.

JPNIA0774ZZ

1.

Rear door speaker

Revision: 2008 October

2009 Murano

AV-768

< ON-VEHICLE REPAIR >

[BOSE AUDIO WITH NAVIGATION]

FRONT SQUAWKER

FRONT SQUAWKER

Exploded View

INFOID:0000000003356704

Removal and Installation

INFOID:0000000003356705

REMOVAL

1.

Remove speaker grille. Refer to 

IP-11, "Exploded View"

.

2.

Remove front squawker screws, lift up the front squawker and disconnect front squawker connector. Then
remove the front squawker.

INSTALLATION

Install in the reverse order of removal.

JPNIA0775ZZ

1.

Front squawker

Revision: 2008 October

2009 Murano

AV

REAR SPEAKER

AV-769

< ON-VEHICLE REPAIR >

[BOSE AUDIO WITH NAVIGATION]

C

D

E

F

G

H

I

J

K

L

M

B

A

O

P

REAR SPEAKER

Exploded View

INFOID:0000000003470919

Removal and Installation

INFOID:0000000003470920

REMOVAL

1.

Remove luggage side finisher upper. Refer to 

INT-33, "Exploded View"

.

2.

Remove rear speaker screws, lift up the rear speaker and disconnect rear speaker connector. Then
remove the rear speaker.

INSTALLATION

Install in the reverse order of removal.

JPNIA0781ZZ

1.

Rear speaker

2.

Rear speaker bracket

Revision: 2008 October

2009 Murano

AV-770

< ON-VEHICLE REPAIR >

[BOSE AUDIO WITH NAVIGATION]

CENTER SPEAKER

CENTER SPEAKER

Exploded View

INFOID:0000000003356706

Removal and Installation

INFOID:0000000003356707

REMOVAL

1.

Remove center speaker grille. Refer to 

IP-11, "Exploded View"

.

2.

Remove center speaker screws, lift up the center speaker and disconnect center speaker connector. Then
remove the center speaker.

INSTALLATION

Install in the reverse order of removal.

JPNIA0780ZZ

1.

Center speaker

Revision: 2008 October

2009 Murano

AV

WOOFER

AV-771

< ON-VEHICLE REPAIR >

[BOSE AUDIO WITH NAVIGATION]

C

D

E

F

G

H

I

J

K

L

M

B

A

O

P

WOOFER

Exploded View

INFOID:0000000003356708

Removal and Installation

INFOID:0000000003356709

REMOVAL

1.

Remove luggage floor finisher center (back). Refer to 

INT-33, "Exploded View"

.

2.

Remove clamp, disconnect woofer connector and remove the woofer.

INSTALLATION

Install in the reverse order of removal.

JPNIA0782ZZ

:

Vehicle front

1.

Clamp

2.

Woofer

Revision: 2008 October

2009 Murano

AV-772

< ON-VEHICLE REPAIR >

[BOSE AUDIO WITH NAVIGATION]

BOSE AMP.

BOSE AMP.

Exploded View

INFOID:0000000003356710

Removal and Installation

INFOID:0000000003356711

REMOVAL

1.

Remove luggage floor finisher. Refer to 

INT-33, "Exploded View"

.

2.

Remove BOSE amp. screws, disconnect BOSE amp. connector and remove the BOSE amp.

INSTALLATION

Install in the reverse order of removal.

JPNIA0783ZZ

:

Vehicle front

1.

BOSE amp.

Revision: 2008 October

2009 Murano

AV

MULTIFUNCTION SWITCH

AV-773

< ON-VEHICLE REPAIR >

[BOSE AUDIO WITH NAVIGATION]

C

D

E

F

G

H

I

J

K

L

M

B

A

O

P

MULTIFUNCTION SWITCH

Exploded View

INFOID:0000000003356718

REMOVAL

Refer to 

IP-11, "Exploded View"

.

DISASSEMBLY

Removal and Installation

INFOID:0000000003356719

REMOVAL

1.

Remove cluster lid D. Refer to 

IP-11, "Exploded View"

.

2.

Remove multifunction switch with center ventilator grille as a single unit.

3.

Remove multifunction switch screws, remove multifunction switch from cluster lid D.

INSTALLATION

Install in the reverse order of removal.

JPNIA0800ZZ

1.

Multifunction switch

2.

Cluster lid D

Revision: 2008 October

2009 Murano

AV-774

< ON-VEHICLE REPAIR >

[BOSE AUDIO WITH NAVIGATION]

PRESET SWITCH

PRESET SWITCH

Exploded View

INFOID:0000000003356720

REMOVAL

Refer to 

IP-11, "Exploded View"

.

DISASSEMBLY

Removal and Installation

INFOID:0000000003356721

REMOVAL

1.

Remove cluster lid C. Refer to 

IP-11, "Exploded View"

.

2.

Remove preset switch screws (A) (B), remove preset switch (1)
from cluster lid C.

INSTALLATION

Install in the reverse order of removal.

1.

Preset switch

2.

Cluster lid C

JPNIA0801ZZ

1.

Preset switch

A.

Screw

B.

Screw

JPNIA0802ZZ

Revision: 2008 October

2009 Murano

AV

STEERING SWITCH

AV-775

< ON-VEHICLE REPAIR >

[BOSE AUDIO WITH NAVIGATION]

C

D

E

F

G

H

I

J

K

L

M

B

A

O

P

STEERING SWITCH

Exploded View

INFOID:0000000003356722

Refer to 

ST-15, "Exploded View"

.

Removal and Installation

INFOID:0000000003356723

REMOVAL

Refer to 

ST-15, "Removal and Installation"

.

INSTALLATION

Install in the reverse order of removal.

Revision: 2008 October

2009 Murano

AV-776

< ON-VEHICLE REPAIR >

[BOSE AUDIO WITH NAVIGATION]

IPOD ADAPTER

IPOD ADAPTER

Exploded View

INFOID:0000000003356724

Removal and Installation

INFOID:0000000003356725

REMOVAL

1.

Remove front console pocket assembly. Refer to 

IP-19, "Exploded View"

.

2.

Disconnect iPod adapter connector, remove iPod adapter screws and remove the iPod adapter.

INSTALLATION

Install in the reverse order of removal.

JPNIA0788ZZ

1.

iPod adapter

Revision: 2008 October

2009 Murano

AV

IPOD CONNECTOR

AV-777

< ON-VEHICLE REPAIR >

[BOSE AUDIO WITH NAVIGATION]

C

D

E

F

G

H

I

J

K

L

M

B

A

O

P

IPOD CONNECTOR

Exploded View

INFOID:0000000003356726

REMOVAL

Refer to 

IP-19, "Exploded View"

.

DISASSEMBLY

Removal and Installation

INFOID:0000000003356727

REMOVAL

1.

Remove center console. Refer to 

IP-19, "Exploded View"

.

2.

Press the pawl from the back of center console to remove iPod connector.

INSTALLATION

Install in the reverse order of removal.

JPNIA0787ZZ

1.

iPod connector

Revision: 2008 October

2009 Murano

AV-778

< ON-VEHICLE REPAIR >

[BOSE AUDIO WITH NAVIGATION]

AUXILIARY INPUT JACKS

AUXILIARY INPUT JACKS

Exploded View

INFOID:0000000003356728

REMOVAL

Refer to 

IP-19, "Exploded View"

.

DISASSEMBLY

Removal and Installation

INFOID:0000000003356729

REMOVAL

1.

Remove console rear finisher. Refer to 

IP-19, "Exploded View"

.

2.

Remove auxiliary input jacks from center console.

INSTALLATION

Install in the reverse order of removal.

JPNIA0795ZZ

1.

Auxiliary input jacks

Revision: 2008 October

2009 Murano

AV

MICROPHONE

AV-779

< ON-VEHICLE REPAIR >

[BOSE AUDIO WITH NAVIGATION]

C

D

E

F

G

H

I

J

K

L

M

B

A

O

P

MICROPHONE

Exploded View

INFOID:0000000003356730

REMOVAL

Refer to 

INL-115, "Exploded View"

.

DISASSEMBLY

Removal and Installation

INFOID:0000000003356731

REMOVAL

1.

Remove map lamp. Refer to 

INL-115, "Exploded View"

.

2.

Remove microphone from map lamp.

INSTALLATION

Install in the reverse order of removal.

JSNIA0132ZZ

1.

Microphone

Revision: 2008 October

2009 Murano

AV-780

< ON-VEHICLE REPAIR >

[BOSE AUDIO WITH NAVIGATION]

GPS ANTENNA

GPS ANTENNA

Exploded View

INFOID:0000000003356732

Harness Layout

INFOID:0000000003356733

JPNIA0803GB

Revision: 2008 October

2009 Murano


Content      ..     60      61      62      63     ..