Infiniti FX35, FX50 (S51). Manual - part 532


  Index      Infiniti     Infiniti FX35, FX50 (S51) - service repair manual 2010 year


Search            


Content   ..  530  531  532  533   ..


Infiniti FX35, FX50 (S51). Manual - part 532


FRONT DOOR

DLK-251

< REMOVAL AND INSTALLATION >

C

D

E

F

G

H

I

J

L

M

A

B

DLK

N

O

P

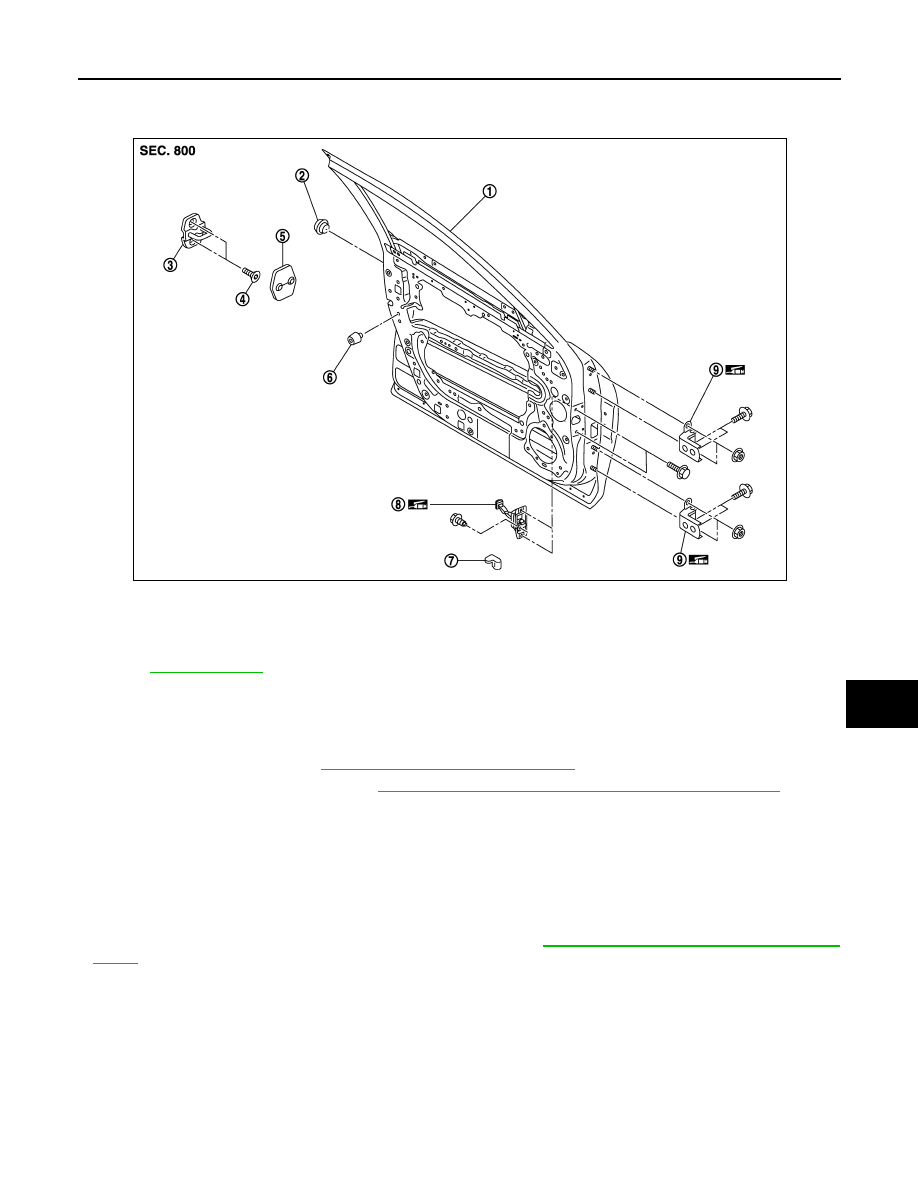
DOOR HINGE : Exploded View

INFOID:0000000005239734

DOOR HINGE : Removal and Installation

INFOID:0000000005239735

REMOVAL

1.

Remove front fender. Refer to 

DLK-245, "Removal and Installation"

.

2.

Remove front door assembly. Refer to 

DLK-248, "DOOR ASSEMBLY : Removal and Installation"

.

3.

Remove front door hinge mounting bolts, and then remove front door hinge.

INSTALLATION

Install in the reverse order of removal.

CAUTION:

• Apply anticorrosive agent onto the mounting surface.
• Check door hinge rotating part for poor lubrication. If necessary, apply body grease.
• After installation, check door open/close, lock/unlock operation.
• After installation, perform the fitting adjustment. Refer to 

DLK-249, "DOOR ASSEMBLY : Adjust-

ment"

.

• After installation, apply touch-up paint (the body color) onto the head of door hinge mounting bolts

and nuts.

DOOR CHECK LINK

1.

Front door panel

2.

Grommet

3.

Door striker

4.

TORX bolt

5.

Door striker cover

6.

Bumper rubber

7.

Door check link cover

8.

Door check link

9.

Door hinge (upper/lower)

Refer to 

GI-4, "Components"

 for symbols in the figure.

JMKIA2639ZZ

DLK-252

< REMOVAL AND INSTALLATION >

FRONT DOOR

DOOR CHECK LINK : Exploded View

INFOID:0000000005239736

DOOR CHECK LINK : Removal and Installation

INFOID:0000000005239737

REMOVAL

1.

Remove front door finisher. Refer to 

INT-11, "Removal and Installation"

.

2.

Fully close the front door window.

3.

Remove front door speaker. Refer to 

AV-139, "Removal and Installation"

 (without navigation) or 

AV-336,

"Removal and Installation"

 (single monitor navigation) or 

AV-567, "Removal and Installation"

 (twin monitor

navigation).

4.

Remove door check link cover.

5.

Remove mounting bolts of door check link on the vehicle.

6.

Remove mounting bolts of door check link on door panel.

7.

Take door check link out from the hole of door panel.

INSTALLATION

Install in the reverse order of removal.

CAUTION:

After installation, check door open/close operation.

1.

Front door panel

2.

Grommet

3.

Door striker

4.

TORX bolt

5.

Door striker cover

6.

Bumper rubber

7.

Door check link cover

8.

Door check link

9.

Door hinge (upper/lower)

Refer to 

GI-4, "Components"

 for symbols in the figure.

JMKIA2639ZZ

REAR DOOR

DLK-253

< REMOVAL AND INSTALLATION >

C

D

E

F

G

H

I

J

L

M

A

B

DLK

N

O

P

REAR DOOR

DOOR ASSEMBLY

DOOR ASSEMBLY : Exploded View

INFOID:0000000005239738

REMOVAL

ADJUSTMENT

1.

Rear door panel

2.

Grommet

3.

Door striker

4.

TORX bolt

5.

Door striker cover

6.

Grommet

7.

Bumper rubber

8.

Door check link

9.

Door check link cover

10. Door hinge (lower)

11.

Door hinge (upper)

Refer to 

GI-4, "Components"

 for symbols in the figure.

JMKIA2641ZZ

DLK-254

< REMOVAL AND INSTALLATION >

REAR DOOR

DOOR ASSEMBLY : Removal and Installation

INFOID:0000000005239739

CAUTION:

• Operate with two workers, because of its heavy weight.
• Use protective tape or shop cloth to protect from damage during removal and installation.

REMOVAL

1.

Remove mounting bolts of door check link on the vehicle.

2.

Disconnect rear door harness connector.

3.

Remove door hinge mounting nuts (door side), and then remove rear door assembly.

INSTALLATION

Install in the reverse order of removal.

CAUTION:

• Apply anticorrosive agent onto the mounting surface.
• Check door hinge rotating part for poor lubrication. If necessary, apply body grease.
• After installation, check door open/close, lock/unlock operation.

1.

Front fender

2.

Front door 

3.

Rear door

4.

Body side outer

5.

Door striker

6.

TORX bolt

7.

Front door hinge (upper/lower)

8.

Rear door hinge (upper)

9.

Rear door hinge (lower)

Refer to 

GI-4, "Components"

 for symbols in the figure.

JMKIA2640GB


Content   ..  530  531  532  533   ..