Infiniti FX35, FX50 (S51). Manual - part 441


  Index      Infiniti     Infiniti FX35, FX50 (S51) - service repair manual 2010 year


Search            


Content   ..  439  440  441  442   ..


Infiniti FX35, FX50 (S51). Manual - part 441


ENGINE COOLANT

CO-9

< PERIODIC MAINTENANCE >

[VQ35HR]

C

D

E

F

G

H

I

J

K

L

M

A

CO

N

P

O

If contaminated, flush the engine cooling system. Refer to 

CO-10, "Flushing"

.

Refilling

INFOID:0000000005246356

1.

Remove engine cover. Refer to 

EM-27, "Exploded View"

.

2.

Install reservoir tank if removed, and radiator drain plug.

CAUTION:

Be sure to clean drain plug and install with new O-ring.

If water drain plugs on cylinder block are removed, close and tighten them. Refer to 

EM-118, "Dis-

assembly and Assembly"

.

3.

Check that each hose clamp is firmly tightened.

4.

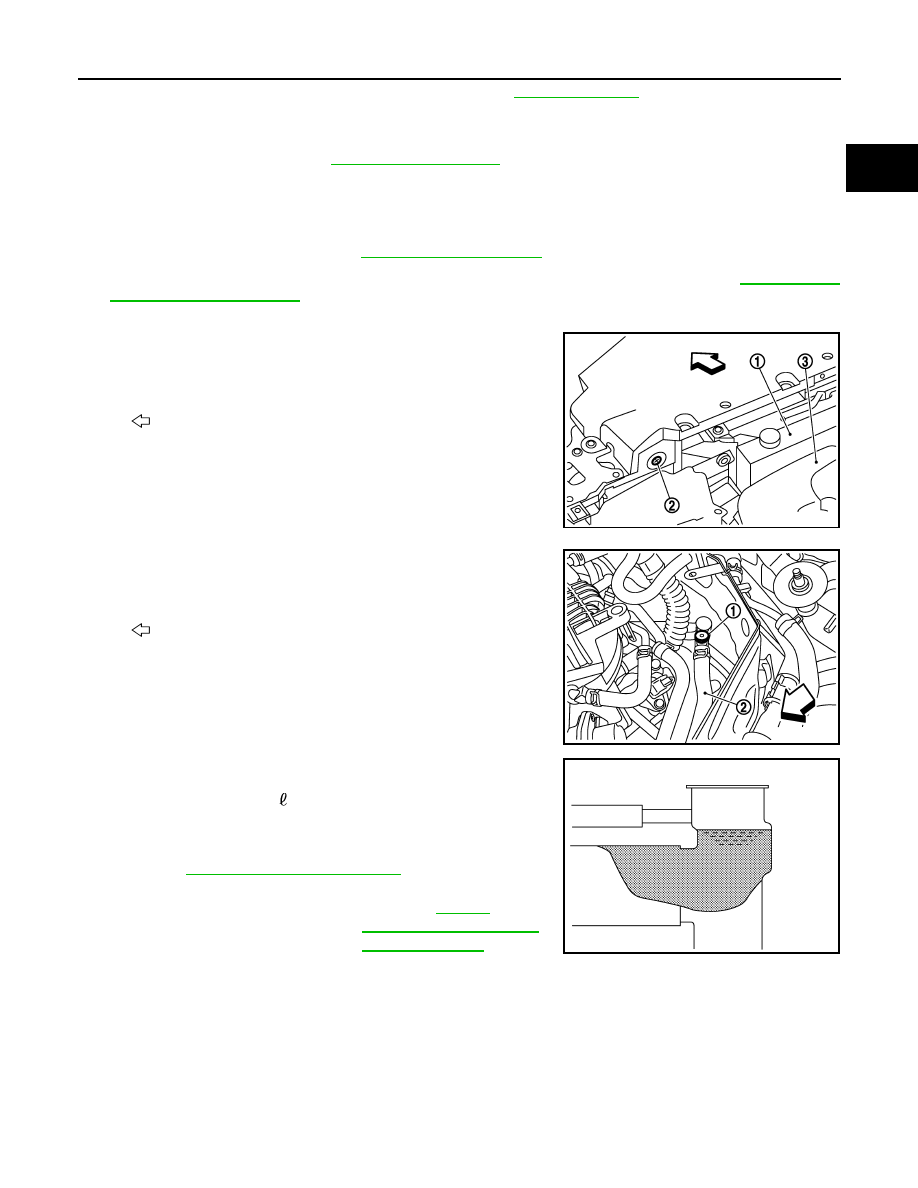
Remove air relief plug (2) on radiator left side. 

5.

Remove air relief plug (1) on heater hose. (models with air relief
plug on heater hose) 

6.

Fill radiator, and reservoir tank if removed, to specified level.
• Pour engine coolant through engine coolant filler neck

slowly of less than 2  (2-1/8 US qt, 1-3/4 lmp qt) a minute
to allow air in system to escape.

• Use Genuine NISSAN Long Life Antifreeze/Coolant or an

equivalent mixed with water (distilled or demineralized).
Refer to 

MA-12, "Fluids and Lubricants"

.

Tightening torque

: Refer to 

CO-14, "Exploded View"

.

1

: Reservoir tank

3

: Engine cover

: Vehicle front

JPBIA0260ZZ

2

: Heater hose

: Vehicle front

JPBIA0104ZZ

Engine coolant capacity

: Refer to 

CO-26, 

"Periodical Maintenanc
e Specification"

.

(With reservoir tank at 
“MAX” level)

JPBIA0412ZZ

CO-10

< PERIODIC MAINTENANCE >

[VQ35HR]

ENGINE COOLANT

7.

When engine coolant overflows air relief hole on radiator, install air relief plug with new O-ring.

8.

Repeat step 6.

9.

When engine coolant overflows air relief hole on heater hose, install air relief plug with new O-ring. Then
refill radiator with engine coolant. (models with air relief plug on heater hose)

10. Install radiator cap.
11. Warm up engine until opening thermostat. Standard for warming-up time is approximately 10 minutes at

3,000 rpm.
• Check thermostat opening condition by touching radiator hose (lower) to see a flow of warm water.

CAUTION:

Watch water temperature gauge so as not to overheat engine.

12. Stop the engine and cool down to less than approximately 50

°

C (122

°

F).

• Cool down using fan to reduce the time.
• If necessary, refill radiator up to filler neck with engine coolant.

13. Refill reservoir tank to “MAX” level line with engine coolant.

14. Repeat steps 10 through 13 two or more times with radiator cap installed until engine coolant level no

longer drops. 

15. Check cooling system for leakage with engine running.

16. Warm up the engine, and check for sound of engine coolant flow while running engine from idle up to

3,000 rpm with heater temperature controller set at several position between “COOL” and “WARM”.
• Sound may be heard from the heater unit.

17. Repeat step 16 three times.
18. If sound is heard, bleed air from cooling system by repeating step 6, and steps from 10 to 17 until engine

coolant level no longer drops. 

19. Check that the reservoir tank cap is tightened.

Flushing

INFOID:0000000005246357

1.

Install reservoir tank if removed, and radiator drain plug.

CAUTION:

Be sure to clean drain plug and install with new O-ring.

If water drain plugs on cylinder block are removed, close and tighten them. Refer to 

EM-118, "Dis-

assembly and Assembly"

.

Reservoir tank engine cool-
ant capacity

: Refer to 

CO-26, 

"Periodical Maintenanc
e Specification"

.

(At “MAX” level)

A

: MAX 

B

:  MIN

JPBIA0102ZZ

Tightening torque

: Refer to 

CO-14, "Exploded View"

.

: 1.2 N·m (0.12 kg-m, 11 in-lb)

Tightening torque

: Refer to 

CO-14, "Exploded View"

.

ENGINE COOLANT

CO-11

< PERIODIC MAINTENANCE >

[VQ35HR]

C

D

E

F

G

H

I

J

K

L

M

A

CO

N

P

O

2.

Remove air relief plug (1) on heater hose. (models with air relief
plug on heater hose) 

3.

Remove air relief plug (2) on radiator.

4.

Fill radiator with water until water spills from the air relief holes, then close air relief plugs. Fill radiator and
reservoir tank with water and reinstall radiator cap.

5.

Run the engine and warm it up to normal operating temperature.

6.

Rev the engine two or three times under no-load.

7.

Stop the engine and wait until it cools down.

8.

Drain water from the system. Refer to 

CO-8, "Draining"

.

9.

Repeat steps 1 through 8 until clear water begins to drain from radiator.

10. Check that the reservoir tank cap is tightened.

2

: Heater hose

: Vehicle front

JPBIA0104ZZ

1

: Reservoir tank

3

: Engine cover

: Vehicle front

JPBIA0260ZZ

Tightening torque

Refer to 

CO-14, "Exploded View"

.

CO-12

< PERIODIC MAINTENANCE >

[VQ35HR]

RADIATOR

RADIATOR

RADIATOR CAP

RADIATOR CAP : Inspection

INFOID:0000000005246358

• Check valve seat of radiator cap. 
- Check if valve seat (A) is swollen to the extent that the edge of the

metal plunger (B) cannot be seen when watching it vertically from
the top.

- Check if valve seat has no soil and damage.

• Pull negative-pressure valve to open it, and check that it close

completely when released.

- Check that there is no dirt or damage on the valve seat of radiator

cap negative-pressure valve. 

- Check that there are no unusualness in the opening and closing

conditions of negative-pressure valve.

• Check radiator cap relief pressure.
- When connecting radiator cap to the radiator cap tester (commer-

cial service tool) and the radiator cap tester adapter (commercial
service tool) (A), apply engine coolant to the cap seal surface. 

• Replace radiator cap if there is an unusualness related to the above three.

CAUTION:

When installing radiator cap, thoroughly wipe out the water outlet (front) filler neck to remove any
waxy residue or foreign material.

RADIATOR

RADIATOR : Inspection

INFOID:0000000005246359

Check radiator for mud or clogging. If necessary, clean radiator as per the following:
• Be careful not to bend or damage radiator fins.
• When radiator is cleaned without removal, remove all surrounding parts such as radiator cooling fan assem-

bly and horns. Then tape harness and connectors to prevent water from entering.

1.

Apply water by hose to the back side of the radiator core vertically downward.

2.

Apply water again to all radiator core surfaces once per minute.

JPBIA0108ZZ

SMA967B

Standard and limit

: Refer to 

CO-26, "Radiator"

.

JPBIA0109ZZ


Content   ..  439  440  441  442   ..