Mazda CX-9 Grand Touring. Manual - part 608


  Index      Mazda     Mazda CX-9 Grand Touring - service repair manual 2008 year


Search            


Content   ..  606  607  608  609   ..


Mazda CX-9 Grand Touring. Manual - part 608


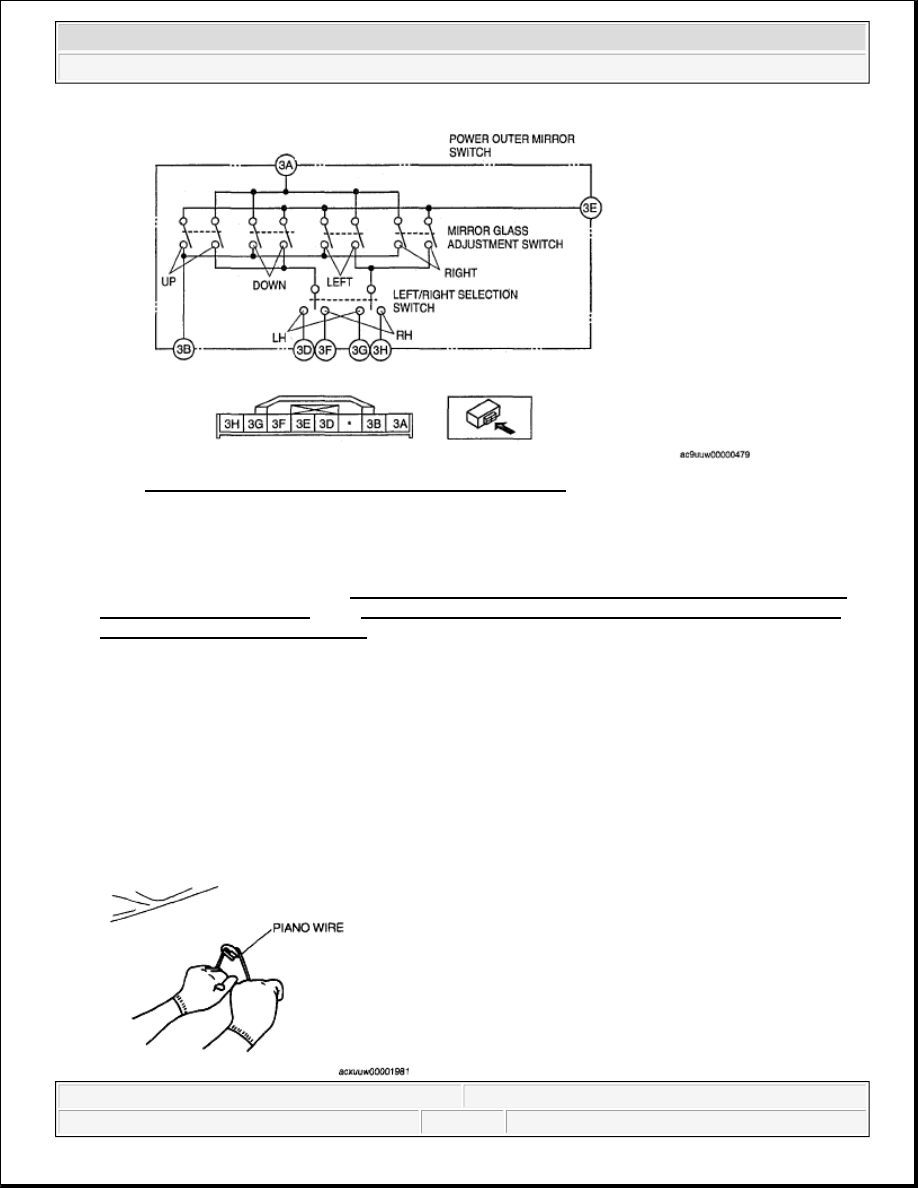
Fig. 75: Power Outer Mirror Switch - Circuit Diagram 
Courtesy of MAZDA MOTORS CORP. 

BASE REMOVAL 

1. Remove the rearview mirror. (See REARVIEW MIRROR REMOVAL [VEHICLES WITH AUTO 

LIGHT/WIPER SYSTEM].) (See REARVIEW MIRROR REMOVAL [VEHICLES WITHOUT 
AUTO LIGHT/WIPER SYSTEM]
.)  

2. Wind each end of a wire around a bar. 

3. Fix one end of the piano wire, and while pulling the other end, cut the sealant to remove the base. 

WARNING:

Using the piano wire with bare hands can cause injury. Always 
wear gloves when using the piano wire.  

NOTE:

Use a long sawing action to spread the work over the whole length of 
the piano wire to prevent it from breaking.  


2008 Mazda CX-9 Grand Touring 

2008 BODY & ACCESSORIES Glass/Windows/Mirrors - Mazda CX-9


Microsoft 


Sunday, November 15, 2009 10:36:17 AM

Page 50 

© 2005 Mitchell Repair Information Company, LLC. 

Fig. 76: Pulling Piano Wire 
Courtesy of MAZDA MOTORS CORP. 

BASE INSTALLATION 

1. Cut away all of the original sealant using a razor. 

2. Clean and degrees the ceramic coating on the glass and the base. 

3. Apply primer to the bonding area of the glass and the base.  

4. Use only glass primer on the glass, and body primer on the base. Allow the primer to dry for approx. 30 

min.  

5. Apply 3.0 mm {0.12 in} layer of sealant to the base. 

Fig. 77: Identifying Sealant Applying Area 
Courtesy of MAZDA MOTORS CORP. 

6. Center the base in the ceramic coating and press it onto the glass.  

7. Use is propyl alcohol to remove any excess repair sealant. 

Hardening time of sealant  

TEMPERATURE SPECIFICATION 

WARNING:

Using a razor with bare hands can cause injury. Always wear 
gloves when using a razor.  

CAUTION:

Keep the area free of dirt and grease, and do not touch the 
surface. Otherwise, the primer may not properly bond to the 
surface of the glass.  

Temperature Surface hardening time Time required until car can be put into service

5°C {41°F}

Approx. 1.5 h

Approx. 12h

20°C {68°F}

Approx. 1 h

Approx. 4 h


2008 Mazda CX-9 Grand Touring 

2008 BODY & ACCESSORIES Glass/Windows/Mirrors - Mazda CX-9


Microsoft 


Sunday, November 15, 2009 10:36:17 AM

Page 51 

© 2005 Mitchell Repair Information Company, LLC. 

8. Install the rearview mirror. 

Fig. 78: Identifying Ceramic Coating On Glass 
Courtesy of MAZDA MOTORS CORP. 

REARVIEW MIRROR REMOVAL [VEHICLES WITH AUTO LIGHT/WIPER 
SYSTEM] 

1. Insert a tape-wrapped flathead screwdriver into the notch and pry with the screwdriver in the direction 

shown by the arrow to remove the covers. 

Fig. 79: View Of Mirror Cover Notch 
Courtesy of MAZDA MOTORS CORP. 

2. Remove the covers.  

3. Remove the rain sensor.(See RAIN SENSOR REMOVAL/INSTALLATION .) 

35°C {95°F}

Approx. 10 min

Approx. 2 h


2008 Mazda CX-9 Grand Touring 

2008 BODY & ACCESSORIES Glass/Windows/Mirrors - Mazda CX-9


Microsoft 


Sunday, November 15, 2009 10:36:17 AM

Page 52 

© 2005 Mitchell Repair Information Company, LLC. 

Fig. 80: Identifying Rearview Mirror And Rearview Mirror Cover 
Courtesy of MAZDA MOTORS CORP. 

4. Make a tool as shown in the figure using wire. 

5. Insert the tool to the position shown in the figure and push the center part of the spring. 

CAUTION:

Using the tool with bare hands can cause injury. Always wear 
gloves when using the tool.  

To prevent damage to the lens sensor, do not use a screwdriver.

Fig. 81: Identifying Rearview Mirror Removal Tool 
Courtesy of MAZDA MOTORS CORP. 

CAUTION:

Perform the procedure while being careful not to damage the 
lens sensor. 


2008 Mazda CX-9 Grand Touring 

2008 BODY & ACCESSORIES Glass/Windows/Mirrors - Mazda CX-9


Microsoft 


Sunday, November 15, 2009 10:36:17 AM

Page 53 

© 2005 Mitchell Repair Information Company, LLC. 


Content   ..  606  607  608  609   ..