Mazda CX-9 Grand Touring. Manual - part 581


  Index      Mazda     Mazda CX-9 Grand Touring - service repair manual 2008 year


Search            


Content   ..  579  580  581  582   ..


Mazda CX-9 Grand Touring. Manual - part 581


6. Pull the front drain hose into the room side.  

7. Remove the front drain hose. 

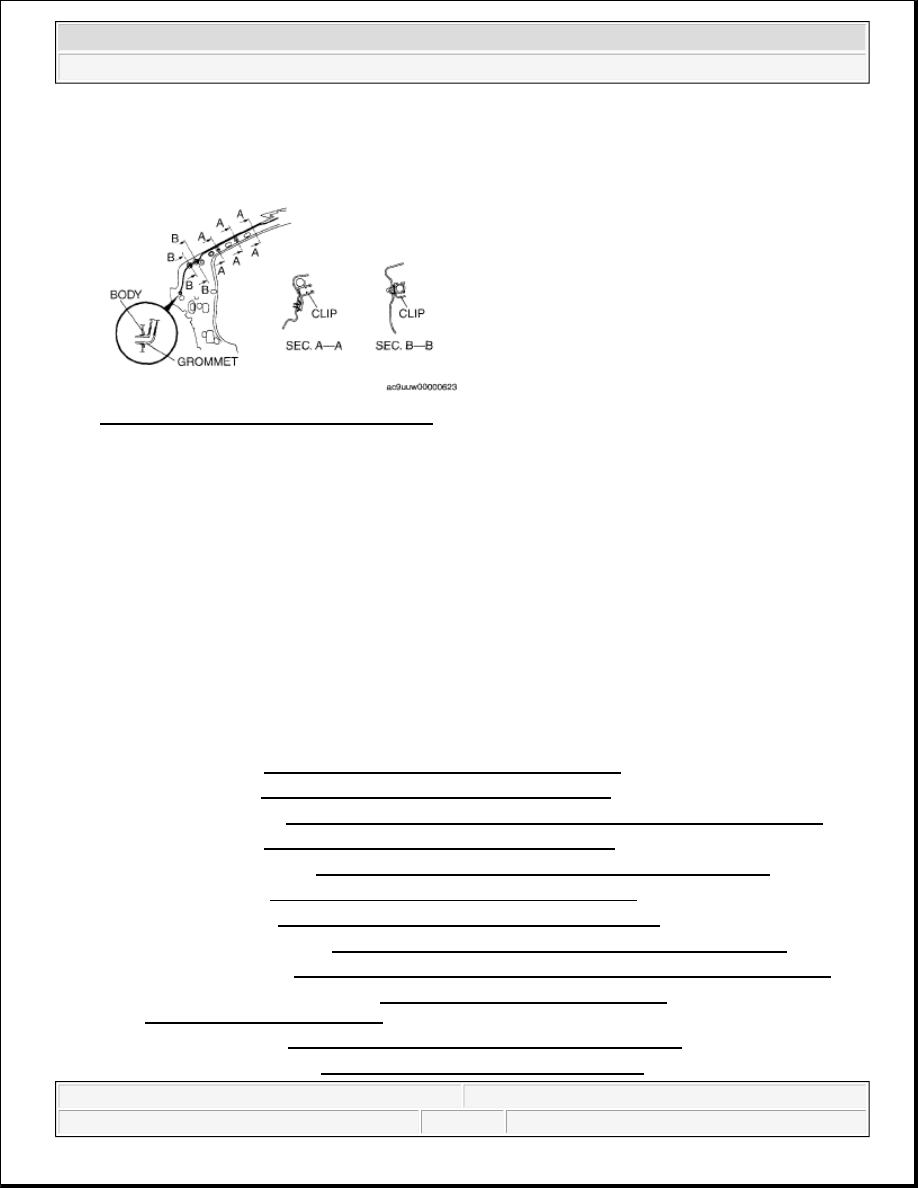
Fig. 14: Identifying Front Drain Hose Clips 

FRONT DRAIN HOSE INSTALLATION 

1. Apply soapy water to the front drain hose inserting area.  

2. Insert one end (the wider end) of the front drain hose into the sunroof frame.  

3. Install the front drain hose to the clips, parallel to the pillar and free of slack.  

4. Insert the front drain hose joint into the hinge pillar inner hole.  

5. Install the following parts: 

1. Dashboard (See DASHBOARD REMOVAL/INSTALLATION .)  

2. Side panel (See SIDE PANEL REMOVAL/INSTALLATION .)  

3. Steering shaft (See STEERING WHEEL AND COLUMN REMOVAL/INSTALLATION .)  

4. Audio unit (See AUDIO UNIT REMOVAL/INSTALLATION .)  

5. Instrument cluster (See INSTRUMENT CLUSTER REMOVAL/INSTALLATION .)  

6. Meter hood (See METER HOOD REMOVAL/INSTALLATION .)  

7. Center panel (See CENTER PANEL REMOVAL/INSTALLATION .)  

8. Combination switch (See COMBINATION SWITCH REMOVAL/INSTALLATION .)  

9. Steering wheel (See STEERING WHEEL AND COLUMN REMOVAL/INSTALLATION .)  

10. Driver-side air bag module (See DRIVER-SIDE AIR BAG MODULE 

REMOVAL/INSTALLATION .)  

11. Column cover (See COLUMN COVER REMOVAL/INSTALLATION .)  

12. Hood release lever (See HOOD LATCH AND RELEASE LEVER 

CAUTION:

If the front drain hose is pinched or bent anywhere, the water in the 
hose may not discharge and enter the inside of the vehicle. During 
and after installation of the trims and the headliner, always make sure 
there is no interference with the front drain hose. Fix any problem if 
found.  


2008 Mazda CX-9 Grand Touring 

2008 BODY & ACCESSORIES Sunroof - Mazda CX-9


Microsoft 


Sunday, November 15, 2009 10:38:25 AM

Page 11 

© 2005 Mitchell Repair Information Company, LLC. 

REMOVAL/INSTALLATION .) 

13. Lower panel (See LOWER PANEL REMOVAL/INSTALLATION .)  

14. Glove compartment (See GLOVE COMPARTMENT REMOVAL/INSTALLATION .)  

15. Front side trim (See FRONT SIDE TRIM REMOVAL/INSTALLATION .)  

16. Console (See CONSOLE REMOVAL/INSTALLATION .)  

17. Console cover (See CONSOLE COVER REMOVAL/INSTALLATION .)  

18. Console panel (See CONSOLE PANEL REMOVAL/INSTALLATION .)  

19. Side wall (See SIDE WALL REMOVAL/INSTALLATION .)  

20. Dashboard under cover (See DASHBOARD UNDER COVER REMOVAL/INSTALLATION .) 

21. Front console box (See FRONT CONSOLE BOX REMOVAL/INSTALLATION .)  

22. Indicator panel (See INDICATOR PANEL REMOVAL/INSTALLATION .)  

23. Front console box mat (See FRONT CONSOLE BOX MAT REMOVAL/INSTALLATION .)  

24. Decoration panel (See DECORATION PANEL REMOVAL/INSTALLATION .)  

25. Headliner (See HEADLINER REMOVAL/INSTALLATION .)  

26. RES unit cover (Vehicles with RES) (See RES UNIT REMOVAL/INSTALLATION .)  

27. Assist handle (See ASSIST HANDLE REMOVAL/INSTALLATION .)  

28. Sunvisor (See SUNVISOR REMOVAL/INSTALLATION .)  

29. Front map light (See FRONT MAP LIGHT REMOVAL/INSTALLATION .)  

30. D-pillar trim (See D-PILLAR TRIM REMOVAL/INSTALLATION .)  

31. Third-row seat belt upper anchor installation bolt (See THIRD-ROW SEAT BELT 

REMOVAL/INSTALLATION .)  

32. C-pillar trim (See C-PILLAR TRIM REMOVAL/INSTALLATION .)  

33. Second-row seat belt upper anchor installation bolt (See SECOND-ROW SEAT BELT 

REMOVAL/INSTALLATION .)  

34. Roof side trim (See ROOF SIDE TRIM REMOVAL/INSTALLATION .)  

35. Trunk side trim (See TRUNK SIDE TRIM REMOVAL/INSTALLATION .)  

36. Third-row seat belt lower anchor installation bolt (See THIRD-ROW SEAT BELT 

REMOVAL/INSTALLATION .)  

37. Third-row seat (See THIRD-ROW SEAT REMOVAL/INSTALLATION .)  

38. Trunk end trim (See TRUNK END TRIM REMOVAL/INSTALLATION .)  

39. Seat side box (See SEAT SIDE BOX REMOVAL/INSTALLATION .)  

40. Trunk box (See TRUNK BOX REMOVAL/INSTALLATION .)  

41. B-pillar upper trim (See B-PILLAR UPPER TRIM REMOVAL/INSTALLATION .)  

42. Front seat belt upper anchor installation bolt (See FRONT SEAT BELT 

REMOVAL/INSTALLATION .)  

43. B-pillar lower trim (See B-PILLAR LOWER TRIM REMOVAL/INSTALLATION .)  

44. Front seat belt lower anchor installation bolt (Driver side) (See FRONT SEAT BELT 

REMOVAL/INSTALLATION .) 


2008 Mazda CX-9 Grand Touring 

2008 BODY & ACCESSORIES Sunroof - Mazda CX-9


Microsoft 


Sunday, November 15, 2009 10:38:25 AM

Page 12 

© 2005 Mitchell Repair Information Company, LLC. 

45. Rear scuff plate inner (See REAR SCUFF PLATE REMOVAL/INSTALLATION .)  

46. Front scuff plate inner (See FRONT SCUFF PLATE REMOVAL/INSTALLATION .)  

47. A-pillar trim (See A-PILLAR TRIM REMOVAL/INSTALLATION .)  

6. Install the seaming welt.  

REAR DRAIN HOSE REMOVAL 

1. Disconnect the negative battery cable.  

2. Partially peel back the seaming welt.  

3. Remove the following parts: 

1. A-pillar trim (See A-PILLAR TRIM REMOVAL/INSTALLATION .)  

2. Front scuff plate inner (See FRONT SCUFF PLATE REMOVAL/INSTALLATION .)  

3. Rear scuff plate inner (See REAR SCUFF PLATE REMOVAL/INSTALLATION .)  

4. Front seat belt lower anchor installation bolt (Driver side) (See FRONT SEAT BELT 

REMOVAL/INSTALLATION .)  

5. B-pillar lower trim (See B-PILLAR LOWER TRIM REMOVAL/INSTALLATION .)  

6. Front seat belt upper anchor installation bolt (See FRONT SEAT BELT 

REMOVAL/INSTALLATION .)  

7. B-pillar upper trim (See B-PILLAR UPPER TRIM REMOVAL/INSTALLATION .)  

8. Trunk box (See TRUNK BOX REMOVAL/INSTALLATION .)  

9. Seat side box (See SEAT SIDE BOX REMOVAL/INSTALLATION .)  

10. Trunk end trim (See TRUNK END TRIM REMOVAL/INSTALLATION .)  

11. Third-row seat (See THIRD-ROW SEAT REMOVAL/INSTALLATION .)  

12. Third-row seat belt lower anchor installation bolt (See THIRD-ROW SEAT BELT 

REMOVAL/INSTALLATION .)  

13. Trunk side trim (See TRUNK SIDE TRIM REMOVAL/INSTALLATION .)  

14. Roof side trim (See ROOF SIDE TRIM REMOVAL/INSTALLATION .)  

15. Second-row seat belt upper anchor installation bolt (See SECOND-ROW SEAT BELT 

REMOVAL/INSTALLATION .)  

16. C-pillar trim (See C-PILLAR TRIM REMOVAL/INSTALLATION .)  

17. Third-row seat belt upper anchor installation bolt (See THIRD-ROW SEAT BELT 

REMOVAL/INSTALLATION .)  

18. D-pillar trim (See D-PILLAR TRIM REMOVAL/INSTALLATION .)  

19. Front map light (See FRONT MAP LIGHT REMOVAL/INSTALLATION .)  

20. Sunvisor (See SUNVISOR REMOVAL/INSTALLATION .)  

21. Assist handle (See ASSIST HANDLE REMOVAL/INSTALLATION .)  

22. RES unit cover (Vehicles with RES) (See RES UNIT REMOVAL/INSTALLATION .)  

23. Headliner (See HEADLINER REMOVAL/INSTALLATION .)  

4. Disconnect the rear drain hose from the sunroof frame. 


2008 Mazda CX-9 Grand Touring 

2008 BODY & ACCESSORIES Sunroof - Mazda CX-9


Microsoft 


Sunday, November 15, 2009 10:38:25 AM

Page 13 

© 2005 Mitchell Repair Information Company, LLC. 

5. Remove the rear drain hose from the clips. 

Fig. 15: Identifying Rear Drain Hose Clips 

6. Pull the rear drain hose into the room side.  

7. Remove the rear drain hose.  

REAR DRAIN HOSE INSTALLATION 

1. Apply soapy water to the rear drain hose inserting area.  

2. Insert one end (the wider side) of the rear drain hose into the sunroof frame.  

3. Install the rear drain hose to the clips parallel to the pillar and free of slack.  

4. Insert the rear drain hose joint into the rear pillar inner hole.  

5. Install the following parts: 

1. Headliner (See HEADLINER REMOVAL/INSTALLATION .)  

2. RES unit cover (Vehicles with RES) (See RES UNIT REMOVAL/INSTALLATION .)  

3. Assist handle (See ASSIST HANDLE REMOVAL/INSTALLATION .)  

4. Sunvisor (See SUNVISOR REMOVAL/INSTALLATION .)  

5. Front map light (See FRONT MAP LIGHT REMOVAL/INSTALLATION .)  

CAUTION:

If the rear drain hose is pinched or bent anywhere, the water in the 
hose may not discharge and enter the inside of the vehicle. During 
and after installation of the trims and the headliner, always make sure 
there is no interference with the rear drain hose. Fix any problem if 
found.  


2008 Mazda CX-9 Grand Touring 

2008 BODY & ACCESSORIES Sunroof - Mazda CX-9


Microsoft 


Sunday, November 15, 2009 10:38:25 AM

Page 14 

© 2005 Mitchell Repair Information Company, LLC. 


Content   ..  579  580  581  582   ..