Mazda CX-9 Grand Touring. Manual - part 565


  Index      Mazda     Mazda CX-9 Grand Touring - service repair manual 2008 year


Search            


Content   ..  563  564  565  566   ..


Mazda CX-9 Grand Touring. Manual - part 565


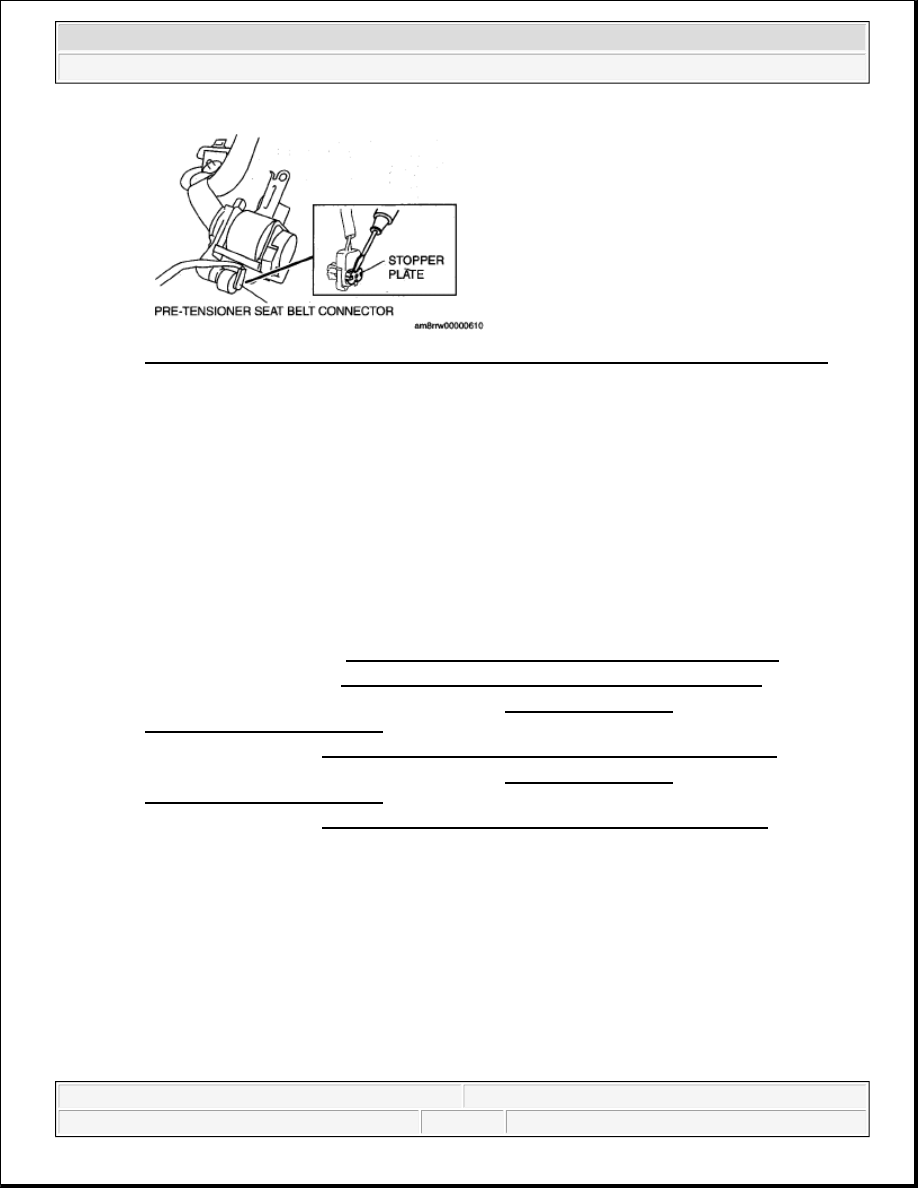
Fig. 3: Prying Out Pre-Tensioner Seat Belt Connector's Stopper Plate Using Screwdriver 
Courtesy of MAZDA MOTORS CORP. 

ADJUSTER ANCHOR REMOVAL/INSTALLATION 

1. Turn the ignition switch to the LOCK position.  

2. Disconnect the negative battery cable.  

3. Remove the following parts: 

1. Front scuff plate inner (See FRONT SCUFF PLATE REMOVAL/INSTALLATION .)  

2. Rear scuff plate inner (See REAR SCUFF PLATE REMOVAL/INSTALLATION .)  

3. Front seat belt lower anchor installation bolt (See FRONT SEAT BELT 

REMOVAL/INSTALLATION.)  

4. B-pillar lower trim (See B-PILLAR LOWER TRIM REMOVAL/INSTALLATION .)  

5. Front seat belt upper anchor installation bolt (See FRONT SEAT BELT 

REMOVAL/INSTALLATION.)  

6. B-pillar upper trim (See B-PILLAR UPPER TRIM REMOVAL/INSTALLATION .)  

4. Remove the bolt.  

5. Rotate the adjuster anchor in the direction of the arrow.  

6. Remove the adjuster anchor by pulling it outward.  

7. Install in the reverse order of removal. 

WARNING:

Side air bag sensor No.1 is attached to the lower part of the B-pillar. 
When working around the B-pillar, disconnect the negative battery 
cable or work carefully, avoiding excessive impact to the lower part 
of the B-pillar.  


2008 Mazda CX-9 Grand Touring 

2008 RESTRAINTS Seat Belt - Mazda CX-9


Microsoft 


Sunday, November 15, 2009 10:19:40 AM

Page 3 

© 2005 Mitchell Repair Information Company, LLC. 

Fig. 4: Rotating Adjuster Anchor & Torque Specifications 
Courtesy of MAZDA MOTORS CORP. 

SECOND-ROW SEAT BELT REMOVAL/INSTALLATION 

1. Turn the ignition switch to the LOCK position.  

2. Disconnect the negative battery cable.  

3. Remove the following parts: 

1. Trunk box (See TRUNK BOX REMOVAL/INSTALLATION .)  

2. Seat side box (See SEAT SIDE BOX REMOVAL/INSTALLATION .)  

3. Trunk end trim (See TRUNK END TRIM REMOVAL/INSTALLATION .)  

4. Third-row seat (See THIRD-ROW SEAT REMOVAL/INSTALLATION .)  

5. Third-row seat belt lower anchor installation bolt (See THIRD-ROW SEAT BELT 

REMOVAL/INSTALLATION.)  

6. Rear scuff plate inner (See REAR SCUFF PLATE REMOVAL/INSTALLATION .)  

7. Trunk side trim (See TRUNK SIDE TRIM REMOVAL/INSTALLATION .)  

4. Remove the cover.  

5. Remove the bolt.  

6. Remove the second-row seat belt.  

7. Install in the reverse order of removal. 

CAUTION:

The ELR (emergency locking retractor) has a spring that will unwind 
if the retractor cover is removed. The spring cannot be rewound by 
hand. If this occurs, the ELR will not work properly. Therefore, do not 
disassemble the retractor.  


2008 Mazda CX-9 Grand Touring 

2008 RESTRAINTS Seat Belt - Mazda CX-9


Microsoft 


Sunday, November 15, 2009 10:19:40 AM

Page 4 

© 2005 Mitchell Repair Information Company, LLC. 

Fig. 5: Identifying Second-Row Seat Belt, Bolt & Torque Specifications 
Courtesy of MAZDA MOTORS CORP. 

SECOND-ROW CENTER SEAT BELT REMOVAL/INSTALLATION 

1. Turn the ignition switch to the LOCK position.  

2. Disconnect the negative battery cable.  

3. Remove the following parts: 

1. A-pillar trim (See A-PILLAR TRIM REMOVAL/INSTALLATION .)  

2. Front scuff plate inner (See FRONT SCUFF PLATE REMOVAL/INSTALLATION .)  

3. Rear scuff plate inner (See REAR SCUFF PLATE REMOVAL/INSTALLATION .)  

4. Front seat belt lower anchor installation bolt (See FRONT SEAT BELT 

REMOVAL/INSTALLATION.)  

5. B-pillar lower trim (See B-PILLAR LOWER TRIM REMOVAL/INSTALLATION .)  

6. Front seat belt upper anchor installation bolt (See FRONT SEAT BELT 

REMOVAL/INSTALLATION.)  

7. B-pillar upper trim (See B-PILLAR UPPER TRIM REMOVAL/INSTALLATION .)  

8. Trunk box (See TRUNK BOX REMOVAL/INSTALLATION .)  

9. Seat side box (See SEAT SIDE BOX REMOVAL/INSTALLATION .)  

10. Trunk end trim (See TRUNK END TRIM REMOVAL/INSTALLATION .)  

11. Third-row seat (See THIRD-ROW SEAT REMOVAL/INSTALLATION .)  

12. Third-row seat belt lower anchor installation bolt (See THIRD-ROW SEAT BELT 

CAUTION:

The ELR (emergency locking retractor) has a spring that will unwind 
if the retractor cover is removed. The spring cannot be rewound by 
hand. If this occurs, the ELR will not work properly. Therefore, do not 
disassemble the retractor.  


2008 Mazda CX-9 Grand Touring 

2008 RESTRAINTS Seat Belt - Mazda CX-9


Microsoft 


Sunday, November 15, 2009 10:19:40 AM

Page 5 

© 2005 Mitchell Repair Information Company, LLC. 

REMOVAL/INSTALLATION.) 

13. Trunk side trim (See TRUNK SIDE TRIM REMOVAL/INSTALLATION .)  

14. Roof side trim (See ROOF SIDE TRIM REMOVAL/INSTALLATION .)  

15. Second-row seat belt upper anchor installation bolt (See SECOND-ROW SEAT BELT 

REMOVAL/INSTALLATION.)  

16. C-pillar trim (See C-PILLAR TRIM REMOVAL/INSTALLATION .)  

17. Third-row seat belt upper anchor installation bolt (See THIRD-ROW SEAT BELT 

REMOVAL/INSTALLATION.)  

18. D-pillar trim (See D-PILLAR TRIM REMOVAL/INSTALLATION .)  

19. Front map light (See FRONT MAP LIGHT REMOVAL/INSTALLATION .)  

20. Sunvisor (See SUNVISOR REMOVAL/INSTALLATION .)  

21. Assist handle (See ASSIST HANDLE REMOVAL/INSTALLATION .)  

22. RES unit cover (Vehicles with RES) (See RES UNIT REMOVAL/INSTALLATION .)  

23. Headliner (See HEADLINER REMOVAL/INSTALLATION .)  

4. Remove the bolt.  

5. Remove the second-row center seat belt.  

6. Install in the reverse order of removal. 

Fig. 6: Identifying Second-Row Center Seat Belt, Bolt & Torque Specifications 
Courtesy of MAZDA MOTORS CORP. 

THIRD-ROW SEAT BELT REMOVAL/INSTALLATION 

CAUTION:

The ELR (emergency locking retractor) has a spring that will unwind 
if the retractor cover is removed. The spring cannot be rewound by 
hand. If this occurs, the ELR will not work properly. Therefore, do not 
disassemble the retractor.  


2008 Mazda CX-9 Grand Touring 

2008 RESTRAINTS Seat Belt - Mazda CX-9


Microsoft 


Sunday, November 15, 2009 10:19:40 AM

Page 6 

© 2005 Mitchell Repair Information Company, LLC. 


Content   ..  563  564  565  566   ..