Mazda CX-9 Grand Touring. Manual - part 495


  Index      Mazda     Mazda CX-9 Grand Touring - service repair manual 2008 year


Search            


Content   ..  493  494  495  496   ..


Mazda CX-9 Grand Touring. Manual - part 495


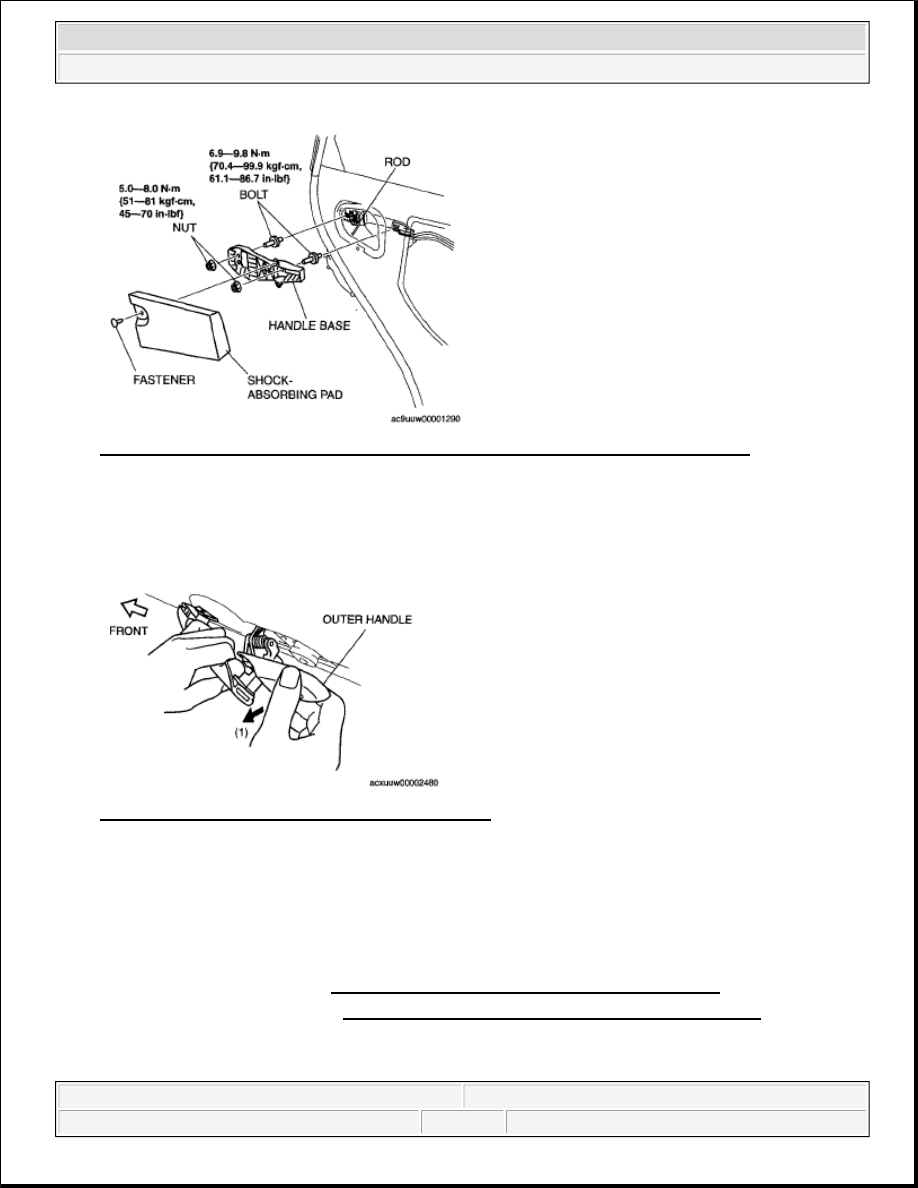
Fig. 7: Identifying Shock-Absorbing Pad, Handle Base, Rod & Torque Specifications 
Courtesy of MAZDA MOTORS CORP. 

10. Secure the rear part of the rear outer handle and, with the rear outer handle lever pulled outward (1), 

remove the rear part of the rear outer handle from the rear door.  

11. Install in the reverse order of removal. 

Fig. 8: Removing Rear Part Of Rear Outer Handle 
Courtesy of MAZDA MOTORS CORP. 

INNER HANDLE REMOVAL/INSTALLATION 

FRONT 

1. Disconnect the negative battery cable.  

2. Remove the inner garnish. (See INNER GARNISH REMOVAL/INSTALLATION .)  

3. Remove the front door trim. (See FRONT DOOR TRIM REMOVAL/INSTALLATION .)  

4. Disconnect the door lock switch connector.  

5. Detach the cables from the inner handle and door lock knob. 


2008 Mazda CX-9 Grand Touring 

2008 BODY & ACCESSORIES Security and Locks - Mazda CX-9


Microsoft 


Sunday, November 15, 2009 10:47:58 AM

Page 7 

© 2005 Mitchell Repair Information Company, LLC. 

6. Install in the reverse order of removal. 

Fig. 9: Identifying Inner Handle & Door Lock Knob 
Courtesy of MAZDA MOTORS CORP. 

REAR 

1. Disconnect the negative battery cable.  

2. Remove the inner sail garnish. (See INNER SAIL GARNISH REMOVAL/INSTALLATION .)  

3. Remove the rear door trim. (See REAR DOOR TRIM REMOVAL/INSTALLATION .)  

4. Detach the cables from the inner handle and door lock knob.  

5. Install in the reverse order of removal. 

Fig. 10: Identifying Inner Handle & Door Lock Knob 
Courtesy of MAZDA MOTORS CORP. 

HOOD LATCH & RELEASE LEVER REMOVAL/INSTALLATION 

1. Disconnect the negative battery cable.  

2. Remove the following parts: 

1. Air cleaner (See INTAKE-AIR SYSTEM REMOVAL/INSTALLATION [MZI-3.7] .)  

2. Splash shield (LH) (See SPLASH SHIELD REMOVAL/INSTALLATION .)  

3. Dashboard under cover (Driver side) (See DASHBOARD UNDER COVER 

REMOVAL/INSTALLATION .) 


2008 Mazda CX-9 Grand Touring 

2008 BODY & ACCESSORIES Security and Locks - Mazda CX-9


Microsoft 


Sunday, November 15, 2009 10:47:58 AM

Page 8 

© 2005 Mitchell Repair Information Company, LLC. 

3. Remove in the order indicated in the table.  

4. Install in the reverse order of removal.  

5. Adjust the hood. (See HOOD ADJUSTMENT .) 

Fig. 11: Identifying Hood Latch, Release Lever Components & Torque Specifications 
Courtesy of MAZDA MOTORS CORP. 

HOOD RELEASE LEVER REMOVAL NOTE 

1. Pull the lever.  

2. Insert a tape-wrapped flathead screwdriver into the position shown in the figure. 

3. Pull the hood release lever outward and remove it. 

CAUTION:

Be careful not to damage the hood release cable when removing 
the hood release lever with the flathead screwdriver.  


2008 Mazda CX-9 Grand Touring 

2008 BODY & ACCESSORIES Security and Locks - Mazda CX-9


Microsoft 


Sunday, November 15, 2009 10:47:58 AM

Page 9 

© 2005 Mitchell Repair Information Company, LLC. 

Fig. 12: Identifying Hood Release Lever 
Courtesy of MAZDA MOTORS CORP. 

HOOD LATCH SWITCH INSPECTION 

1. When inspecting the latch, press the latch lever using a flathead screwdriver or a similar tool. 

Fig. 13: Identifying Hood Latch Switch, Latch Lever 
Courtesy of MAZDA MOTORS CORP. 

2. Inspect for continuity between the hood latch switch terminals. 

If not as specified, replace the hood latch. 

Fig. 14: Terminals Continuity Chart 
Courtesy of MAZDA MOTORS CORP.


2008 Mazda CX-9 Grand Touring 

2008 BODY & ACCESSORIES Security and Locks - Mazda CX-9


Microsoft 


Sunday, November 15, 2009 10:47:58 AM

Page 10 

© 2005 Mitchell Repair Information Company, LLC. 


Content   ..  493  494  495  496   ..